×
- Hello
- Login or Register
- Quick Links
- Live Chat
- Track Order
- Parts Availability
- RMA
- Help Center
- Contact Us
- Shop for
- Mitsubishi Parts
My Garage
My Account
Cart
Genuine Mitsubishi Diamante Thermostat
Engine Coolant Thermostat- Select Vehicle by Model
- Select Vehicle by VIN
Select Vehicle by Model
orMake
Model
Year
Select Vehicle by VIN
For the most accurate results, select vehicle by your VIN (Vehicle Identification Number).
4 Thermostats found

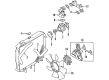
Mitsubishi Diamante Thermostat Part Number: 1305A191
$24.50 MSRP: $31.90You Save: $7.40 (24%)Ships in 1-2 Business Days
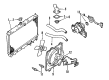
Mitsubishi Diamante Thermostat Part Number: MD972903
$25.36 MSRP: $33.02You Save: $7.66 (24%)Ships in 1-2 Business Days
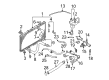
Mitsubishi Diamante Thermostat Part Number: MD350415
$30.14 MSRP: $39.25You Save: $9.11 (24%)Ships in 1-2 Business DaysMitsubishi Diamante Thermostat Part Number: MD194988
$35.56 MSRP: $46.66You Save: $11.10 (24%)Ships in 1-2 Business Days
Mitsubishi Diamante Thermostat
OEM Thermostat can boast superior quality and long-term durability. Each part meets strict factory specs and passes careful checks in production. So you'll get Thermostat with long-lasting strength and an exact fit. If you need OEM Mitsubishi Diamante Thermostat, the online store is the ideal place. The store carry a wide range of genuine Mitsubishi Diamante parts at the highly competitive prices. You'll enjoy a simple and no-hassle shopping experience. You'll get unbeatable prices and fast delivery service. You'll get the manufacturer's warranty and a straightforward return policy. Shop with confidence and keep your car in top condition.
Mitsubishi Diamante Thermostat Parts Questions & Experts Answers
- Q: What are the steps involved in the removal and installation process of a thermostat on Mitsubishi Diamante?A:The first step in the process of removing and installing is to first disconnect the negative battery cable and drain the cooling system, and in order to be safe, it is essential not to service or drain the radiator or cooling system when hot since this may result in burns due to steam and hot coolant. Use care with ethylene glycol antifreeze that is lethal to pets when ingested and never empty coolant into a container unless it is sealed to be used again unless contaminated or more than several years old. The second step is to take out any parts required to reach the thermostat, and then take out the thermostat housing that has the bolts and pull the housing off the engine. Cautiously take out the thermostat taking note of the position in which it was initially placed in its housing. To install, both mating surfaces must be clean and without any old gasket material so as to avoid leakage. Install the thermostat by fitting its flange into the machined groove, and aligning the relief valve with the mark on the housing. Install a new gasket or O-ring to re-fit the thermostat housing, and tighten the mounting bolts to the required values of various engine types. Once that is done, add coolant to the system, reconnect the air intake plumbing, reconnect the negative battery cable and drive the vehicle until the thermostat opens and the radiator gets full of coolant. Lastly, after the vehicle is cool, recheck on the level of the coolant.

Related Mitsubishi Diamante Parts
 Mitsubishi Diamante Coolant Pipe Seal
 Mitsubishi Diamante Coolant Reservoir Cap
 Mitsubishi Diamante Coolant Reservoir Hose
 Mitsubishi Diamante Fan Motor
 Mitsubishi Diamante Idler Pulley
 Mitsubishi Diamante Radiator Cap
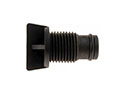 Mitsubishi Diamante Radiator Drain Plug
 Mitsubishi Diamante Serpentine Belt
 Mitsubishi Diamante Thermostat Gasket
 Mitsubishi Diamante Water Hose
 Mitsubishi Diamante Water Pump
 Mitsubishi Diamante Water Pump Gasket