×
- Hello
- Login or Register
- Quick Links
- Live Chat
- Track Order
- Parts Availability
- RMA
- Help Center
- Contact Us
- Shop for
- Mitsubishi Parts
My Garage
My Account
Cart
Genuine Mitsubishi Galant Hood Release Cable
Hood Cable- Select Vehicle by Model
- Select Vehicle by VIN
Select Vehicle by Model
orMake
Model
Year
Select Vehicle by VIN
For the most accurate results, select vehicle by your VIN (Vehicle Identification Number).
2 Hood Release Cables found

Mitsubishi Galant Release Cable Part Number: MR287721
$8.99 MSRP: $11.70You Save: $2.71 (24%)Ships in 1-2 Business Days
Mitsubishi Galant Release Cable Part Number: MR599919
$10.48 MSRP: $13.65You Save: $3.17 (24%)Ships in 1-2 Business Days
Mitsubishi Galant Hood Release Cable
OEM Hood Release Cable can boast superior quality and long-term durability. Each part meets strict factory specs and passes careful checks in production. So you'll get Hood Release Cable with long-lasting strength and an exact fit. If you need OEM Mitsubishi Galant Hood Release Cable, the online store is the ideal place. The store carry a wide range of genuine Mitsubishi Galant parts at the highly competitive prices. You'll enjoy a simple and no-hassle shopping experience. You'll get unbeatable prices and fast delivery service. You'll get the manufacturer's warranty and a straightforward return policy. Shop with confidence and keep your car in top condition.
Mitsubishi Galant Hood Release Cable Parts Questions & Experts Answers
- Q: How to remove and install the Hood Latch and Hood Release Cable on Mitsubishi Galant?A:In order to take off the latch, one should open the hood and hold it up using the prop rod. Indicate the alignment around the hood latch assembly with a permanent marker or paint so as to make the installation of the item easy in future. Secondly, loosen the bolts or nuts to loosen the latch assembly to the radiator support and loosen the release cable by sliding the cable housing out of the keyhole slot. To install, simply reverse the disassembly procedure by matching the hood latch assembly with the marks that have already been made on the radiator support and by tightening the nuts, followed by a check on the operation of the hood latch and a recheck in case of need. To disassemble the cable, unscrew it on one end to the hood latch and the other end to the clips on the radiator support. Use a screwdriver to remove the screws of the release lever then push the lever up to access the screws. On the floor, detach the push-in retainer and cable grommet of the firewall. Fit a heavy piece of string or flexible wire to the end of the cable nearest the engine compartment, and pull through the firewall into the vehicle. Take off the string or wire of the old cable. To install you need to have the string or wire connected to the new cable and then pull it back through the firewall into the engine compartment and then you need to do the rest of the steps in the reverse order of installation.

Related Mitsubishi Galant Parts
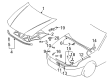
 Mitsubishi Galant Hood
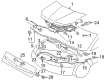
 Mitsubishi Galant Hood Latch
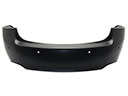 Mitsubishi Galant Bumper Cover
 Mitsubishi Galant Cigarette Lighter
 Mitsubishi Galant Door Hinge
 Mitsubishi Galant Floor Pan
 Mitsubishi Galant Front Door Striker
 Mitsubishi Galant Hood Hinge
 Mitsubishi Galant Rear Door Striker
 Mitsubishi Galant Shift Knob
 Mitsubishi Galant Tailgate Lock
 Mitsubishi Galant Weather Strip