×
- Hello
- Login or Register
- Quick Links
- Live Chat
- Track Order
- Parts Availability
- RMA
- Help Center
- Contact Us
- Shop for
- Mitsubishi Parts
My Garage
My Account
Cart
Genuine Mitsubishi Mirage Wheel Stud
Rim Wheel Stud- Select Vehicle by Model
- Select Vehicle by VIN
Select Vehicle by Model
orMake
Model
Year
Select Vehicle by VIN
For the most accurate results, select vehicle by your VIN (Vehicle Identification Number).
2 Wheel Studs found

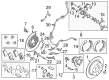
Mitsubishi Mirage Wheel Stud Part Number: MB911495
$3.30 MSRP: $4.31You Save: $1.01 (24%)Ships in 1-2 Business Days
Mitsubishi Mirage Wheel Bolt Part Number: MB301509
$3.30 MSRP: $4.30You Save: $1.00 (24%)Ships in 1-2 Business Days
Mitsubishi Mirage Wheel Stud
OEM Wheel Stud can boast superior quality and long-term durability. Each part meets strict factory specs and passes careful checks in production. So you'll get Wheel Stud with long-lasting strength and an exact fit. If you need OEM Mitsubishi Mirage Wheel Stud, the online store is the ideal place. The store carry a wide range of genuine Mitsubishi Mirage parts at the highly competitive prices. You'll enjoy a simple and no-hassle shopping experience. You'll get unbeatable prices and fast delivery service. You'll get the manufacturer's warranty and a straightforward return policy. Shop with confidence and keep your car in top condition.
Mitsubishi Mirage Wheel Stud Parts Questions & Experts Answers
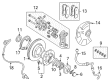
- Q: How to remove and install a Wheel Stud and other components with disc and drum brakes on Mitsubishi Mirage?A:In order to remove and install components with disc brakes, first raise the proper end of the vehicle and support it safely with jackstands and remove the wheel. Next, remove the brake pads and caliper. Support the caliper aside using a hanger. Detach the outer wheel bearing and lift off the rotor, ensuring the rotor is properly supported with press bars. Drive the stud out with the aid of an arbor press. If you don't have a press, ensure that the rotor is supported evenly and used a blunt drift to carefully drive the old stud out. To install a new stud, clean the stud hole first with a wire brush and start the stud with a hammer and drift pin. Do not use any lubricant or thread sealer. Complete the stud installation using the press or, if no press available, install flat washers and a lug nut to draw the stud into position; hold it fully seated before removing the lug nut and washers. Next, the rotor is installed and the wheel bearings adjusted, followed by the brake caliper and pads. Finally, put the wheel on, remove the jackstands, lower the car, and torque the lug nuts to spec. To access drum brakes, first raise and support the vehicle, then remove its wheel and brake drum. Remove brake shoes if necessary to clear jam. Using a large C-clamp and socket, press out the stud from the axle flange. Coat the serrated part of the stud in liquid soap and press it into the hole. For installing the stud, place flat washers on the stud and thread the lug nut. Then hold the flange while tightening the lug to pull the stud into position. Make sure that the stud is seated all the way before removing the lug nut and washers. If required, fit the brake shoes then the brake drum, then the wheel, and finally remove the jackstands and lower the vehicle and tighten the lug nuts to the proper torque.

Related Mitsubishi Mirage Parts
 Mitsubishi Mirage Brake Caliper
 Mitsubishi Mirage Wheel Bearing
 Mitsubishi Mirage ABS Control Module
 Mitsubishi Mirage ABS Pump And Motor Assembly
 Mitsubishi Mirage Axle Bearing Lock Rings
 Mitsubishi Mirage Brake Caliper Bracket
 Mitsubishi Mirage Brake Caliper Piston
 Mitsubishi Mirage Brake Drum
 Mitsubishi Mirage Brake Dust Shields
 Mitsubishi Mirage Brake Line
 Mitsubishi Mirage Hydraulic Hose
 Mitsubishi Mirage Wheel Hub Bolt