×
- Hello
- Login or Register
- Quick Links
- Live Chat
- Track Order
- Parts Availability
- RMA
- Help Center
- Contact Us
- Shop for
- Mitsubishi Parts
My Garage
My Account
Cart
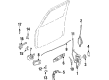
Genuine Mitsubishi Montero Interior Door Handle
- Select Vehicle by Model
- Select Vehicle by VIN
Select Vehicle by Model
orMake
Model
Year
Select Vehicle by VIN
For the most accurate results, select vehicle by your VIN (Vehicle Identification Number).
8 Interior Door Handles found

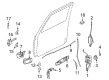
Mitsubishi Montero Handle, Inside, Driver Side Part Number: 5716A237XA
$67.03 MSRP: $93.10You Save: $26.07 (28%)Ships in 1-2 Business DaysMitsubishi Montero Handle, Inside, Passenger Side Part Number: 5716A236XA
$70.21 MSRP: $97.52You Save: $27.31 (28%)Ships in 1-2 Business DaysMitsubishi Montero Handle, Inside, Driver Side Part Number: 5716A235XA
$81.59 MSRP: $113.32You Save: $31.73 (28%)Ships in 1-2 Business DaysMitsubishi Montero Handle, Inside, Passenger Side Part Number: 5716A256XA
$27.90 MSRP: $36.33You Save: $8.43 (24%)Ships in 1-2 Business DaysMitsubishi Montero Handle, Inside, Passenger Side Part Number: MR656170
$35.51 MSRP: $46.60You Save: $11.09 (24%)Ships in 1-2 Business DaysMitsubishi Montero Handle, Inside, Driver Side Part Number: MR656169
$38.23 MSRP: $50.17You Save: $11.94 (24%)Ships in 1-2 Business Days
Mitsubishi Montero Handle, Inside, Passenger Side Part Number: MB669170
$28.15 MSRP: $36.65You Save: $8.50 (24%)Ships in 1-2 Business DaysMitsubishi Montero Handle, Inside, Driver Side Part Number: MB669169
$28.79 MSRP: $37.48You Save: $8.69 (24%)Ships in 1-2 Business Days
Mitsubishi Montero Interior Door Handle
OEM Interior Door Handle can boast superior quality and long-term durability. Each part meets strict factory specs and passes careful checks in production. So you'll get Interior Door Handle with long-lasting strength and an exact fit. If you need OEM Mitsubishi Montero Interior Door Handle, the online store is the ideal place. The store carry a wide range of genuine Mitsubishi Montero parts at the highly competitive prices. You'll enjoy a simple and no-hassle shopping experience. You'll get unbeatable prices and fast delivery service. You'll get the manufacturer's warranty and a straightforward return policy. Shop with confidence and keep your car in top condition.
Mitsubishi Montero Interior Door Handle Parts Questions & Experts Answers
- Q: How to remove and install the Door Lock, Door Lock Cylinder, Exterior Door Handle and Interior Door Handle on front door and cargo door on Mitsubishi Montero?A:To remove and install a front door, the initial step involves removing the door trim panel as well as carefully and without tearing the plastic watershield. Remove the inside lever link clip from the door lock assembly and unfasten the screws that secure the interior handle assembly before lifting it out. After that, remove glass run channel and unsnapped the door lock rod from the door latch assembly. Uninstall the door latch assembly mounting screws and lift out that assembly. If needed, remove the two nuts securing the exterior handle and lift out that handle. Remove the door lock cylinder from the exterior of the door. During installation, be sure to grease the sliding surfaces of all levers and springs. To set the outside door handle freeplay, unclip the retaining clip from the actuating rod, and adjust the connector up or down as necessary. The procedure for the cargo door begins similarly with the door trim panel and plastic watershield removed next inside lever link clip unfastened and interior handle assembly screws undone. Detach the rod from the door lock assembly. Remove the mounting screws for the door lock assembly. If necessary, remove the two nuts for the exterior handle and lift the assembly out. Make use of pliers to squeeze the retaining clip so as to push the door lock cylinder through to the outside, from where it can be pulled out. Apply grease during installation to the sliding surfaces of all levers and springs. The freeplay of the outside door handle can be adjusted in a similar manner to the inside door handle.
Related Mitsubishi Montero Parts
 Mitsubishi Montero Door Check
 Mitsubishi Montero Door Hinge
 Mitsubishi Montero Door Lock
 Mitsubishi Montero Door Screws
 Mitsubishi Montero Door Seal
 Mitsubishi Montero Power Window Switch
 Mitsubishi Montero Rear Door Striker
 Mitsubishi Montero Rear Passenger Door Handle Latch
 Mitsubishi Montero Weather Strip
 Mitsubishi Montero Window Motor
 Mitsubishi Montero Window Regulator
 Mitsubishi Montero Window Run
Browse by Year
2006
2005
2004
2003
2002
2001
2000
1999
1998
1997
1996
1995
1994
1993
1992