×
- Hello
- Login or Register
- Quick Links
- Live Chat
- Track Order
- Parts Availability
- RMA
- Help Center
- Contact Us
- Shop for
- Mitsubishi Parts
My Garage
My Account
Cart
Genuine Mitsubishi Galant Automatic Transmission Filter
AT Filter- Select Vehicle by Model
- Select Vehicle by VIN
Select Vehicle by Model
orMake
Model
Year
Select Vehicle by VIN
For the most accurate results, select vehicle by your VIN (Vehicle Identification Number).
3 Automatic Transmission Filters found

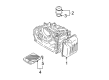
Mitsubishi Galant Filter Part Number: MD758684
$64.68 MSRP: $89.83You Save: $25.15 (28%)Ships in 1-2 Business Days
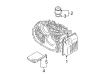
Mitsubishi Galant Oil Filter Part Number: MD752072
$21.43 MSRP: $27.90You Save: $6.47 (24%)Ships in 1-2 Business Days
Mitsubishi Galant Filter Part Number: MR350441
$41.61 MSRP: $54.60You Save: $12.99 (24%)Ships in 1-2 Business Days
Mitsubishi Galant Automatic Transmission Filter
OEM Automatic Transmission Filter can boast superior quality and long-term durability. Each part meets strict factory specs and passes careful checks in production. So you'll get Automatic Transmission Filter with long-lasting strength and an exact fit. If you need OEM Mitsubishi Galant Automatic Transmission Filter, the online store is the ideal place. The store carry a wide range of genuine Mitsubishi Galant parts at the highly competitive prices. You'll enjoy a simple and no-hassle shopping experience. You'll get unbeatable prices and fast delivery service. You'll get the manufacturer's warranty and a straightforward return policy. Shop with confidence and keep your car in top condition.
Mitsubishi Galant Automatic Transmission Filter Parts Questions & Experts Answers
- Q: Should the automatic transaxle fluid and Automatic Transmission Filter be changed at recommended intervals, and how should the process be carried out on Mitsubishi Galant?A:You should replace the automatic transaxle fluid and filter as recommended and clean the magnet if you have one. Start by lifting the front of the vehicle using a hydraulic jack and placing jackstands underneath. Then, place a large drain pan under the transaxle. For models from 1997 and older, removing the drain plugs in both the fluid pan and the transaxle housing will allow fluid to drain. As fluid drains out, take note of the amount of drained fluid, as it will help you in replenishing the amount later. Once drained, replace and tighten the drain plugs, remove the pan bolts and lower the pan, if necessary, tapping the corners with a soft-faced mallet. If there is a filter, remove it. Clean any traces of old gasket sealant from the pan and transaxle body. Clean the pan and the magnet with a solvent dampened lint-free cloth. Replace the magnet as required. First, put in a new filter and tighten the mounting bolts. Then, install the pan with a new gasket and tighten the bolts. The transaxle should be filled with the recommended oil. Initially drain off one-third of the amount; after which fill oil and cycle through the gears, thereby repeating until the correct amount appears on the dipstick. Do not overfill. For models from 1998, unhook the hose from the oil cooler, let the liquid drain, filter replacement and liquid refill and similar steps to follow. For model years 1999 and up, disconnect the oil cooler hose at the radiator, drain fluid from the transaxle case, and replace the spin-on-type filter. Be sure to lubricate the filter's O-ring. Please repeat the same top-off procedure as before, checking for contamination and topping off fluids as needed and applicable. After performing the procedure for all models, throw away the old fluid in the proper place. Do not pour the fluid on the ground or down the drain. Check locally for recycling options.

Related Mitsubishi Galant Parts
 Mitsubishi Galant Automatic Transmission Seal
 Mitsubishi Galant Automatic Transmission Shift Indicator
 Mitsubishi Galant Automatic Transmission Shift Levers
 Mitsubishi Galant Clutch Fork
 Mitsubishi Galant Clutch Master Cylinder
 Mitsubishi Galant Clutch Release Bearing
 Mitsubishi Galant Clutch Slave Repair Kit
 Mitsubishi Galant Flywheel Ring Gear
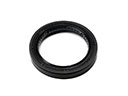 Mitsubishi Galant Output Shaft Seal
 Mitsubishi Galant Transfer Case Seal
 Mitsubishi Galant Transmission Assembly
 Mitsubishi Galant Transmission Pan