×
- Hello
- Login or Register
- Quick Links
- Live Chat
- Track Order
- Parts Availability
- RMA
- Help Center
- Contact Us
- Shop for
- Mitsubishi Parts
My Garage
My Account
Cart
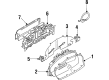
Genuine Mitsubishi Instrument Panel Light Bulb
- Select Vehicle by Model
- Select Vehicle by VIN
Select Vehicle by Model
orMake
Model
Year
Select Vehicle by VIN
For the most accurate results, select vehicle by your VIN (Vehicle Identification Number).
9 Instrument Panel Light Bulbs found

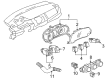
Mitsubishi Bulb Part Number: 8475A004
$1.96 MSRP: $2.55You Save: $0.59 (24%)Ships in 1-2 Business DaysProduct Specifications- Other Name: Bulb, Instrument Panel S; Instrument Panel Light Bulb; Car Bulbs


Mitsubishi Bulb Part Number: MR471775
$2.32 MSRP: $3.02You Save: $0.70 (24%)Ships in 1-2 Business DaysProduct Specifications- Other Name: Bulb, Instrument Panel M; Instrument Panel Light Bulb; Car Bulbs

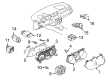
Mitsubishi Bulb & Socket Part Number: MR444537
$4.75 MSRP: $6.18You Save: $1.43 (24%)Ships in 1-2 Business DaysProduct Specifications- Other Name: Bulb, Instrument Panel M; Instrument Panel Light Bulb; Light Socket; Car Bulbs

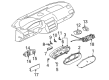
Mitsubishi Bulb & Socket Part Number: MR444536
$5.02 MSRP: $6.53You Save: $1.51 (24%)Ships in 1-2 Business DaysProduct Specifications- Other Name: Bulb, Instrument Panel M; Instrument Panel Light Bulb; Light Socket; Car Bulbs
Mitsubishi Bulb & Socket Part Number: MR572562
$5.16 MSRP: $6.72You Save: $1.56 (24%)Ships in 1-2 Business DaysProduct Specifications- Other Name: Bulb, Instrument Panel M; Instrument Panel Light Bulb; Light Socket; Car Bulbs

Mitsubishi Bulb Part Number: MR444418
$5.22 MSRP: $6.80You Save: $1.58 (24%)Ships in 1-2 Business DaysProduct Specifications- Other Name: Bulb, Instrument Panel M; Instrument Panel Light Bulb; Car Bulbs

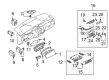
Mitsubishi Bulb Part Number: MR568787
$5.86 MSRP: $7.63You Save: $1.77 (24%)Ships in 1-2 Business DaysProduct Specifications- Other Name: Bulb, Heater Control EQU; Instrument Panel Light Bulb; Car Bulbs
Mitsubishi Bulb & Socket Part Number: MR506551
$3.76 MSRP: $4.79You Save: $1.03 (22%)Ships in 1-2 Business DaysProduct Specifications- Other Name: Bulb, Instrument Panel M; Instrument Panel Light Bulb; Light Socket; Car Bulbs

Mitsubishi Bulb Part Number: MB066068
$2.38 MSRP: $3.10You Save: $0.72 (24%)Ships in 1-2 Business DaysProduct Specifications- Other Name: Bulb, Console Meter; Instrument Panel Light Bulb; Car Bulbs
Mitsubishi Instrument Panel Light Bulb
The Mitsubishi Instrument Panel Light Bulb puts out a constant 12 volt power for portable devices, making it a convenient plug-in point for drivers. Since its debut in 1870, Mitsubishi has been a daring innovator that has never strayed too far away from practical technology. Mitsubishi now applies that same spirit to the cars it makes, finding ways to meet everyday needs with advanced ideas like MIVEC high breathing engines, Super All Wheel Control for surefooted grip, and smart smartphone link systems to keep teens and parents connected on any trip. The company's focus on smart simplicity is evident in plug-in hybrid options that stretch fuel economy, in fleet trials of fuel cell prototypes, and in safety sensors that watch the road so families can relax. These unique features aim to make life easier. The Instrument Panel Light Bulb fits that objective as well. It turns a familiar cigarette lighter shape into a universal power socket. The Instrument Panel Light Bulb, located on the dash and easily within reach, has a standard plug that closes the circuit and supplies steady electricity without using an older-style heat coil, which burns out and wastes electricity. The sturdy barrel housing withstands bumps of the road every day, while a single action push fit allows attention to remain on the road. This charging device is ideal for powering a music player on a run at the beach or a GPS on a mountain pass. Its auxiliary power extends the versatility of every Mitsubishi vehicle.
Pick genuine OEM Instrument Panel Light Bulb if you want superb performance and durability that lasts. Mitsubishi builds that using high-grade materials and official factory techniques to meet very strict standards. This means you get parts you can actually trust for your daily drive. Finding the right parts is simple in the massive stock of genuine inventory. You can stop guessing if a part will fit or hold up. You will love the low prices, dependable service and the real manufacturer's warranty on Mitsubishi Instrument Panel Light Bulb. Order today and the store will ship your brand-new items to your door as fast as possible.
Mitsubishi Instrument Panel Light Bulb Parts Questions & Experts Answers
- Q: How to remove and install Instrument Panel Light Bulb, Side Marker Light and Turn Signal Lights (parking and side marker lights) on Mitsubishi Diamante?A:In order to remove and install parking and side marker lights, first disconnect the negative battery cable then access the bulbs by finding and removing any required components. In the case of the bulb sockets, one has to rotate it anti clockwise to remove, hold the bulb and pull it straight out. The opposite of removing is installation. In front turn signals, once the negative battery cable has been disconnected, remove the two retaining screws in the lens and remove the lens then rotate the bulb socket counterclockwise to take off. Draw the bulb out and repeat the process to install. To access the rear lamp assembly, the negative battery cable, trunk, retainers, and inner trim panel should be disconnected to access the rear turn signals, rear brake, and tail lights. Unscrew the bulb and socket set, extract it, squeeze the bulb and twist it to change it and vice versa. To back-up lights, unhook the negative battery cable, open the trunk, and trim (where available). To loosen the socket, one turns the socket counterclockwise to unlock, removes the bulb and repeats the steps to install and to reconnect the negative battery cable and to test the lamp is working. In case of side marker lights, loosen the retaining screws of the lens, remove the lens, counterclockwisely rotate the bulb socket to loosen it, pull out the bulb and vice versa. On high-mount brake lights on other models, to remove the lamp assembly, disconnect the negative battery cable, remove the lamp assembly off the trunk, remove the electrical connector, retaining screw, lower the lamp assembly, and rotate the bulb clockwise to remove it, and vice versa. In the case of license plate lights, do not connect the negative battery cable, screw out the lamp lens, lower the lens, and then take the bulb out of the terminals and install the new bulb and lens screwing the screws back in and reconnecting the negative battery cable. In the case of dome/passenger area lamps, it is important to take the cover off, remove the bulb, clean the contacts, place in the new one, switch it to test functionality and replace the cover. In the case of instrument cluster light bulbs, disconnect the negative battery cable, take off the instrument cluster, turn the bulb socket in a counterclockwise motion to take out the bulb, pull the bulb out, replace it with a new bulb (where applicable), replace the socket, replace the instrument cluster, and reconnect the negative battery cable.
- Q: How to replace Car Bulbs, Fog Light Bulb and Instrument Panel Light Bulb, such as the front park/turn signal lights and other bulbs on Mitsubishi Galant?A:To replace the front park/turn signal lights, disconnect the electrical connector of the bulb holder, then turn the socket counterclockwise to remove it and take out the bulb. To replace the rear tail light, open the trunk, loosen the trunk lining, loosen the electrical connector, loosen the nuts that hold the tail light assembly in place, and remove the tail light assembly out of the rear panel. To change a bulb, turn the bulb holder in an anti-clockwise direction and remove the bulb out of the holder. In the case of the high-mounted brake light, open the trunk, then turn the bulb holder in a counterclockwise direction to lower it out of the housing and remove the bulb. The instrument cluster lights are only accessible by removing the instrument cluster, then the bulbs are replaceable by rotating the bulb holder counterclockwise. In the case of reading lights, older lights (before 1998) need to remove the lens and simply straight out the bulb, whereas later lights (since 1999) need to peel the housing off the headliner and pop the clips to get the bulbs out. To replace the license plate light, open the trunk and tap behind the assembly and turn the bulb holder counter clockwise to eject the bulb. In the case of fog lights, lift the vehicle, unscrew the electrical connector at the back of the bumper and on 1998 and earlier models, unscrew the screws to pull off the fog light, and in 1999 and later models, unscrew the electrical connector and turn the bulb holder to remove it. All the components can be installed in reverse to the removal.

Related Mitsubishi Parts
 Mitsubishi Tail Light
 Mitsubishi Headlight
 Mitsubishi Headlight Bulb
 Mitsubishi Car Bulbs
 Mitsubishi Fog Light
 Mitsubishi Fog Light Lens
 Mitsubishi License Plate Lights
 Mitsubishi Light Socket
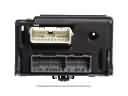 Mitsubishi Lighting Control Module
 Mitsubishi Tail Light Lens
 Mitsubishi Third Brake Light
 Mitsubishi Turn Signal Lights