×
- Hello
- Login or Register
- Quick Links
- Live Chat
- Track Order
- Parts Availability
- RMA
- Help Center
- Contact Us
- Shop for
- Mitsubishi Parts
My Garage
My Account
Cart
Genuine Mitsubishi Lancer Door Lock
Power Door Lock Actuator- Select Vehicle by Model
- Select Vehicle by VIN
Select Vehicle by Model
orMake
Model
Year
Select Vehicle by VIN
For the most accurate results, select vehicle by your VIN (Vehicle Identification Number).
20 Door Locks found

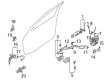
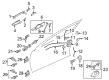
Mitsubishi Lancer Latch, Driver Side Part Number: MN159933
$245.69 MSRP: $347.02You Save: $101.33 (30%)Ships in 1-2 Business Days
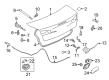
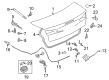
Mitsubishi Lancer Gate Latch Part Number: MN169642
$63.48 MSRP: $88.17You Save: $24.69 (28%)Ships in 1-2 Business Days
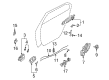
Mitsubishi Lancer Latch Part Number: 5927A013
$73.20 MSRP: $101.66You Save: $28.46 (28%)Ships in 1-2 Business Days
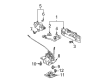
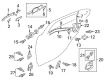
Mitsubishi Lancer Lock, Passenger Side Part Number: MN159630
$78.06 MSRP: $108.42You Save: $30.36 (28%)Ships in 1-2 Business DaysMitsubishi Lancer Latch, Passenger Side Part Number: MN159932
$80.70 MSRP: $112.08You Save: $31.38 (28%)Ships in 1-2 Business Days

Mitsubishi Lancer Latch Part Number: MN126990
$45.94 MSRP: $63.80You Save: $17.86 (28%)Ships in 1-2 Business Days
Mitsubishi Lancer Latch Part Number: 5927A015
$60.65 MSRP: $84.23You Save: $23.58 (28%)Ships in 1-2 Business Days
Mitsubishi Lancer Latch, Passenger Side Part Number: 5715A420
$174.96 MSRP: $237.07You Save: $62.11 (27%)Ships in 1-2 Business DaysMitsubishi Lancer Latch, Passenger Side Part Number: 5715A424
$193.98 MSRP: $262.85You Save: $68.87 (27%)Ships in 1-2 Business Days
Mitsubishi Lancer Latch, Driver Side Part Number: 5745A303
$195.82 MSRP: $265.33You Save: $69.51 (27%)Ships in 1-2 Business DaysMitsubishi Lancer Latch, Driver Side Part Number: 5715A425
$195.82 MSRP: $265.33You Save: $69.51 (27%)Ships in 1-2 Business DaysMitsubishi Lancer Latch, Passenger Side Part Number: 5745A304
$215.40 MSRP: $291.86You Save: $76.46 (27%)Ships in 1-2 Business DaysMitsubishi Lancer Latch, Passenger Side Part Number: 5715A426
$215.40 MSRP: $291.86You Save: $76.46 (27%)Ships in 1-2 Business DaysMitsubishi Lancer Latch, Driver Side Part Number: 5715A419
$215.40 MSRP: $291.86You Save: $76.46 (27%)Ships in 1-2 Business Days
Mitsubishi Lancer Latch, Passenger Side Part Number: 5715A672
$228.89 MSRP: $310.15You Save: $81.26 (27%)Ships in 1-2 Business DaysMitsubishi Lancer Latch, Passenger Side Part Number: MN159934
$232.81 MSRP: $315.47You Save: $82.66 (27%)Ships in 1-2 Business Days
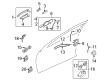
Mitsubishi Lancer Lock Part Number: 5715A402
$76.03 MSRP: $105.60You Save: $29.57 (28%)Ships in 1-2 Business DaysMitsubishi Lancer Lock Part Number: 5745A302
$80.29 MSRP: $111.52You Save: $31.23 (28%)Ships in 1-2 Business DaysMitsubishi Lancer Lock Part Number: 5715A401
$80.52 MSRP: $111.83You Save: $31.31 (28%)Ships in 1-2 Business DaysMitsubishi Lancer Lock Part Number: 5745A301
$93.14 MSRP: $129.37You Save: $36.23 (28%)Ships in 1-2 Business Days
Mitsubishi Lancer Door Lock
Mitsubishi Lancer Door Lock prevents opening of the vehicle door with ease and restricts entry unless opened deliberately. In the Mitsubishi cab, when Door Lock is engaged, a clasp on the latch snares the striker on the door jamb and a link to the remote handle releases the clasp after unlocking only. A key-driven cylinder operates linkage rods to move the latch, while the interior knob provides another manual means to lock the Lancer door. Power locks use an electric actuator and the same hardware as a standard Door Lock. The power locking kit installs a motor that runs when a switch sends current to the motor. Remote keyless entry is designed to enhance convenience. It does so with the use of a small radio transmitter installed in the key fob. This device sends a coded radio signal to a receiver inside the vehicle that commands the Door Lock. In addition, many remote keyless entry models automatically lock once drive is chosen or once the vehicle's preset speed is reached. The security function of the Mitsubishi Lancer still relies on the original mechanical latch no matter the method of control. For smooth operation, the cylinder, rods, and latch must be adequately lubricated to prevent the application of excess force that can bend the various components. Giving attention to the Door Lock ensures reliable sealing of the door for Mitsubishi Lancer and provides consistent protection against unauthorized entry when the vehicle is in motion or parked.
OEM Door Lock can boast superior quality and long-term durability. Each part meets strict factory specs and passes careful checks in production. So you'll get Door Lock with long-lasting strength and an exact fit. If you need OEM Mitsubishi Lancer Door Lock, the online store is the ideal place. The store carry a wide range of genuine Mitsubishi Lancer parts at the highly competitive prices. You'll enjoy a simple and no-hassle shopping experience. You'll get unbeatable prices and fast delivery service. You'll get the manufacturer's warranty and a straightforward return policy. Shop with confidence and keep your car in top condition.
Mitsubishi Lancer Door Lock Parts Questions & Experts Answers
- Q: How to remove and install front Car Mirror, Door Lock, Door Lock Cylinder, Exterior Door Handle, Interior Door Handle and Window Regulator on Mitsubishi Lancer?A:To remove / install the interior handles, trim panel and sealing sheet on CE models, with the regulator handle engage the washer is pushed away. Then withdraw the handle retaining clip with a wire hook, and remove the handle and washer. For power windows, remove the retaining screw within the pull handle. Carefully prise the switch panel from the door trim using a cloth-covered screwdriver. Disconnect the wiring and withdraw the switch panel. On the passenger's side, it's not necessary to remove this. After that, take out the retaining screw in the pull handle cavity and pull out the pull handle, then take out the retaining screw from the inner handle trim and pull out the trim. With utmost care, remove the cover from the screw at the front of the door trim. Then undo the screw. Take note that for a sedan model, there's another screw at the back of the trim above the door lock. To remove the trim panel, grasp its lower outside edge and pull it away from the door to disengage the retaining clips. Next, lift the trim panel up and withdraw it. If working on the passenger's side of a model with power windows, disconnect power window switch wiring before removing trim panel. After removing the retaining screws, the pull handle bracket is withdrawn. After that, remove the retaining screws of the interior handle and carefully peel off the plastic sheet from the door by cutting the sealant. If required, feed the wiring connector through and then remove the sealing sheet from the door. Store it flat and with the sealant-side facing up. If necessary, release the clips that hold the control rods to the interior handle. Remove the handle. The process of installation is just the reverse of that of removal and entails ensuring that the sealing sheet is correctly positioned, the sealant remains in operable condition, replacing any damaged trim panel retaining clips, and tightening all screws securely. The CG and CH models start the same way: the switch panel and pull handle are removed. Next, the interior handle trim and the trim panel are removed. If the model is equipped with power windows, the power window switch wiring must be disconnected. The window glass removal entails positioning of the glass to expose the retaining screws, temporally installing the window regulator handle or connecting of power window switch wiring so the glass can be moved as required, loosening of screws retaining the glass to the regulator slide, tilting the glass up and by maneuvering it through the door opening. To install the window, one must follow the steps in reverse to ensure it is seated properly and operates properly before putting the sealing sheet and trim panel back on. To service each window regulator, remove the trim panel, sealing sheet, window glass, if applicable disconnect the wiring of power window motor, if applicable remove the retaining bolts and move out the regulator assembly from the door and lubricate the sliding surfaces before refitting. Removing the exterior handle and lock cylinder requires that the window (which we can assume is the window of a car) be raised. Subsequently, the trim panel must first be removed, control rods disconnected, and the handle and lock cylinder removed. With everything on the right place, the exterior handle and lock cylinder will operate properly. The door lock removal consists of disconnecting control rods and wiring;after removing retaining screws grease sliding parts before reinstalling. Mark the position of the lock striker, remove retaining screw, and reinstall an aligned position. To renew mirror glass, adjust mirror and disengage spring or clips if necessary, next remove mirror cover and the surrounding panel if applicable, disconnect power mirror wiring, remove retaining screws or nuts, finally reinstall and test mirror operation.
- Q: How are the power door locks controlled and what procedures should be followed to diagnose and repair faults within the system on Mitsubishi Lancer?A:The body control module (BCM), situated at the back of the interior fuse box, regulates power door locks. You should observe the fault diagnosing and repairing procedures along with the wiring diagrams of the power door lock system. The actuator and switch refer to any part of the door lock assembly. To inspect the actuators, first remove the door trim panel and sealing sheet from the door that has the faulty power door lock. To reverse probe the actuator motor connector terminals using jumper leads connected to battery power, it should cycle in one direction to lock or unlock the door actuator. The door locks are supposed to cycle in reverse by swapping the positive and negative wires. Please be aware that CE Sedan rear door actuators work differently to front door actuators. If the door actuator is cycled in both positions, it is serviceable. If not, check the power supply or earth fault circuit for the B.C.M. to see if power and earth supplies are reaching it. Examine the linkages of the door lock for damage or seizing. Separate the wiring from the door actuator. Check for continuity between the door lock actuator connector and the BCM. Furthermore, measure the resistance between the motor wires at the door actuator connector. If open circuit, renew the door lock assembly. To begin our investigation, the door trim panel and sealing sheet are removed. After separating the wiring connector, we check continuity between earth wire and unlock wire. To do this the door lock cylinder is placed in the unlock position. After this continuity is checked between earth wire and lock wire with the door lock cylinder placed in the lock position. Unless this is not faulty the key switch is renewed.


Related Mitsubishi Lancer Parts
 Mitsubishi Lancer Door Lock Actuator
 Mitsubishi Lancer Door Latch Cable
 Mitsubishi Lancer Door Lock Switch
 Mitsubishi Lancer Door Screws
 Mitsubishi Lancer Front Door Striker
 Mitsubishi Lancer Interior Door Handle
 Mitsubishi Lancer Lift Support
 Mitsubishi Lancer Liftgate Hinge
 Mitsubishi Lancer Liftgate Lift Support
 Mitsubishi Lancer Tailgate Handle
 Mitsubishi Lancer Window Motor
 Mitsubishi Lancer Window Run