×
- Hello
- Login or Register
- Quick Links
- Live Chat
- Track Order
- Parts Availability
- RMA
- Help Center
- Contact Us
- Shop for
- Mitsubishi Parts
My Garage
My Account
Cart
Genuine Mitsubishi Montero Axle Shaft Seal
CV Axle Seal- Select Vehicle by Model
- Select Vehicle by VIN
Select Vehicle by Model
orMake
Model
Year
Select Vehicle by VIN
For the most accurate results, select vehicle by your VIN (Vehicle Identification Number).
8 Axle Shaft Seals found


Mitsubishi Montero Inner Shaft Cover Part Number: MB160948
$8.58 MSRP: $11.17You Save: $2.59 (24%)Ships in 1-2 Business Days
Mitsubishi Montero Axle Seals Part Number: MB837719
$8.68 MSRP: $11.30You Save: $2.62 (24%)Ships in 1-2 Business Days
Mitsubishi Montero Axle Seals Part Number: MB664612
$9.55 MSRP: $12.43You Save: $2.88 (24%)Ships in 1-2 Business Days
Mitsubishi Montero Dust Seal Part Number: MB160946
$12.81 MSRP: $16.68You Save: $3.87 (24%)Ships in 1-2 Business Days
Mitsubishi Montero Axle Seals Part Number: MB092437
$12.95 MSRP: $16.87You Save: $3.92 (24%)Ships in 1-2 Business Days
Mitsubishi Montero Side Seals Part Number: MB393883
$13.54 MSRP: $17.63You Save: $4.09 (24%)Ships in 1-2 Business DaysMitsubishi Montero Axle Seals Part Number: MB290013
$14.28 MSRP: $18.60You Save: $4.32 (24%)Ships in 1-2 Business Days
Mitsubishi Montero Oil Seal Part Number: MB620515
$11.05 MSRP: $14.38You Save: $3.33 (24%)Ships in 1-2 Business Days
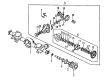
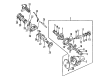
Mitsubishi Montero Axle Shaft Seal
OEM Axle Shaft Seal can boast superior quality and long-term durability. Each part meets strict factory specs and passes careful checks in production. So you'll get Axle Shaft Seal with long-lasting strength and an exact fit. If you need OEM Mitsubishi Montero Axle Shaft Seal, the online store is the ideal place. The store carry a wide range of genuine Mitsubishi Montero parts at the highly competitive prices. You'll enjoy a simple and no-hassle shopping experience. You'll get unbeatable prices and fast delivery service. You'll get the manufacturer's warranty and a straightforward return policy. Shop with confidence and keep your car in top condition.
Mitsubishi Montero Axle Shaft Seal Parts Questions & Experts Answers
- Q: How can the axle shafts be removed without disturbing the differential assembly or the Axle Shaft Seal on Mitsubishi Montero?A:The axleshafts can be removed without disturbing the differential assembly, which is important for oil seal replacement and for removing the differential carrier from the rear axle casing. Start by elevating the back end of the vehicle up and support the vehicle with jackstands. The front wheels need to be blocked so the vehicle doesn't roll. Remove the rear wheels and release the parking brake; drain the differential lubricant into a suitable container and finger-tighten the drain plug. With drum brake models, remove the drum and the metal brake line from the wheel cylinder without disassembling the brakes. Detach the vehicle's parking brake cables without removing the cables from the levers in the rear brake assemblies. Only remove the cable on the side of the axle shaft being removed if only one cable is being removed. Detach the four nuts and lock washers that are securing the bearing case and brake backing plate to the axle housing, thus withdrawing the axle, bearing case, brake backing plate, and brake assembly. A slide hammer-type axle puller may be necessary for dislodging the bearing housing. Also, care must be taken to support the axle shaft during removal so that the old seal will not be damaged. Remove the O-ring and the shim(s) at the rear axle housing flange, ensuring to retain the shim(s) for reinstallation. Before putting the new seal with the rubber side facing out, take out the oil seal from the housing and clean up area where the seal fits. The axleshaft assembly should be taken to the dealer service department or an automotive machine shop if the outer oil seal or wheel bearing needs replacement. Before assembling the two components, clear old gasket sealer and rust off the mating surfaces. Then pack the bearing case and axle housing end with high-temperature wheel bearing grease and lubricate the oil seal lip. When reassembling, install the left-side shaft first, then a 0.040 inch shim and the new O-ring on the left end of the axle housing. After applying a thin and even coat of silicone-type gasket sealer to the bearing case mating surface, install the left-side axle/brake assembly, taking care not to damage the oil seal. Tighten the four lock washers and nuts to the required torque. Install the right-side axle without shim or O-ring and lightly tighten the nuts to 5 in-lbs. This will create a gap between the bearing case and axle housing end flange that must be measured with a feeler gauge. Choose a shim whose thickness matches the measured gap and another shim whose thickness is 0.020 to 0.079-inch. After installing the selected shims and new O-ring on the axle housing end, apply silicone gasket sealer to the bearing case mating surface, and install the axle assembly, securing it with lock washers and nuts tightened to spec. Utilize a dial indicator to verify the axial play of the axle shaft. Replace shims as required and recheck until the axial play is within specification limits if it does not meet specifications. After reinstalling the parking brake cables, connect the brake lines and install the brake drums, bleeding the brakes at a rear wheel cylinde When all is done tighten the rear axle housing drain plug to specifications. Then fill the rear axle housing with approved gear lubricant and install and tighten the filler plug. Next, install the wheels and lower the vehicle. Finally, test drive the vehicle and check for leaks at the wheel bearing case attachment.

Related Mitsubishi Montero Parts
 Mitsubishi Montero CV Boot
 Mitsubishi Montero Differential Bearing
 Mitsubishi Montero Differential Seal
 Mitsubishi Montero Drive Shaft
 Mitsubishi Montero Driveshaft Yokes
 Mitsubishi Montero Pinion Bearing
 Mitsubishi Montero Radius Arm Bushing
 Mitsubishi Montero Slip Yoke
 Mitsubishi Montero Universal Joint