×
- Hello
- Login or Register
- Quick Links
- Live Chat
- Track Order
- Parts Availability
- RMA
- Help Center
- Contact Us
- Shop for
- Mitsubishi Parts
My Garage
My Account
Cart
Genuine Mitsubishi Montero CV Boot
Axle Boot- Select Vehicle by Model
- Select Vehicle by VIN
Select Vehicle by Model
orMake
Model
Year
Select Vehicle by VIN
For the most accurate results, select vehicle by your VIN (Vehicle Identification Number).
6 CV Boots found

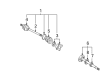
Mitsubishi Montero Inner Boot Part Number: MR528709
$77.27 MSRP: $107.33You Save: $30.06 (29%)Ships in 1-2 Business Days
Mitsubishi Montero Outer Boot Part Number: MR528639
$79.48 MSRP: $110.39You Save: $30.91 (28%)Ships in 1-2 Business Days
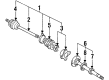
Mitsubishi Montero Outer Boot Part Number: MR232240
$60.05 MSRP: $83.40You Save: $23.35 (28%)Ships in 1-2 Business DaysMitsubishi Montero Inner Boot Part Number: MR350589
$68.34 MSRP: $94.92You Save: $26.58 (28%)Ships in 1-2 Business Days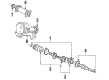
Mitsubishi Montero Boot Kit Part Number: MB896069
$75.59 MSRP: $104.98You Save: $29.39 (28%)Ships in 1-2 Business DaysMitsubishi Montero Inner Boot Part Number: MB886676
$102.32 MSRP: $142.12You Save: $39.80 (28%)Ships in 1-2 Business Days
Mitsubishi Montero CV Boot
OEM CV Boot can boast superior quality and long-term durability. Each part meets strict factory specs and passes careful checks in production. So you'll get CV Boot with long-lasting strength and an exact fit. If you need OEM Mitsubishi Montero CV Boot, the online store is the ideal place. The store carry a wide range of genuine Mitsubishi Montero parts at the highly competitive prices. You'll enjoy a simple and no-hassle shopping experience. You'll get unbeatable prices and fast delivery service. You'll get the manufacturer's warranty and a straightforward return policy. Shop with confidence and keep your car in top condition.
Mitsubishi Montero CV Boot Parts Questions & Experts Answers
- Q: What should you consider about the CV Boot and CV Joint before starting the overhaul of CV joints showing signs of wear on Mitsubishi Montero?A:The worn CV joints, particularly if the boots are torn, it is likely worth considering this option before starting the overhaul. Complete rebuilt driveaxles are available on an exchange basis and will save you time and hassle. If the Birfield joints are worn or damaged, do not disassemble them. You will need to purchase a new rubber boot kit for each joint before disassembly. Before removing the boot bands, first remove the large circlip from the outer race of the DOJ. Extract the driveaxle and wipe excess grease. After that, lift and remove the balls from the DOJ cage. Disengage snap-ring, inner race and cage. Rotate cage by 30 degrees and slide on driveaxle till cage is separate from inner race. Eliminate the circlip and the covers and tape the splines to prevent injury. Remove the dust covers with a large screwdriver, thoroughly clean all parts in solvent, and inspect for damage, wear, and rust. Examine the condition of driveaxle shafts, circlips, rubber boots and all the components of each DOJ joint. Using a suitably sized pipe and hammer, drive new dust covers onto the joint. Wrap tape around the splines before putting on new boots and bands. To the shaft, put the DOJ cage on. Place circlip, inner race, snap-ring. Ensure proper seating. Using the prescribed grease, coat the IEEE inner race and cage, align the ball races, and insert the balls with grease. Sufficient quantity of grease must be packed into the DOJ outer race. Now, the DOJ outer race must be installed on the driveaxle. After that, another quantity of grease must be packed behind the inner race and the cage. Finally, the circlip must be installed. Adjust the boot over the outer race, using a screwdriver equalize the pressure and install the band clamps. Lastly, pack grease in the Birfield joint, install the boot, the same procedure for the remaining driveaxle.
Related Mitsubishi Montero Parts
 Mitsubishi Montero Axle Shaft Seal
 Mitsubishi Montero Differential Bearing
 Mitsubishi Montero Differential Seal
 Mitsubishi Montero Drive Shaft
 Mitsubishi Montero Driveshaft Yokes
 Mitsubishi Montero Pinion Bearing
 Mitsubishi Montero Radius Arm Bushing
 Mitsubishi Montero Slip Yoke
 Mitsubishi Montero Universal Joint