×
- Hello
- Login or Register
- Quick Links
- Live Chat
- Track Order
- Parts Availability
- RMA
- Help Center
- Contact Us
- Shop for
- Mitsubishi Parts
My Garage
My Account
Cart
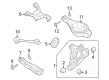
Genuine Mitsubishi Trailing Arm
Trailing Control Arm- Select Vehicle by Model
- Select Vehicle by VIN
Select Vehicle by Model
orMake
Model
Year
Select Vehicle by VIN
For the most accurate results, select vehicle by your VIN (Vehicle Identification Number).
27 Trailing Arms found


Mitsubishi Trailing Arm, Passenger Side Part Number: 4125A010
$248.71 MSRP: $351.28You Save: $102.57 (30%)Ships in 1-2 Business DaysProduct Specifications- Other Name: Arm Assembly, Rear Suspension Trailing; Radius Arm
- Position: Passenger Side
Mitsubishi Trailing Arm, Driver Side Part Number: 4125A009
$248.71 MSRP: $351.28You Save: $102.57 (30%)Ships in 1-2 Business DaysProduct Specifications- Other Name: Arm Assembly, Rear Suspension Trailing; Radius Arm
- Position: Driver Side
Mitsubishi Trailing Arm, Passenger Side Part Number: MR418041
$286.04 MSRP: $404.02You Save: $117.98 (30%)Ships in 1-2 Business DaysProduct Specifications- Other Name: Arm Assembly, Rear Suspension Trailing; Radius Arm
- Position: Passenger Side

Mitsubishi Trailing Arm, Passenger Side Part Number: MR519134
$303.58 MSRP: $428.78You Save: $125.20 (30%)Ships in 1-2 Business DaysProduct Specifications- Other Name: Arm Assembly, Rear Suspension Trailing; Radius Arm
- Position: Passenger Side

Mitsubishi Trailing Arm, Passenger Side Part Number: 55110W000P
$347.47 MSRP: $490.79You Save: $143.32 (30%)Ships in 1-2 Business DaysProduct Specifications- Other Name: Arm Assembly, Rear Suspension Trailing; Radius Arm
- Position: Passenger Side

Mitsubishi Trailing Arm, Passenger Side Part Number: 4125A116
$368.48 MSRP: $520.45You Save: $151.97 (30%)Ships in 1-2 Business DaysProduct Specifications- Other Name: Arm Assembly, Rear Suspension Trailing; Radius Arm
- Position: Passenger Side
Mitsubishi Trailing Arm, Driver Side Part Number: 4125A115
$368.48 MSRP: $520.45You Save: $151.97 (30%)Ships in 1-2 Business DaysProduct Specifications- Other Name: Arm Assembly, Rear Suspension Trailing; Radius Arm
- Position: Driver Side

Mitsubishi Trailing Arm, Passenger Side Part Number: 4125A038
$382.00 MSRP: $539.54You Save: $157.54 (30%)Ships in 1-2 Business DaysProduct Specifications- Other Name: Arm Assembly, Rear Suspension Trailing; Radius Arm
- Position: Passenger Side


Mitsubishi Trailing Arm, Passenger Side Part Number: 4125A132
$384.20 MSRP: $542.65You Save: $158.45 (30%)Ships in 1-2 Business DaysProduct Specifications- Other Name: Arm Assembly, Rear Suspension Trailing; Radius Arm
- Position: Passenger Side
Mitsubishi Trailing Arm, Driver Side Part Number: 4125A131
$386.91 MSRP: $546.48You Save: $159.57 (30%)Ships in 1-2 Business DaysProduct Specifications- Other Name: Arm Assembly, Rear Suspension Trailing; Radius Arm
- Position: Driver Side
Mitsubishi Trailing Arm, Driver Side Part Number: 4125A111
$391.11 MSRP: $552.42You Save: $161.31 (30%)Ships in 1-2 Business DaysProduct Specifications- Other Name: Arm Assembly, Rear Suspension Trailing; Radius Arm
- Position: Driver Side

Mitsubishi Trailing Arm, Driver Side Part Number: 4125A079
$394.53 MSRP: $557.26You Save: $162.73 (30%)Ships in 1-2 Business DaysProduct Specifications- Other Name: Arm Assembly, Rear Suspension Trailing; Radius Arm
- Position: Driver Side

Mitsubishi Trailing Arm, Driver Side Part Number: MR594607
$401.47 MSRP: $567.05You Save: $165.58 (30%)Ships in 1-2 Business DaysProduct Specifications- Other Name: Arm Assembly, Rear Suspension Trailing; Radius Arm
- Position: Driver Side
Mitsubishi Trailing Arm, Driver Side Part Number: 4125A037
$406.14 MSRP: $573.65You Save: $167.51 (30%)Ships in 1-2 Business DaysProduct Specifications- Other Name: Arm Assembly, Rear Suspension Trailing; Radius Arm
- Position: Driver Side
Mitsubishi Trailing Arm, Passenger Side Part Number: 4125A080
$413.32 MSRP: $583.79You Save: $170.47 (30%)Ships in 1-2 Business DaysProduct Specifications- Other Name: Arm Assembly, Rear Suspension Trailing; Radius Arm
- Position: Passenger Side
Mitsubishi Trailing Arm, Passenger Side Part Number: 4125A112
$445.77 MSRP: $629.62You Save: $183.85 (30%)Ships in 1-2 Business DaysProduct Specifications- Other Name: Arm Assembly, Rear Suspension Trailing; Radius Arm
- Position: Passenger Side

Mitsubishi Trailing Arm, Passenger Side Part Number: 4125A100
$572.09 MSRP: $808.03You Save: $235.94 (30%)Ships in 1-2 Business DaysProduct Specifications- Other Name: Arm Assembly, Rear Suspension Trailing; Radius Arm
- Position: Passenger Side
Mitsubishi Trailing Arm, Driver Side Part Number: 4125A099
$583.53 MSRP: $824.20You Save: $240.67 (30%)Ships in 1-2 Business DaysProduct Specifications- Other Name: Arm Assembly, Rear Suspension Trailing; Radius Arm
- Position: Driver Side

Mitsubishi Trailing Arm Part Number: 4125A145
$48.97 MSRP: $68.02You Save: $19.05 (29%)Ships in 1-2 Business DaysProduct Specifications- Other Name: Arm Assembly, Rear Suspension Trailing; Radius Arm

Mitsubishi Trailing Arm Part Number: MB870330
$61.57 MSRP: $85.52You Save: $23.95 (29%)Ships in 1-2 Business DaysProduct Specifications- Other Name: Arm Assembly, Rear Suspension Trailing; Radius Arm
| Page 1 of 2 |Next >
1-20 of 27 Results
Mitsubishi Trailing Arm
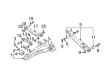
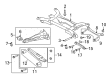
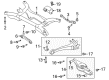
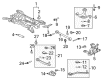
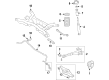
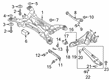
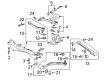
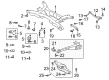
The Trailing Arm is a component that keeps the rear wheels aligned to the chassis for responsive cornering and smoothness over bumps. Mitsubishi, a brand that started out as a shipping enterprise in 1870, went on to become an automaker. Its long line of cars illustrates a range of tough vehicles embedded with smart tech. Furthermore, all Mitsubishi cars feature punchy MIVEC engines ensuring a confident drive with rear and front wheels gripping. With the Super All Wheel Control, you get even more traveler ease. Intelligent cruise control and smartphone link are intuitive features that make everyday driving simple and fun. The company is also keen on plug-in hybrid power and fuel cell research as it pursues cleaner motion without compromising reliability families trust. Mitsubishi's statement shows that each vehicle has balanced performance, easy operation, and value that lasts on city or country streets. This is a reason why many drivers stick to Mitsubishi year after year. While these characteristics receive the limelight, it is the unseen parts under the body such as the Trailing Arm that do equally important jobs. A Trailing Arm represents a pivot point that connects the axle to the frame. It allows for the vertical travel of the wheel. It also prevents the axle from moving forward or backward. Thus, the wheels remain planted firmly to the ground. The alignment will remain true. Both ends feature pivot bushings to help isolate vibrations so spring and shock can work properly. The Trailing Arm is made from stamped steel, cast iron, or lightweight aluminum. It manages the day-to-day stresses. As it is straightforward in shape, it can quickly be serviced or its bushings swapped should corrosion or hard impacts occur. This helps the entire suspension deliver predictable handling mile after mile.
Pick genuine OEM Trailing Arm if you want superb performance and durability that lasts. Mitsubishi builds that using high-grade materials and official factory techniques to meet very strict standards. This means you get parts you can actually trust for your daily drive. Finding the right parts is simple in the massive stock of genuine inventory. You can stop guessing if a part will fit or hold up. You will love the low prices, dependable service and the real manufacturer's warranty on Mitsubishi Trailing Arm. Order today and the store will ship your brand-new items to your door as fast as possible.
Mitsubishi Trailing Arm Parts Questions & Experts Answers
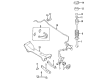
- Q: How to remove and install the rear trailing arm, rear lower control arm, rear toe control arm, and rear upper control arm on Mitsubishi Galant?A:Before removing the wheels, loosen the wheel lug nuts, lift the vehicle and support it securely on jackstands. Detach the nut, washer, and bolt that are securing the rear end of the trailing arm to the rear knuckle and remove the plug at the front end of the trailing arm to gain access to the nut on the pivot bolt. Removing the nut, washer, and bolt connecting the trailing arm body's front end allows you to remove the trailing arm and check the bushings for cracks and deterioration. Replace any parts which do not look good. To install, reverse removal! Install bolts with heads facing out. Raise rear knuckle to normal ride height and tighten bolts/nuts to specified torque. Only after all other suspension bolts/nuts are tightened should the lug nuts be tightened. To remove the lower control arm, you must first remove the nut securing the stabilizer bar link. Next, if your vehicle is equipped with ABS, unbolt the clamp for the wheel speed sensor wiring harness. After that, remove the nut, lock washer and bolt securing both ends of the lower control arm to the knuckle. Finally, take out the lower control arm. Prior to loosening the balljoint nut, knock the knuckle to free the stud, and remove the pivot bolt with lockwasher and nut, mark the position of the eccentric at the inner end of the control arm for the toe. Check for wear or damage in the bushings and the ball-joint in the outer end of the toe-control arm. For installation, align the reference marks made on the eccentric and rear suspension crossmember. Raise the rear knuckle and tighten the bolt/nuts to the specified torque. Finally, check the rear wheel alignment and adjust if necessary. With another lug nut loosened, raise the vehicle again. Remove the bolt, nut and washer attaching the upper control arm to the knuckle. Then unscrew the bolts connecting both pivots to the body. Now, take out the upper control arm to prevent the knuckle from dropping outwards. Examine the control arm for cracks or bending and check the bushings for wear; replace both as an assembly if there are any problems. If brackets are separated, ensure they are positioned correctly and torque the pivot bolts and nuts to the specified setting. To install, reverse removal steps, tighten mounting bracket bolts, raise rear knuckle, tighten arm-to-knuckle bolt/nut to torque spec, before finally tightening lug nuts.
- Q: How to remove and install the trailing arm and its components on Mitsubishi Lancer?A:The procedure requires the rear of the vehicle to be raised up and securely supported on jackstands. Remove the back wheel and release the handbrake. Next unscrew and remove the screw, which holds the drum to the hub and pull the drum off. Next detach the rear hub and clip retaining the brake hose to the trailing arm's bracket, the brake hose separates from the bracket. Loosen the brake pipe from the wheel cylinder and seal off the cylinder and the pipe to prevent the entry of dirt and the loss of any fluid. Take out the brake shoes and free the handbrake cable from the brake shoe. Remove the retaining bolts. Remove the backing plate from the stub axle. Take out the bolt that holds the handbrake cable to the trailing arm. Remove the nuts that hold the upper and lower control arms and withdraw the pivot bolts from the trailing arm. Detach the bolts that secure the control link to the trailing arm. Next, remove the pivot bolt from the front of the trailing arm while guiding the handbrake cable. The trailing arm can then be withdrawn from the vehicle. Examine the trailing arm bush for wear and degradation and renew it as necessary. Inspect the trailing arm for cracks and damage. Examine the pivot bolt for wear on the shaft or threads and renew as necessary. To install, reverse the removal procedure. As such, fit the trailing arm and pivot bolt but do not tighten the nut yet. Next, fit the upper and lower control arm pivot bolts and nuts but do not tighten yet. The brake backing plate must be installed, then the brake pipe connected to the wheel cylinder and securely tightened and the handbrake cable retaining bolt tightened. Attach the rear hub to the stub axle then assemble the brake drum and tighten the retaining screw securely. Remove air from the brakes hydraulic system and fit rear wheels. Lower the vehicle onto the ground and bounce the rear several times with the weight on the wheels, then tighten the nuts on the trailing arm pivot bolts to torque as specified. Have the rear wheel alignment checked and adjusted as necessary if a new trailing arm has been fitted. To renew bushes, take off the trailing arm and mark the installed position of the old bush in relation to the trailing arm and its installed depth. Using a tube or deep socket silly of a diameter for the bush to pass through support the trailing arm around the bush. Using a mandrel or tube press the bush from the trailing arm. The new trailing arm bush should be marked at the same location as the old bush. Align the matchmarks on the bush and trailing arm. Press the bush into the trailing arm until it is protruding on both sides as noted during removal. Only press on the circumference of the bush. The trailing arm bush should be installed as per removal to prevent wear of the new bush in the short term. Lastly, install the trailing arm.


Related Mitsubishi Parts
 Mitsubishi Wheel Hub
 Mitsubishi Axle Beam Mount
 Mitsubishi Coil Spring Insulator
 Mitsubishi Control Arm Bolt
 Mitsubishi Differential Mount
 Mitsubishi Lateral Link
 Mitsubishi Steering Knuckle
 Mitsubishi Steering Knuckle Bushing
 Mitsubishi Strut Housing
 Mitsubishi Strut Mounts
 Mitsubishi Sway Bar Link Bushing
 Mitsubishi Trailing Arm Bushing