×
- Hello
- Login or Register
- Quick Links
- Live Chat
- Track Order
- Parts Availability
- RMA
- Help Center
- Contact Us
- Shop for
- Mitsubishi Parts
My Garage
My Account
Cart
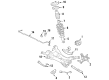
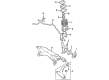
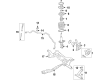
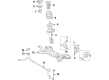
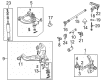
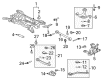
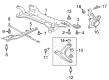
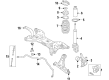
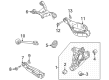
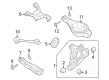
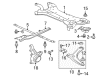
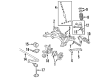
Genuine Mitsubishi Steering Knuckle
Front Steering Knuckle- Select Vehicle by Model
- Select Vehicle by VIN
Select Vehicle by Model
orMake
Model
Year
Select Vehicle by VIN
For the most accurate results, select vehicle by your VIN (Vehicle Identification Number).
36 Steering Knuckles found

Mitsubishi Knuckle, Driver Side Part Number: MR589521
$249.40 MSRP: $352.27You Save: $102.87 (30%)Ships in 1-2 Business DaysProduct Specifications- Other Name: Knuckle Assembly, Rear Axle, Left-Hand; Steering Knuckle
- Position: Driver Side

Mitsubishi Knuckle, Passenger Side Part Number: MR491322
$259.05 MSRP: $365.88You Save: $106.83 (30%)Ships in 1-2 Business DaysProduct Specifications- Other Name: Knuckle, Right-Hand; Steering Knuckle
- Position: Passenger Side

Mitsubishi Knuckle, Passenger Side Part Number: 3870A008
$272.76 MSRP: $385.25You Save: $112.49 (30%)Ships in 1-2 Business DaysProduct Specifications- Other Name: Knuckle, Right-Hand; Steering Knuckle
- Position: Passenger Side
Mitsubishi Knuckle, Driver Side Part Number: 3870A007
$272.76 MSRP: $385.25You Save: $112.49 (30%)Ships in 1-2 Business DaysProduct Specifications- Other Name: Knuckle, Left-Hand; Steering Knuckle
- Position: Driver Side

Mitsubishi Knuckle, Passenger Side Part Number: 3870A198
$276.27 MSRP: $390.21You Save: $113.94 (30%)Ships in 1-2 Business DaysProduct Specifications- Other Name: Knuckle, Right-Hand; Steering Knuckle
- Position: Passenger Side

Mitsubishi Knuckle, Passenger Side Part Number: MR113895
$281.56 MSRP: $397.68You Save: $116.12 (30%)Ships in 1-2 Business DaysProduct Specifications- Other Name: Knuckle, Right-Hand; Steering Knuckle
- Position: Passenger Side
Mitsubishi Knuckle, Driver Side Part Number: 3870A197
$289.43 MSRP: $408.79You Save: $119.36 (30%)Ships in 1-2 Business DaysProduct Specifications- Other Name: Knuckle, Left-Hand; Steering Knuckle
- Position: Driver Side

Mitsubishi Knuckle, Passenger Side Part Number: 3770A010
$294.43 MSRP: $415.87You Save: $121.44 (30%)Ships in 1-2 Business DaysProduct Specifications- Other Name: Knuckle, Rear Axle, Right-Hand; Steering Knuckle
- Position: Passenger Side

Mitsubishi Knuckle, Passenger Side Part Number: 3870A012
$310.56 MSRP: $438.66You Save: $128.10 (30%)Ships in 1-2 Business DaysProduct Specifications- Other Name: Knuckle, Right-Hand; Steering Knuckle
- Position: Passenger Side
Mitsubishi Knuckle, Driver Side Part Number: 3870A011
$325.36 MSRP: $459.55You Save: $134.19 (30%)Ships in 1-2 Business DaysProduct Specifications- Other Name: Knuckle, Left-Hand; Steering Knuckle
- Position: Driver Side

Mitsubishi Knuckle, Passenger Side Part Number: 3870A116
$330.32 MSRP: $466.55You Save: $136.23 (30%)Ships in 1-2 Business DaysProduct Specifications- Other Name: Knuckle, Right-Hand; Steering Knuckle
- Position: Passenger Side
Mitsubishi Knuckle, Driver Side Part Number: 3870A115
$330.32 MSRP: $466.55You Save: $136.23 (30%)Ships in 1-2 Business DaysProduct Specifications- Other Name: Knuckle, Left-Hand; Steering Knuckle
- Position: Driver Side
Mitsubishi Knuckle, Driver Side Part Number: 3770A009
$350.13 MSRP: $494.53You Save: $144.40 (30%)Ships in 1-2 Business DaysProduct Specifications- Other Name: Knuckle, Rear Axle, Left-Hand; Steering Knuckle
- Position: Driver Side

Mitsubishi Knuckle Assembly, Passenger Side Part Number: 3770A108
$356.40 MSRP: $503.38You Save: $146.98 (30%)Ships in 1-2 Business DaysProduct Specifications- Other Name: Knuckle Assembly, Rear Axle, Right-Hand; Steering Knuckle; Knuckle
- Position: Passenger Side

Mitsubishi Knuckle Assembly, Driver Side Part Number: 3770A071
$375.95 MSRP: $531.00You Save: $155.05 (30%)Ships in 1-2 Business DaysProduct Specifications- Other Name: Knuckle Assembly, Rear Axle, Left-Hand; Steering Knuckle
- Position: Driver Side

Mitsubishi Knuckle, Passenger Side Part Number: 3870A018
$382.00 MSRP: $539.55You Save: $157.55 (30%)Ships in 1-2 Business DaysProduct Specifications- Other Name: Knuckle, Right-Hand; Steering Knuckle
- Position: Passenger Side
Mitsubishi Knuckle, Driver Side Part Number: 3870A017
$382.00 MSRP: $539.55You Save: $157.55 (30%)Ships in 1-2 Business DaysProduct Specifications- Other Name: Knuckle, Left-Hand; Steering Knuckle
- Position: Driver Side

Mitsubishi Knuckle, Passenger Side Part Number: MR418066
$394.50 MSRP: $557.20You Save: $162.70 (30%)Ships in 1-2 Business DaysProduct Specifications- Other Name: Knuckle, Rear Axle, Right-Hand; Steering Knuckle
- Position: Passenger Side


Mitsubishi Knuckle, Passenger Side Part Number: 3870A048
$462.08 MSRP: $652.65You Save: $190.57 (30%)Ships in 1-2 Business DaysProduct Specifications- Other Name: Knuckle, Right-Hand; Steering Knuckle
- Position: Passenger Side
Mitsubishi Knuckle, Driver Side Part Number: 3870A047
$481.95 MSRP: $680.72You Save: $198.77 (30%)Ships in 1-2 Business DaysProduct Specifications- Other Name: Knuckle, Left-Hand; Steering Knuckle
- Position: Driver Side
| Page 1 of 2 |Next >
1-20 of 36 Results
Mitsubishi Steering Knuckle
The Mitsubishi Steering Knuckle connects the suspension and steering parts to the wheel hub and delivers precise handling and consistent wheel movement. Mitsubishi strives to create cars that feel intuitive. This involves using punchy MIVEC engines, incorporating Super All Wheel Control for dirt or snow grip, and equipping them with tech such as cruise control and smartphone link for simple daily travel. As the company's founding dates back to 1870 and its first Model A sedan attempts to meet basic needs with effective design, it targets vehicles that blend solid craftsmanship with bright looking ideas including plug-in hybrid power and trial fuel-cell systems and testing smart safety sensors so every ride feels secure. With all these benefits, the result is a lineup that remains strong and efficient while being easy to use in urban traffic or on a weekend getaway. Like the Mitsubishi, which appreciates strong feedback and durability, the Steering Knuckle provides the mechanical foundation to achieve this objective. Constructed from sturdy metal, the Steering Knuckle contains mounting points for the upper and lower control arms, tie rod end, and hub or spindle, which receives the wheel so it can rise over bumps and pivot smoothly. The drive axle runs through the center of the wheel so it can also transfer power while keeping it aligned. This helps prevent wearing of the tires and keeps the steering precise. This part may be replaced if it is bent from a hard impact or if worn-out bores loosen fitment to restore straight tracking and confident handling, needing no complex adjustments.
Pick genuine OEM Steering Knuckle if you want superb performance and durability that lasts. Mitsubishi builds that using high-grade materials and official factory techniques to meet very strict standards. This means you get parts you can actually trust for your daily drive. Finding the right parts is simple in the massive stock of genuine inventory. You can stop guessing if a part will fit or hold up. You will love the low prices, dependable service and the real manufacturer's warranty on Mitsubishi Steering Knuckle. Order today and the store will ship your brand-new items to your door as fast as possible.
Mitsubishi Steering Knuckle Parts Questions & Experts Answers
- Q: How to remove and install a wheel, brake caliper, and steering knuckle on Mitsubishi Galant?A:The hinges and latch assemblies of the doors, hood and trunk must be sprayed with a few drops of light oil or lock lubricant every 3000 miles or every three months. A thin layer of grease should also be applied on the door latch strikers so that they wear less and move freely. Also, spray on graphite lubricant on the door and trunk locks. Start with the brake fluid reservoir cap, take the cap off and remove approximately 2/3 of the fluid, and reattach the cap. Use a suction gun or old poultry baster, taking care that should there be a baster, it is not used again with food. Always mind not to spill the brake fluid because it can spoil paint and the spillage must be wiped off with clean and cold water. Then, loosen the lug nuts of a wheel, lift the vehicle high on jackstands, and block the still-ground wheels. Take the wheels off and be ready using the assembled brake as a guide in case of need. Place a drain pan beneath the brake assembly and sponge with brake system cleaner the caliper and area around it. Pushing the piston back into the bore: Use a C-clamp to push the piston back into the bore, being careful not to overflow the level of fluid in the master cylinder, and siphon excess fluid as needed. To change the brake pads, use the illustrations given with a check on the caliper and the dust boot of the piston whether it is leaking or torn and replace the caliper in case necessary. Always examine the brake disc and hose carefully to determine whether there is any damage or not. Wipe caliper guide pin boots down, and look at corrosion, replacing them if badly corroded. In the event that the guide pin and lock pin were removed, re-insert them into the right positions based on the markings on the pins and caliper body and then tighten them to the recommended torque. Follow the same procedure on the other wheel, fit the wheels and lug nuts, drop the car down, and screw the lug nuts to the desired tightness. Fill the reservoir with the correct brake fluid up to the mark, press the brake pedal a few times to engage the pads with the disc and verify the level of the brake fluid and refill as necessary. Lastly, ensure that the brakes are working well before putting the car back to usual operation, do not use heavy braking until the pads have been rubbed softly a few times to make sure they are in place. When replacement is suggested, which may be as a result of fluid leakage, replacement of the calipers and not an overhaul is advised and new and factory rebuilt units are offered on an exchange basis. Never replace only one caliper, but always replace in pairs. The first thing to do is to loosen the lug nuts on the wheel before lifting up the vehicle and putting it on jackstands to remove the wheel. In case of a front caliper, loosen the fitting bolt and detach the brake hose and plug it to avoid contamination and loss of brake fluid, and remember to fit the sealing washers in place of the hose. Do not disconnect the hose in case you are removing the caliper so that you can access another component. In the case of a rear caliper, take off the rear brake hose. In removing the caliper, use coil spring and a piece of wire to make the caliper hang to the coil spring. Installation: To install, revert the removal process, but replace the sealing washers at the brake hose-to-caliper junction and torque the caliper guide/lock pins to the required amount. Bleed brake circuit, in case the brake hose was removed, and suspect leakages at connections of the hose. Unless the hose was disconnected, pump the brake pedal a few times to ensure that the pads touch the disc. Lastly, check the brakes thoroughly and then put the vehicle back to normal service. Unscrew the lug nuts of the wheel, lift the car and place it on jackstands. Take off the wheel and put the lug nuts back in to keep the disc in place, with washers as needed. Releasing the parking brake is necessary in case of working on the rear brake disc. Install the brake pads and caliper without connective the brake hose to the caliper so that the brakes are not bled when installed. After removing the caliper bolts, suspend the caliper out of the way with a piece of wire. Check the disc surface visually, both marks of the score and surface damage; shallow grooves and light scratches are normal, but deep scoring demands the removal and refinishing of the disc. Look around the edges of the disc, and a severe wear would indicate that the disc has to be changed. In order to test the disc runout, position a dial indicator approximately 1/2-inch away on the outer edge of the disc, and place the dial indicator at zero and spin the disc, making sure that the reading does not go beyond the maximum allowable runout limit. No matter the reading, the discs must be resurfaced to provide a smooth finish and flat surface to remove brake pedal bouncing. Otherwise repeat, scrape the glaze off the surface with emery cloth in a swirling motion. Make sure the disc is not machined in a way that would leave the minimum allowable thickness less than the thickness stated and since the specified thickness is cast into the inside of the disc, it can be checked using a micrometer. Unscrew the caliper mounting bracket and the lug nuts that kept the disc in position and then unscrew the disc out of the hub. In case the disc is stuck, screw two bolts of the right size and thread pitch to take off the hub. Install the mounting bracket, place the new disc in position on top of the wheel studs and tighten the bolts to the required torque. Install the brake pads and caliper by fitting the caliper guide pin/lock pin to the appropriate torque. Install the wheel, lower the vehicle and attach the lug nuts to the recommended torque. Press the brake pedal a couple of times to ensure the brake pads come into contact with the disc, and make sure the brakes are functioning properly before driving the vehicle. Should replacement be indicated, as in the case of fluid leakage or sticky operation, check all possibilities prior to commencing the task. This is very easy as new wheel cylinders are available. Never replace a single wheel cylinder, it is important to replace both at a time. Begin by taking out the rear brake shoes. Disconnect, if possible, the brake line fitting on the wheel cylinder with a flare-nut wrench. To remove the wheel cylinder and brake backing plate, disconnect the brake line fitting, and then loosen the wheel cylinder bolts, however, care must be taken not to remove the metal line out of the wheel cylinder; otherwise it will bend. Then remove two bolts which attach the wheel cylinder to the backing plate and remove the wheel cylinder. Attach the end of the brake line to avoid the brake fluid loss and dirt entry. To install, reverse the removal procedure, and be sure to tighten the wheel cylinder mounting bolts to the correct torque and install the line fitting. Lastly, fit the brake shoes, brake drum and bleed the brakes. Before regular operation, carefully test the brake functioning. The master cylinder is mounted in the engine compartment and attached to the power brake booster with the fluid reservoir on the earlier models mounted on the firewall adjacent to the booster with the later models mounted directly on the master cylinder. Start by taking away the battery. Take a big syringe and pump out the brake fluid in the master cylinder reservoir taking care not to spill it over the painted areas to avoid spilling paint. Then, disassemble the windshield washer fluid reservoir and disconnect any electrical connectors as necessary. Should there be a remote reservoir, then rags under the fittings and caps or plastic bags to cover the ends of the lines when not in use. Unscrew the clamps of the brake hoses and push them off the reservoir and seal the ends. Uncouple the fluid lines with the master cylinder with a flare nut wrench and, where appropriate, disconnect the electrical connector with the fluid level sensor. Unscrew the nuts holding the master cylinder to the power booster, and take great care in removing it off the studs, to prevent spilling of fluid. Bench bleed the master cylinder; before installing, clamp the master in a vise and fit bleeder tubes to the outlet ports, and fill the reservoir with the recommended brake fluid. Gradually insert the pistons into the master cylinder to force the air off till there are no bubbles. Once the bleed tubes have been removed, place plugs in the open ports and the reservoir cap. Attach the master cylinder to the power brake booster studs and screw in the nuts by hand with the fingers of the nut tightening tool and also fit the reservoir hoses as to connect them. Install the brake line fittings into the master cylinder, without stripping them, and then screw the mounting nuts and brake line fittings into place. Add fluid to the master cylinder reservoir, bleed the master cylinder and the brake system, keep an assistant to depress the brake pedal, loosening the fittings to release air and fluid until there are no air bubbles in the fluid. Lastly, replace the battery, verify that the car has the required amount of brake fluid and thoroughly test the functionality of the brake system before getting behind the wheel. The rubber hoses that join the steel brake lines to the front and rear brake systems are important components of the brake system and should be checked whenever the vehicle is raised and the jackstands are firmly in place to examine them thoroughly, looking for cracks, chafing, leaks, blisters and other damages. It is important to conduct a proper inspection, and a light and a mirror could help you in this activity. In case any hose develops signs of damage, change immediately. To get rid of a flexible hose, clean the dirt of the hose fittings, and disconnect the metal brake line with a flare-nut wrench, never bending the frame bracket or line. When the fitting is corroded, put on penetrating oil, and leave it to soak before trying to loosen it. Take out the bracket of the brakeline, being sure to close the metal line when it is not in use. In the case of hoses that are connected to the caliper, unscrew the fitting bolt and take away the hose, disposing of the sealing washers. In installing a rear hose in a disc brake model, remove the securing clip and unscrew the hose in the caliper. Install the new brake hose to the caliper with new sealing washers when using on front hose and tighten the fitting bolt. Insert the opposite end of the new hose into the bracket without kinking or twisting it and then fit and tight the metal line to the hose. Ensure that the hose is not in touch with suspension or steering parts and verify this with the assistance of an assistant. Once installed, monitor the master cylinder fluid level, top-up fluid (where needed) and bleed the brakes before testing brake performance. When replacing the metal brake lines, be sure to use the right parts, do not use copper tubing and buy the steel brake lines at a dealer or auto parts store. Ready-made, flared-end brake lines, with fitted fittings can be purchased, and in case bending is required, a tubing bender must be utilised to eliminate kinking. Tighten the fittings in place well supported and clear of moving parts or hot parts. Once installed, test the master cylinder fluid level, fill fluid when it is required, and bleed the brakes before testing the brakes. Relax the lug nuts of the wheels, elevate the vehicle and hold it firmly on jackstands before taking the wheel off. Then, take off the driveaxle/hub nut and in case the vehicle has ABS then remove the wheel speed sensor. Next, unscrew the brake caliper and prop it up with a bit of wire and de-assemble the brake caliper mounting bracket and detach the brake disc and the hub. Disassemble the bottom balljoint(s) and steering knuckle, push the steering knuckle outward and push the driveaxle out of the hub to reach the hub mounting bolts, holding the end of the driveaxle with a piece of wire. Take the core of the knuckle off the vehicle; unbolt the hub. Should it be necessary, remove the brake disc shield of the knuckle. Ensure that the hub bearing is not worn or damaged: Spin the bearing with your fingers and observe rough, loose, or noisy rotation: in case of problems, change the hub as an assembly: the bearing cannot be changed independently. Installation: Reverse the steps to remove, but make sure to tighten the hub bolts and balljoint fasteners to the required torque and the driveaxle/hub nut to the required torque, and the brake fasteners to the required torque. In order to take off the wheel, loosen the lug nuts, lift the vehicle, place the lug nuts on jack stands and then remove the wheel. Then remove the brake caliper and hold it using a piece of wire; in the case the vehicle has ABS, remove the knuckle wheel speed sensor by unbolting and removing it. Take caliper mounting bracket off, lift off the brake disc off the hub and take off the driveaxle/hub nut. Next, unscrew the tie-rod end of the steering knuckle arm, and the control arm(s) of the knuckle. Take the driveaxle out of the hub and hold onto it with wire. In models after 1999, detach the steering knuckle and the strut, and unbolt the hub at the knuckle, if necessary, taking care not to overstrain the steering knuckle. To install, redo in the order of removal, all suspension and steering fasteners should be screwed to the correct torque values, including the driveaxle/hub nut with a new cotter pin, the brake fasteners and the wheel lug nuts.
- Q: How to inspect and overhaul the front Steering Knuckle and Wheel Hub assembly on Mitsubishi Lancer?A:Elevate the front of the vehicle and place it securely on jackstands to inspect. Turn the wheel while listening for rumbles, indicating that the front wheel bearings are worn, and check for play in the wheel bearing. If the hub assembly is unserviceable, it should be overhauled. If the serviceability of the hub assembly is in doubt, remove the front wheel. Before the caliper assembly is removed it is necessary to check the hub end float. Remove the two brake caliper anchor plate retaining bolts and slide the caliper assembly from the disc and withdraw the brake disc from the hub. Using a dial gauge, attach the suspension unit to the plunger against the hub face. While pushing the hub towards the suspension unit, zero the dial gauge. Following this, pull the hub in an axial direction to check the hub end float. If the float at the hub end is out of specifications the drive shaft nut should be tightened to specification. If there is excessive end float despite a tight drive shaft nut, dismantle the hub assembly and replace the worn components. Renew the bearings and seals as they will be damaged during the dismantling process. You should either fit a new exchange steering knuckle or have the hub overhaul done by a front-end specialist. Lift the front side of the vehicle once more, remove the front wheel and proceed to extract the split pin from drive shaft end. With the help of the assistant applying the brakes, slacken the drive shaft nut by about one turn. Remove retaining bolts from brake caliper anchor plate, slide the assembly off the disc and suspend it from the coil spring. On CE models, loosen the nut that retains the ball joint to the steering knuckle. Next, disconnect the ball joint with a separator or hammer. On the CG and CH models, take out the ball joint pinch nut and bolt. To detach the drive shaft, disconnect the tie rod eye from the steering knuckle with the steering wheel in the straight-ahead position. Using a proper puller, press the drive shaft through the hub assembly without damaging the drive shaft joint boot. Leave drive shaft in transaxle and secure away from work area. Detach the screws and nuts that link the suspension devices to the steering knuckle and hub assembly, and then take them off the vehicle. To remove the steering knuckle and hub assembly, pry the oil seal from the inner side of the steering knuckle, remove the snap ring, and press the hub out through the steering knuckle. If required, take out the dust cover and remove the remaining part of the bearing assembly using a bearing separator. Thoroughly wash the steering knuckle and hub and check for wear, cracks and damage. Renew the bearing, seals and snap ring as required. Reversal of removal and dismantling procedure should be followed for assembly and installation. Ensure that new bearing is installed by pressing it into the steering knuckle. Apply grease on new outer oil seal and install it in noted direction. Complement the hub with press plates, seat the steering knuckle onto the hub, and press the bearing fully onto the hub. A new snap ring must be installed and the new inner oil seal greased before fitting. Make sure that the hub rotates freely in the bearings, install the steering knuckle to the suspension unit assembly and tighten the nuts and bolts. The drive shaft must be directed into the hub, with the nut positioned on the end of the drive shaft. After installing the ball joint and tie rod end, the nuts must be tightened and new split pins fitted as necessary. To finish, install the brake caliper assembly. Tighten the anchor plate bolts. Then, with someone pressing the brakes, tighten the drive shaft nut and align the hole. Install a new split pin, then fit the front wheel and let the vehicle back down to the ground.


Related Mitsubishi Parts
 Mitsubishi Ball Joint
 Mitsubishi Shock Absorber
 Mitsubishi Coil Springs
 Mitsubishi Coil Spring Insulator
 Mitsubishi Differential Mount
 Mitsubishi Steering Knuckle Bushing
 Mitsubishi Strut Bearing
 Mitsubishi Strut Housing
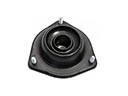 Mitsubishi Strut Mounts
 Mitsubishi Sway Bar Bracket
 Mitsubishi Torsion Bar
 Mitsubishi Wheel Seal
Browse by Model
Eclipse Cross Steering Knuckle Eclipse Steering Knuckle Endeavor Steering Knuckle Galant Steering Knuckle Lancer Steering Knuckle Mirage G4 Steering Knuckle Mirage Steering Knuckle Montero Sport Steering Knuckle Montero Steering Knuckle Outlander PHEV Steering Knuckle Outlander Sport Steering Knuckle Outlander Steering Knuckle