×
- Hello
- Login or Register
- Quick Links
- Live Chat
- Track Order
- Parts Availability
- RMA
- Help Center
- Contact Us
- Shop for
- Mitsubishi Parts
My Garage
My Account
Cart
Tail Gate
1992 Mitsubishi Montero Door Lock, Trunk Lid Latch
Currently shopping for
1992 Mitsubishi Montero
Change VehicleVehicle Options
6 Cyl 3.0 L GASVehicle Options
6 Cyl 3.0 L GASCategories Close X
Currently selected
Body & Hardware
- Bumper & Components - Front
- Center Pillar & Rocker
- Dash Panel Components
- Door
- Door Assembly
- Ducts
- Floor
- Front Door
- Front Door - Lock & Hardware
- Glass - Door
- Glass - Lift Gate
- Glass - Windshield
- Glove Box
- Hinge Pillar
- Hood & Components
- Information Labels
- Instrument Panel
- Lift Gate - Lock & Hardware
- Rear Console
- Rear Door
- Rear Door - Lock & Hardware
- Reveal Moldings
- Splash Shields
- Sunroof
- Tail Gate
- Tracks & Components
- Wiper & Washer Components
Other Categories
A/C & Heating
Air & Fuel Delivery
Belts & Cooling
Brakes
Charging & Starting
Driveline & Axles
Electrical
Emission Control & Exhaust
Engine
Headlights & Lighting
Interior & Exterior Trim
Maintenance & Lubrication
Steering
Suspension
Transmission
Categories Close X
How to use OE catalog
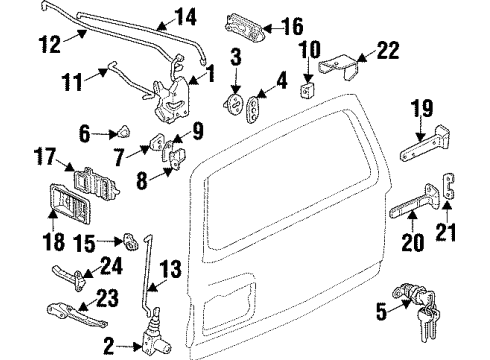
Diagram (1 of 1): Lift Gate - Lock & Hardware
Sort by:
Ref No.
Ref No.
Part No. & Part Description
Price & Qty.
Part No. &
Part Description
Part Description
- 1
- 4
 $5.65 $4.341
- 6

- 7

- 14
- 15

- 16
 $101.45 $73.041
- 19$190.88 $140.871
- 20$112.26 $80.821
OEM 1992 Mitsubishi Montero Parts for Tail Gate
The OEM parts are ultimately desired quality-wise. The Tail Gate components are produced by Mitsubishi, manufacture according to factory guidelines and during production they undergo quality testing. In case you require new OEM 1992 Mitsubishi Montero parts then you can view our entire catalogue. All of our genuine OEM 1992 Mitsubishi Montero Door Lock, Trunk Lid Latch are sold at a low price and are supported by a warranty of the manufacturer. In addition, we provide quick delivery and easy return policy to provide a good experience. No longer wait and do shopping with us!
Door Lock Installation and Repair Tips for 1992 Mitsubishi Montero
- Q: How to remove and install the Door Lock, Door Lock Cylinder, Exterior Door Handle and Interior Door Handle on front door and cargo door on 1992 Mitsubishi Montero?A: To remove/install front and cargo doors, take off trim panel and plastic watershield, take off inside lever-link clip, take off handle screws (and front glass-run channel), take off lock rod, take off latch/lock mounting screws and exterior-handle nuts (if there), take off lock cylinder, grease sliding levers/springs, and adjust outside-handle freeplay by removing the retaining clip.