×
- Hello
- Login or Register
- Quick Links
- Live Chat
- Track Order
- Parts Availability
- RMA
- Help Center
- Contact Us
- Shop for
- Mitsubishi Parts
My Garage
My Account
Cart
Steering Gear & Linkage
1994 Mitsubishi Diamante Rack and Pinion, Tie Rod, Tie Rod End
Currently shopping for
1994 Mitsubishi Diamante
Change VehicleVehicle Options
6 Cyl 3.0 L GASVehicle Options
6 Cyl 3.0 L GASCategories Close X
Currently selected
Steering
Other Categories
A/C & Heating
Air & Fuel Delivery
Belts & Cooling
Body & Hardware
Brakes
Charging & Starting
Electrical
Emission Control & Exhaust
Engine
Headlights & Lighting
Maintenance & Lubrication
Suspension
Transmission
Categories Close X
How to use OE catalog
2 diagrams found for the vehicle you selected.Select your vehicle options to narrow down results.
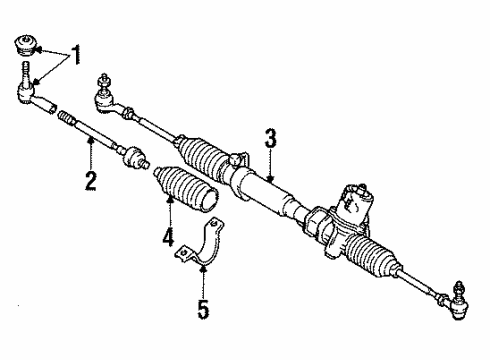
- 1.Steering - Steering Gear & Linkage
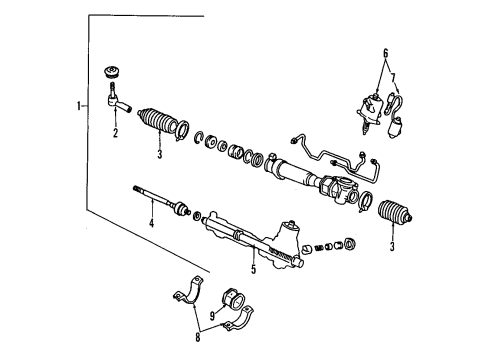
- 2.Steering Gear & Linkage - Steering Gear & Linkage
Sort by:
Ref No.
Ref No.
Part No. & Part Description
Price & Qty.
Part No. &
Part Description
Part Description
- 1
 $101.10 $72.791
- 2
 $101.10 $72.791
- 3
 $48.75 $37.151
- 4
- 4
 $28.50 $21.891
OEM 1994 Mitsubishi Diamante Parts for Steering Gear & Linkage
The OEM parts are ultimately desired quality-wise. The Steering Gear & Linkage components are produced by Mitsubishi, manufacture according to factory guidelines and during production they undergo quality testing. In case you require new OEM 1994 Mitsubishi Diamante parts then you can view our entire catalogue. All of our genuine OEM 1994 Mitsubishi Diamante Rack and Pinion, Tie Rod, Tie Rod End are sold at a low price and are supported by a warranty of the manufacturer. In addition, we provide quick delivery and easy return policy to provide a good experience. No longer wait and do shopping with us!
Tie Rod Installation and Repair Tips for 1994 Mitsubishi Diamante
- Q: How to remove and install tie rod ends on 1994 Mitsubishi Diamante?A: Unscrew battery and take off wheel. With outer tie rod: take off cotter pin and castle nut, separate rod, back off jam nut, unscrew and replace end, torque nut and place new cotter pin. To inner tie rods: hoist up vehicle, take boot and inner rod out, put in new one, fit it, re-fit wheels, and adjust.