×
- Hello
- Login or Register
- Quick Links
- Live Chat
- Track Order
- Parts Availability
- RMA
- Help Center
- Contact Us
- Shop for
- Mitsubishi Parts
My Garage
My Account
Cart
Instrument Panel Components
1998 Mitsubishi Diamante Instrument Panel Light Bulb
Currently shopping for
1998 Mitsubishi Diamante
Change VehicleVehicle Options
6 Cyl 3.5 L GASVehicle Options
6 Cyl 3.5 L GASCategories Close X
Currently selected
Body & Hardware
- Bumper & Components - Front
- Bumper & Components - Rear
- Cowl
- Dash Panel Components
- Door
- Door & Components
- Fender & Components
- Front Door
- Front Door - Lock & Hardware
- Fuel Door
- Glass - Door
- Glass & Hardware - Back Glass
- Grille & Components
- Hood & Components
- Instrument Panel Components
- Quarter Panel & Components
- Radiator Support
- Rear Door
- Rear Door - Lock & Hardware
- Reveal Moldings
- Seat Belt
- Sound System
- Sunroof
- Trunk
- Trunk Lid & Components
- Wiper & Washer Components
Other Categories
A/C & Heating
Air & Fuel Delivery
Belts & Cooling
Brakes
Charging & Starting
Driveline & Axles
Electrical
Emission Control & Exhaust
Engine
Headlights & Lighting
Interior & Exterior Trim
Maintenance & Lubrication
Steering
Suspension
Transmission
Categories Close X
How to use OE catalog
2 diagrams found for the vehicle you selected.Select your vehicle options to narrow down results.
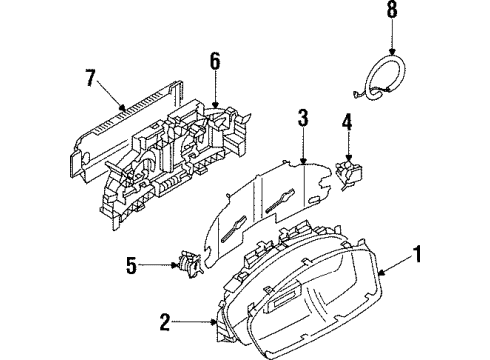
- 1.Instrument Panel - Instrument Panel Components (Cluster)
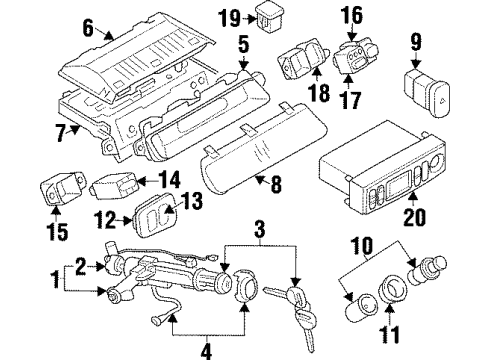
- 2.Instrument Panel - Instrument Panel Components (Switches & Display Unit)
Sort by:
Ref No.
Ref No.
Part No. & Part Description
Price & Qty.
Part No. &
Part Description
Part Description
- 2
 $68.94 $49.631
- 8
OEM 1998 Mitsubishi Diamante Parts for Instrument Panel Components
The OEM parts are ultimately desired quality-wise. The Instrument Panel Components components are produced by Mitsubishi, manufacture according to factory guidelines and during production they undergo quality testing. In case you require new OEM 1998 Mitsubishi Diamante parts then you can view our entire catalogue. All of our genuine OEM 1998 Mitsubishi Diamante Instrument Panel Light Bulb are sold at a low price and are supported by a warranty of the manufacturer. In addition, we provide quick delivery and easy return policy to provide a good experience. No longer wait and do shopping with us!
Instrument Panel Light Bulb Installation and Repair Tips for 1998 Mitsubishi Diamante
- Q: How to remove and install Instrument Panel Light Bulb, Side Marker Light and Turn Signal Lights (parking and side marker lights) on 1998 Mitsubishi Diamante?A: Remember to always disconnect the negative battery cable, unscrew the lamp assembly (take out lenses, screws, trim or cluster when necessary) and open/turn the bulb socket (usually counterclockwise; some high-mount clockwise) and simply pull the bulb out. Install bulb, put back together in reverse, reconnect battery and test; clean contacts on interior lamps.