×
- Hello
- Login or Register
- Quick Links
- Live Chat
- Track Order
- Parts Availability
- RMA
- Help Center
- Contact Us
- Shop for
- Mitsubishi Parts
My Garage
My Account
Cart
Powertrain Control
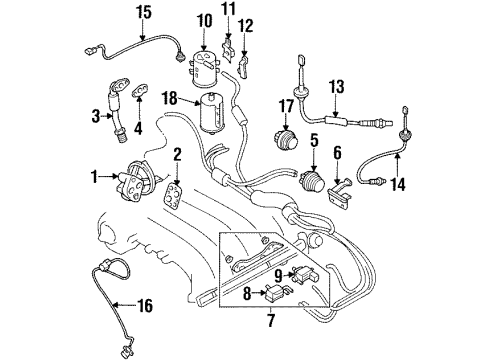
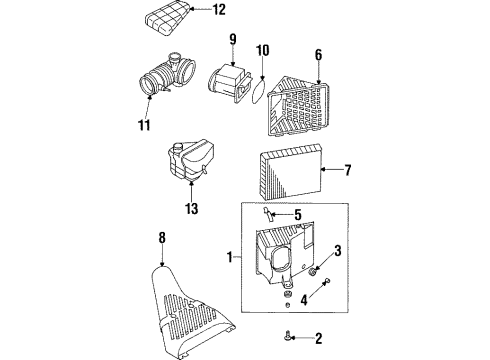
1999 Mitsubishi Diamante Engine Control Module, Knock Sensor, MAP Sensor, Oxygen Sensor
Currently shopping for
1999 Mitsubishi Diamante
Change VehicleVehicle Options
Base; 6 Cyl 3.5 L GASVehicle Options
Base; 6 Cyl 3.5 L GASCategories Close X
Currently selected
Air & Fuel Delivery
Other Categories
A/C & Heating
Belts & Cooling
Body & Hardware
Brakes
Charging & Starting
Driveline & Axles
Electrical
Emission Control & Exhaust
Engine
Headlights & Lighting
Interior & Exterior Trim
Maintenance & Lubrication
Steering
Suspension
Transmission
Categories Close X
How to use OE catalog
Diagram (1 of 1): Engine / Transaxle - Air Intake
Sort by:
Ref No.
Ref No.
Part No. & Part Description
Price & Qty.
Part No. &
Part Description
Part Description
- 2
 $2.27 $1.741
- 4
 $4.62 $3.551
- 5$8.44 $6.481
- 6
- 7
- 9$676.75 $479.141
- 10
 $19.11 $14.671
 $81.12 $58.401
- $105.88 $76.241

 $182.40 $134.611
- $252.54 $186.381
- $136.32 $98.161
- $139.58 $100.501
OEM 1999 Mitsubishi Diamante Parts for Powertrain Control
The OEM parts are ultimately desired quality-wise. The Powertrain Control components are produced by Mitsubishi, manufacture according to factory guidelines and during production they undergo quality testing. In case you require new OEM 1999 Mitsubishi Diamante parts then you can view our entire catalogue. All of our genuine OEM 1999 Mitsubishi Diamante Engine Control Module, Knock Sensor, MAP Sensor, Oxygen Sensor are sold at a low price and are supported by a warranty of the manufacturer. In addition, we provide quick delivery and easy return policy to provide a good experience. No longer wait and do shopping with us!
Crankshaft Position Sensor Installation and Repair Tips for 1999 Mitsubishi Diamante
- Q: What is the function of the Crankshaft Position Sensor, and how is it tested and installed in various engine types on 1999 Mitsubishi Diamante?A: Crankshaft Position (CKP) sensor measures crank angle, providing a pulse that the PCM uses to measure engine speed, fuel injection and ignition timing. Testing involves costly special tools, but can be tracked using scan tool. Removal/Installation The process differs depending on the engine whether in the distributor or through procedures such as disconnection of battery, detachment of timing belt and unscrewing of sensor.