×
- Hello
- Login or Register
- Quick Links
- Live Chat
- Track Order
- Parts Availability
- RMA
- Help Center
- Contact Us
- Shop for
- Mitsubishi Parts
My Garage
My Account
Cart
Genuine Mitsubishi Diamante Brake Line
Brake Hose- Select Vehicle by Model
- Select Vehicle by VIN
Select Vehicle by Model
orMake
Model
Year
Select Vehicle by VIN
For the most accurate results, select vehicle by your VIN (Vehicle Identification Number).
1 Brake Line found

Mitsubishi Diamante Flex Hose Part Number: MR129781
$13.94 MSRP: $18.15You Save: $4.21 (24%)Ships in 1-2 Business Days
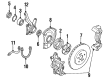
Mitsubishi Diamante Brake Line
OEM Brake Line can boast superior quality and long-term durability. Each part meets strict factory specs and passes careful checks in production. So you'll get Brake Line with long-lasting strength and an exact fit. If you need OEM Mitsubishi Diamante Brake Line, the online store is the ideal place. The store carry a wide range of genuine Mitsubishi Diamante parts at the highly competitive prices. You'll enjoy a simple and no-hassle shopping experience. You'll get unbeatable prices and fast delivery service. You'll get the manufacturer's warranty and a straightforward return policy. Shop with confidence and keep your car in top condition.
Mitsubishi Diamante Brake Line Parts Questions & Experts Answers
- Q: How should Brake Line components (metal lines and rubber brake hoses) be checked and maintained to ensure proper braking function on Mitsubishi Diamante?A:Brake hose lines made of metal and rubber are required to be inspected regularly in case of leakage and external damages, where metal lines are very likely to be crushed and kinked beneath the vehicle, which may limit the flow of fluids and the ability to brake. Rubber hoses should be checked on cracking or scraping since this could form some weak points that could break when pressure is applied. Removal and disconnection of lines require extreme cleanliness, all connections and joints must be cleaned prior to disassembly, and lines and ports must be plugged as soon as open. Brake fluid should be emptied into new lines and hoses before it is installed. To take off a line or hose, remove the negative battery cable, lift and support the vehicle, and take off any required wheel and tire assembly to do so. Wipe up the surrounding of the joints, put a catch pan under, and with two wrenches, unscrew the hose or line. Unplug the other side, shifting the drain pan, as necessary, and insert a back-up wrench to prevent damaging the fitting. Loose retaining clips or brackets that hold the line. In case the brake system is going to stay open, tape or plug some left-over clips and ports to prevent entry of contaminants. To install, begin with the new line or hose at the end most distant to the master cylinder and make certain to thread both fittings. The new line should not touch any other parts, and should be at least 1/2 inch clearance to steering column and moving parts, with any protective shielding or insulators replaced. Fit any fitting with two wrenches, re-fit any retaining clips or brackets and where possible re-fit the wheel and tire assemblies before lowering the vehicle. Before reconnecting the negative battery cable refill the brake master cylinder reservoir with clean brake fluid that is of DOT 3 specifications and properly bleed the brake system.
Related Mitsubishi Diamante Parts
 Mitsubishi Diamante Brake Caliper Piston
 Mitsubishi Diamante Brake Dust Shields
 Mitsubishi Diamante Brake Pads
 Mitsubishi Diamante Brake Shoe Set
 Mitsubishi Diamante Hydraulic Hose
 Mitsubishi Diamante Parking Brake Cable
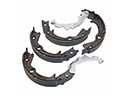 Mitsubishi Diamante Parking Brake Shoes
 Mitsubishi Diamante Wheel Cylinder Repair Kit
 Mitsubishi Diamante Wheel Hub Bolt
 Mitsubishi Diamante Wheel Stud