×
- Hello
- Login or Register
- Quick Links
- Live Chat
- Track Order
- Parts Availability
- RMA
- Help Center
- Contact Us
- Shop for
- Mitsubishi Parts
My Garage
My Account
Cart
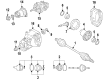
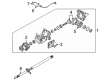
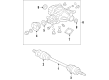
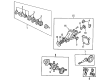
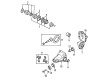
Genuine Mitsubishi Drive Shaft
Axle Shaft- Select Vehicle by Model
- Select Vehicle by VIN
Select Vehicle by Model
orMake
Model
Year
Select Vehicle by VIN
For the most accurate results, select vehicle by your VIN (Vehicle Identification Number).
10 Drive Shafts found

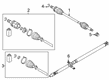
Mitsubishi Drive Shaft Assembly Part Number: 3401A458
$1047.75 MSRP: $1366.03You Save: $318.28 (24%)Ships in 1-2 Business DaysProduct Specifications- Other Name: Shaft Assembly, Propeller; Drive Shaft

Mitsubishi Propeller Shaft Part Number: 3401A237
$1070.76 MSRP: $1396.03You Save: $325.27 (24%)Ships in 1-2 Business DaysProduct Specifications- Other Name: Shaft Assembly, Propeller; Drive Shaft

Mitsubishi Drive Shaft Part Number: 3401A574
$1540.95 MSRP: $1865.56You Save: $324.61 (18%)Ships in 1-2 Business DaysProduct Specifications- Other Name: Shaft Assembly, Propeller; Drive Shaft Assembly


Mitsubishi Propeller Shaft Part Number: MR953165
$615.52 MSRP: $802.51You Save: $186.99 (24%)Ships in 1-2 Business DaysProduct Specifications- Other Name: Shaft Assembly, Propeller; Drive Shaft
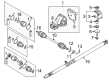
Mitsubishi Drive Shaft Part Number: MR581617
$823.16 MSRP: $1073.22You Save: $250.06 (24%)Ships in 1-2 Business DaysProduct Specifications- Other Name: Shaft Kit, Propeller, Rear
Mitsubishi Drive Shaft Part Number: 3401A022
$1030.13 MSRP: $1343.06You Save: $312.93 (24%)Ships in 1-2 Business DaysProduct Specifications- Other Name: Shaft Assembly, Propeller
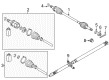
Mitsubishi Drive Shaft Part Number: 37000W080P
$1082.53 MSRP: $1411.38You Save: $328.85 (24%)Ships in 1-2 Business DaysProduct Specifications- Other Name: Shaft Assembly, Propeller, Rear
- Replaces: 3401B250
Mitsubishi Propeller Shaft Part Number: 3401A147
$1531.66 MSRP: $1854.31You Save: $322.65 (18%)Ships in 1-2 Business DaysProduct Specifications- Other Name: Shaft Assembly, Propeller; Drive Shaft
Mitsubishi Propeller Shaft Part Number: 3401A172
$1557.77 MSRP: $1885.91You Save: $328.14 (18%)Ships in 1-2 Business DaysProduct Specifications- Other Name: Shaft Assembly, Propeller; Drive Shaft
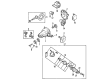
Mitsubishi Propeller Shaft Part Number: MN147054
Product Specifications- Other Name: Shaft Assembly, Propeller; Drive Shaft
Mitsubishi Drive Shaft
Every journey starts with smooth, reliable motion thanks to the ingenious Drive Shaft that directs engine torque to the axles. Mitsubishi has been developing car models that are elemental and functional for more than a century. It started its journey from the Model A and carried on growing to make cars with MIVEC engines, Super All Wheel Control and smartphone link systems. Mitsubishi values simple controls and smart technology. It is experimenting with plug-in hybrids, trialing fuel cells and small electric city cars to minimize fuel usage while not compromising convenience. The solid quality feel, the cruise control for relaxing trips as well as safety sensors that keep an eye on the road help inexperienced drivers feel confident. Further, continuous refinement of the chassis ensures that every model is capable on loose gravel or slick pavement. On the same note, the Drive Shaft's hollow steel tube lowers rotating mass, but the wall thickness can withstand twisting loads during hard acceleration or while loaded. Universal joints allow the shaft to pivot with the suspension. Where angles sharpen, a double Cardan keeps rotation smooth. A Rzeppa constant velocity joint does the same thing. Certain designs segment the length into dual components with a mid-supporting, which maintains alignment, and meticulous balancing counters vibrations caused by dings or absent weights. When the joints of the Drive Shaft are lubricated regularly to limit wear and noise, it can deliver consistent power on the tarmacked road as well as on the rugged path. Therefore, with such care, the Mitsubishi vehicles stay nimble.
Pick genuine OEM Drive Shaft if you want superb performance and durability that lasts. Mitsubishi builds that using high-grade materials and official factory techniques to meet very strict standards. This means you get parts you can actually trust for your daily drive. Finding the right parts is simple in the massive stock of genuine inventory. You can stop guessing if a part will fit or hold up. You will love the low prices, dependable service and the real manufacturer's warranty on Mitsubishi Drive Shaft. Order today and the store will ship your brand-new items to your door as fast as possible.
Mitsubishi Drive Shaft Parts Questions & Experts Answers
- Q: How should you remove and install a drive shaft on Mitsubishi Lancer?A:If the drive shafts are already damaged or worn out, it is usually more economical to have an exchange assembly installed by a drive shaft specialist. To detach and attach it, first remove the wheel cover if it is present and loosen the front wheel nuts. Proceed to remove the split pin securing the end of the drive shaft nut, then get an assistant to apply the brakes and loosen off the drive shaft nut about one turn without removing it completely. Raise the front of the vehicle and securely support on jack stands. Remove the drive shaft nut and withdraw the washer. Place a container below the transaxle and drain the transaxle oil. Ensure that sealing washer of the drain plug is serviceable and refit the drain plug. Loosen the castellated nut retaining the tie rod end to the steering knuckle, taking into mind that a self-locking nut has replaced the castellated nut in some models. Using a hammer or a ball joint separator, disconnect the tie rod end from the steering knuckle and remove the spring clip holding the brake hose. On certain models, remove the nut retaining the ball joint to the steering knuckle and disconnect in a similar manner. For other models, remove the steering knuckle's pinch nut and bolt for lower ball joint. Levering the lower control arm downward helps to separate the ball joint stud. Make sure to leave the steering in the straight ahead position when removing the drive shaft. Using a suitable puller, press the drive shaft through the hub assembly without damaging the drive shaft joint boot. If necessary, strike the assembly with a heavy copper/hide faced hammer to dislodge it. Using a wooden block, hold the suspension unit away from the transaxle to provide adequate working space while avoiding any damage to the drive shaft oil seal. Remove the drive shaft from the car and cover the hole in the transaxle to prevent dirt from entering. Discard the drive shaft snap ring. The installation procedure is a reversal of removal, ensuring the drive shaft joints and boots are usable, fitting a new snap ring, checking the transaxle oil seal for damage, and coating the steering knuckle inner oil seal with grease. Make sure the inner joint is properly seated in the transaxle, fit the drive shaft hub washer and nut, tighten the nut to the specified torque while an assistant applies the brakes and install a new split pin. Incorporate the requisite amount and kind of oil into transaxle lubrication. When renewing boots, it is essential to use the grease included in the repair kit. It is recommended to renew both drive shaft boots together. Take off the appropriate drive shaft, and the keepers, and pull the rubber boot back from the drive shaft inner joint. Take note of the where the inner joint housing is fixed, remove the large internal snap ring, and pull the trunnion and drive shaft assembly from the joint housing. Eliminate the surplus grease and the small retaining snap ring installed at the end of the drive shaft and then mark the installed position of the trunnion assembly and pull it off. Use a clean rag to wipe the inside of the joint housing, trunnion assembly, and drive shaft splines without solvent. When disassembling the drive shaft, mark the dynamic damper's installed position and remove the retaining clip. The outer joint boot retaining clip will need to be removed, and the rubber boot will be withdrawn and noted for its fitted position. Using the special grease supplied with the outer boot repair kit, remove as much old grease as possible from the outer drive shaft joint. Cover the splines on the inner end of the drive shaft with electrical tape and work the grease into the outer joint. Install the rubber boot over the shaft, fit and tighten the new small retaining clip, and where fitted install the dynamic damper. Place the small retaining clip and the new inner boot onto the drive shaft, then place the trunnion assembly and the small retaining snap ring. Placing the special grease in the inner joint housing, slide the joint housing onto the trunnion assembly and make sure it is seated properly. The large internal snap ring should be installed while excess grease is packed inside the rubber boot and the cavity inside the housing. Slide the rubber boot onto the inner joint housing and secure it with a small retaining clip. Remove surplus air from the boots and fit new large boot retaining clips to both rubber boots being replaced. Then tighten the clips appropriately before refitting the drive shaft.
Related Mitsubishi Parts
 Mitsubishi CV Joint
 Mitsubishi Axle Shaft
 Mitsubishi CV Boot
 Mitsubishi Differential Bearing
 Mitsubishi Differential Cover
 Mitsubishi Differential Seal
 Mitsubishi Driveshaft Center Support Bearing
 Mitsubishi Driveshaft Yokes
 Mitsubishi Radius Arm Bushing
 Mitsubishi Ring And Pinion
 Mitsubishi Slip Yoke
 Mitsubishi Universal Joint