×
- Hello
- Login or Register
- Quick Links
- Live Chat
- Track Order
- Parts Availability
- RMA
- Help Center
- Contact Us
- Shop for
- Mitsubishi Parts
My Garage
My Account
Cart
Genuine Mitsubishi Hood
Engine Hood- Select Vehicle by Model
- Select Vehicle by VIN
Select Vehicle by Model
orMake
Model
Year
Select Vehicle by VIN
For the most accurate results, select vehicle by your VIN (Vehicle Identification Number).
26 Hoods found

Mitsubishi Hood Part Number: 5900A746
$425.43 MSRP: $600.88You Save: $175.45 (30%)Ships in 1-2 Business Days
Mitsubishi Hood Part Number: MR241919
$436.56 MSRP: $616.62You Save: $180.06 (30%)Ships in 1-2 Business DaysMitsubishi Hood Part Number: 5900B129
$472.50 MSRP: $667.37You Save: $194.87 (30%)Ships in 1-2 Business Days
Mitsubishi Hood Part Number: 5900A512
$482.44 MSRP: $681.42You Save: $198.98 (30%)Ships in 1-2 Business DaysMitsubishi Hood Part Number: 5900A623
$494.77 MSRP: $698.83You Save: $204.06 (30%)Ships in 1-2 Business Days

Mitsubishi Hood Part Number: 5900A209
$497.72 MSRP: $703.00You Save: $205.28 (30%)Ships in 1-2 Business DaysMitsubishi Hood Part Number: MR508038
$500.87 MSRP: $707.45You Save: $206.58 (30%)Ships in 1-2 Business Days
Mitsubishi Hood Part Number: 5900A414
$503.05 MSRP: $710.51You Save: $207.46 (30%)Ships in 1-2 Business Days
Mitsubishi Hood Part Number: 5900A157
$524.89 MSRP: $741.37You Save: $216.48 (30%)Ships in 1-2 Business Days
Mitsubishi Hood Part Number: 5900A330
$576.47 MSRP: $814.22You Save: $237.75 (30%)Ships in 1-2 Business Days
Mitsubishi Hood Part Number: 5900B117
$587.62 MSRP: $829.97You Save: $242.35 (30%)Ships in 1-2 Business Days
Mitsubishi Hood Part Number: 5900A283
$105.52 MSRP: $146.55You Save: $41.03 (28%)Ships in 1-2 Business Days

Mitsubishi Hood Part Number: 5900A392
$191.88 MSRP: $260.00You Save: $68.12 (27%)Ships in 1-2 Business DaysMitsubishi Hood Part Number: MN150295
$143.91 MSRP: $194.00You Save: $50.09 (26%)Ships in 1-2 Business Days

Mitsubishi Hood Part Number: 65100W170P
$627.78 MSRP: $818.49You Save: $190.71 (24%)Ships in 1-2 Business Days
Mitsubishi Hood Part Number: 5900A586
$628.67 MSRP: $819.65You Save: $190.98 (24%)Ships in 1-2 Business DaysMitsubishi Hood Part Number: 5900A138
$642.01 MSRP: $837.04You Save: $195.03 (24%)Ships in 1-2 Business Days
Mitsubishi Hood Part Number: 5900A739
$715.43 MSRP: $932.77You Save: $217.34 (24%)Ships in 1-2 Business DaysMitsubishi Hood Part Number: 65100W000P
$733.62 MSRP: $956.48You Save: $222.86 (24%)Ships in 1-2 Business Days
Mitsubishi Hood Part Number: 5900A244
$865.07 MSRP: $1127.85You Save: $262.78 (24%)Ships in 1-2 Business Days
| Page 1 of 2 |Next >
1-20 of 26 Results
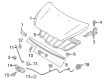
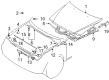
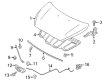
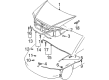
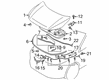
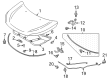
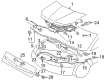
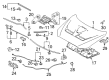
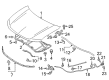
Mitsubishi Hood
Mitsubishi Hood gives good protection to the engine bay. It can be easily opened to check the engine, and its smooth surface directs air over the front of the car to cut down the drag. Constructed of heavy steel or lightweight fiberglass, the Hood can be installed to fit snugly between the fenders to prevent vibration and wind noise. The weather seals prevent rain and dust access to sensitive components. The Hood has balanced reinforcement ribs that make it strong without excess bulk. Owners have options to choose a primer coated panel that is ready to be custom painted or a gelcoat finish that saves weight and is lighter to lift. Both options leave the barrier strong without additional preparation work. Precise dimensions make all latches line up to make access easy and the exterior appearance uniform and tidy. Mitsubishi started in shipping and transitioned into cars and today strikes a balance between tradition and innovation. Its MIVEC engines combine fuel economy with snappy response, and Super All Wheel Control provides sure footing on gravel, snow, and wet roads. The firm tries plug-in hybrids, primitive safety sensors, cruise control, and smartphone connection to make trips easier and connected. Motivations include the ease with which Mitsubishi manufactures cars, their intelligent design and construction to accommodate everyday living and weekend outings. The desire to maintain high quality and yet provide practical value to a broad audience is evidenced by constant testing of new materials and drive systems.
Pick genuine OEM Hood if you want superb performance and durability that lasts. Mitsubishi builds that using high-grade materials and official factory techniques to meet very strict standards. This means you get parts you can actually trust for your daily drive. Finding the right parts is simple in the massive stock of genuine inventory. You can stop guessing if a part will fit or hold up. You will love the low prices, dependable service and the real manufacturer's warranty on Mitsubishi Hood. Order today and the store will ship your brand-new items to your door as fast as possible.
Mitsubishi Hood Parts Questions & Experts Answers
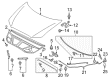
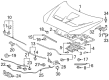
- Q: How to remove and install the Hood on Mitsubishi Lancer?A:To remove and install the Hood, first lift the Hood and place covers on both front mudguards and a heavy cloth behind each rear corner to prevent damage. To make installation easier, mark around the hinge plate with a lead pencil. To do this task you will require essential tools such as T15 torque bits, 10mm socket, and Phillips screwdriver. Lifting the Hood Disconnect the windscreen washer hose from the connector in the Hood's center. Remove the bolts retaining the hinges. With assistance, lift the Hood clear of the vehicle. For installation of hood, make sure to line up the marks made earlier, install and tighten retaining bolts and slowly shut the hood while checking for proper alignment and adjusting as needed. If necessary, adjust the height of the front Hoods by turning the rubber bump stops to align with the body. Check the Hood lock to ensure that it pops the Hood up when released. To adjust Hood horizontally, loosen the hinge retaining bolts to move the Hood so it is evenly spaced from adjacent panels. In order to facilitate the removal and installation of the Hood lock, remove the grille and front bumper, if any. Remove the retaining bolts on Hood lock assembly, detach cable of lock lever, and withdraw lock from vehicle. The order of reinstallation is reverse and connect the release cable properly. To renew the release cable, remove the Hood lock and splashguard, release the cable from the retainers and withdraw it from the conduit beneath the radiator support panel. Take out the screws holding the Hood release lever inside the vehicle, push it forward and pull it out. Gently pull the wire through the firewall grommet and withdraw the assembly. To install, put the release cable in the grommet hole, install the release lever and tighten the screws, feed the cable through the conduit and install the Hood lock.

Related Mitsubishi Parts
 Mitsubishi Emblem
 Mitsubishi Hood Latch
 Mitsubishi License Plate
 Mitsubishi Front Cross-Member
 Mitsubishi Body Mount Hole Plug
 Mitsubishi Door Screws
 Mitsubishi Fuel Door Hinge
 Mitsubishi Hood Hinge
 Mitsubishi Hood Release Cable
 Mitsubishi Liftgate Lift Support
 Mitsubishi Weather Strip
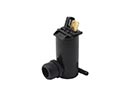 Mitsubishi Windshield Washer Pump