×
- Hello
- Login or Register
- Quick Links
- Live Chat
- Track Order
- Parts Availability
- RMA
- Help Center
- Contact Us
- Shop for
- Mitsubishi Parts
My Garage
My Account
Cart
Genuine Mitsubishi Lancer Hazard Warning Switch
Hazard Warning Emergency Light Switch- Select Vehicle by Model
- Select Vehicle by VIN
Select Vehicle by Model
orMake
Model
Year
Select Vehicle by VIN
For the most accurate results, select vehicle by your VIN (Vehicle Identification Number).
2 Hazard Warning Switches found

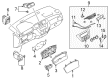
Mitsubishi Lancer Hazard Switch Part Number: MN185089
$50.60 MSRP: $70.28You Save: $19.68 (28%)Ships in 1-2 Business Days
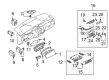
Mitsubishi Lancer Hazard Switch Part Number: MR406456
$53.62 MSRP: $74.47You Save: $20.85 (28%)Ships in 1-2 Business Days
Mitsubishi Lancer Hazard Warning Switch
OEM Hazard Warning Switch can boast superior quality and long-term durability. Each part meets strict factory specs and passes careful checks in production. So you'll get Hazard Warning Switch with long-lasting strength and an exact fit. If you need OEM Mitsubishi Lancer Hazard Warning Switch, the online store is the ideal place. The store carry a wide range of genuine Mitsubishi Lancer parts at the highly competitive prices. You'll enjoy a simple and no-hassle shopping experience. You'll get unbeatable prices and fast delivery service. You'll get the manufacturer's warranty and a straightforward return policy. Shop with confidence and keep your car in top condition.
Mitsubishi Lancer Hazard Warning Switch Parts Questions & Experts Answers
- Q: How to access and test A/C Switch, Brake Light Switch, Hazard Warning Switch and Relay on Mitsubishi Lancer?A:Most switches have three or more wires; one from power, one taking power to the component or relay, possibly another one for illumination which may necessitate a fourth wire to earth the bulb. To get to the switch, you must take off the component it is fixed on. Observe the wire colors joining the power source to the switch and that of the switch to the component. Utilize an ohmmeter to measure resistance across the terminals after disconnecting the wire, the switch should show no resistance in On position and open circuit in Off position. A relay is basically an electrical switch that is operated by the aid of a remote signal. That is, a relay can carry a bigger current than a small switch. Thus the relay has the advantage of not needing heavy-duty switches and thick wires. The contacts in the relay are closed by a solenoid when the component switch is ON to allow power flow. In the engine compartment fuse and relay box as well as under the dashboard, there are various relays. Due to different equipment levels, not all vehicles are fitted with all the relays. To test to check a relay, first remove it from its housing. Then use an ohmmeter to check the continuity between the terminals. Next apply battery power to the relay and check its functionality. A combination switch is a single unit that contains a headlamp and turn signal lamp switch on one side and a wiper and washer switch on the other side. These switches have individual component parts that can be re-newed. To remove and install the steering column, adjust the steering column out of the way. Remove the steering column retaining screws. Disconnect the steering column wiring. Perform the above steering column removal and installation procedures for the CE, CG and CH. The removal and installation procedures for the Hazard Warning Switch and ventilation control switches also include details on the wiring. The lower dash panel contains the rheostat, which requires removal of the panel for access. The reverse lamp switch is incorporated into the inhibitor switch on automatic models, while on manual models, the functionality of the switch should be checked and renewed if necessary. The Brake Light Switch requires tests, adjustments and renewals and handbrake warning lamp switch needs tests and retire if needed. The removal and installation of courtesy lamp switches in the doors and tailgates need to be done carefully so the wiring can connect securely.

Related Mitsubishi Lancer Parts
 Mitsubishi Lancer Instrument Cluster
 Mitsubishi Lancer Air Bag Sensor
 Mitsubishi Lancer Brake Light Switch
 Mitsubishi Lancer Door Jamb Switch
 Mitsubishi Lancer Headlight Switch
 Mitsubishi Lancer Neutral Safety Switch
 Mitsubishi Lancer Steering Column Cover
 Mitsubishi Lancer Temperature Sender
 Mitsubishi Lancer Transmission Control Module
 Mitsubishi Lancer Turn Signal Switch
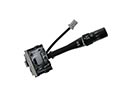 Mitsubishi Lancer Windshield Wiper Switch
 Mitsubishi Lancer Wiper Pulse Module