×
- Hello
- Login or Register
- Quick Links
- Live Chat
- Track Order
- Parts Availability
- RMA
- Help Center
- Contact Us
- Shop for
- Mitsubishi Parts
My Garage
My Account
Cart
Genuine Mitsubishi Lancer Oil Pan
Oil Drain Pan- Select Vehicle by Model
- Select Vehicle by VIN
Select Vehicle by Model
orMake
Model
Year
Select Vehicle by VIN
For the most accurate results, select vehicle by your VIN (Vehicle Identification Number).
6 Oil Pans found

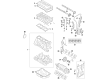
Mitsubishi Lancer Oil Pan Part Number: 1200A394
$244.68 MSRP: $345.60You Save: $100.92 (30%)Ships in 1-2 Business Days
Mitsubishi Lancer Oil Pan Part Number: MN187235
$265.25 MSRP: $374.66You Save: $109.41 (30%)Ships in 1-2 Business Days
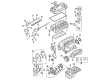
Mitsubishi Lancer Oil Pan Part Number: MD369654
$46.38 MSRP: $64.42You Save: $18.04 (28%)Ships in 1-2 Business Days
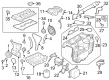
Mitsubishi Lancer Oil Pan Part Number: MN187236
$233.72 MSRP: $316.70You Save: $82.98 (27%)Ships in 1-2 Business Days
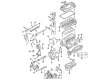
Mitsubishi Lancer Oil Pan Part Number: MN195078
$240.81 MSRP: $326.29You Save: $85.48 (27%)Ships in 1-2 Business Days
Mitsubishi Lancer Oil Pan Part Number: 1200A020
$240.81 MSRP: $326.29You Save: $85.48 (27%)Ships in 1-2 Business Days
Mitsubishi Lancer Oil Pan
Mitsubishi Lancer Oil Pan is an essential component of the wet sump system in the car that stores lubricating oil of the engine and supplies it when in need to prevent leaks. The location of the Oil Pan below the engine block gives it a low location in the lubrication path. By virtue of this position, applied oil caps off and flows back under the influence of gravity after reducing friction and drawing off heat. The oil is drawn from the Oil Pan by a pump and sent through critical engine passages. After that, the fluid returns to the Oil Pan. The closed construction confines the volume and helps maintain a steady feed during normal acceleration, braking, or cornering. Its location further acts as a barrier between the oil and debris from the road. This limits spillage, improving the operation's cleanliness as well. The Oil Pan's internal contours are constructed to fit around structural members while still offering enough capacity for the specified quantity of oil to be applied in the engine. All models of Mitsubishi that bear the name Lancer use this arrangement in the sump, and none are identified as having a different style. The component in question is essential for the daily functioning of a Mitsubishi Lancer. Furthermore, it simplifies the routine maintenance since the incorporated drain aperture allows the old oil to quickly remove by itself before the addition of fresh oil. As a result, every Mitsubishi Lancer powerplant is able to maintain long-term reliability due to this item.
OEM Oil Pan can boast superior quality and long-term durability. Each part meets strict factory specs and passes careful checks in production. So you'll get Oil Pan with long-lasting strength and an exact fit. If you need OEM Mitsubishi Lancer Oil Pan, the online store is the ideal place. The store carry a wide range of genuine Mitsubishi Lancer parts at the highly competitive prices. You'll enjoy a simple and no-hassle shopping experience. You'll get unbeatable prices and fast delivery service. You'll get the manufacturer's warranty and a straightforward return policy. Shop with confidence and keep your car in top condition.
Mitsubishi Lancer Oil Pan Parts Questions & Experts Answers
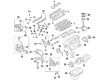
- Q: How to remove and install the Oil Pan and related engine components as described in the paragraph on Mitsubishi Lancer?A:To remove and install, first raise the front of the vehicle and support it securely on jack stands. Remove the bolts and scrivets retaining the right-hand side splashguard and withdraw the guard from the vehicle. Drain the engine oil into a suitable container if necessary, install a new O-ring to the drain plug, and tighten the plug to the specified torque. Remove the nuts retaining the engine pipe to the Exhaust Manifold, the retaining bolt to the bracket on the engine block, the two flange bolts at the catalytic converter, and both exhaust mounts to take out the front engine pipe. For models with air conditioning, remove the bolts retaining the air conditioning compressor to the bracket on the cylinder block and suspend the compressor with the hoses still attached using wire or rope. Next, remove the bolts retaining the air conditioning compressor support bracket to the cylinder block and withdraw the bracket from the engine compartment. If fitted, remove the bolts retaining the engine brace between the engine and transaxle, then remove the cover plate from between the Oil Pan and transmission. Remove the bolts retaining the Oil Pan to the cylinder block, ensuring to remove the lower Oil Pan bolt first on 2.0 litre models. Caution is advised on 2.0 litre models to avoid using a knife or seal cutter to separate the lower Oil Pan from the upper Oil Pan, as the upper Oil Pan is made of alloy and can be easily damaged; instead, use a rubber mallet to tap the lower Oil Pan along the side to break the seal. For all models except the 2.0 litre, with all retaining bolts removed, cut the bead of sealant between the cylinder block and Oil Pan using a sealant cutter or sharp knife, taking care not to damage the oil pump housing or any alloy components. On 2.0 litre models, remove the remaining bolts that retain the upper Oil Pan to the engine, using leveraging points to separate the upper Oil Pan from the engine. If required and where fitted, remove the bolts retaining the baffle plate inside the Oil Pan and remove the Oil Pan. If necessary, remove the bolts retaining the oil pump pickup pipe and withdraw the pipe from the engine compartment, discarding the gasket. Installation is a reversal of the removal procedure with attention to thoroughly cleaning the mating surfaces of the cylinder block and the Oil Pan, using a scraper or razor blade to remove old sealant, and cleaning the Oil Pan mating face with a solvent that will not leave a residue. Clean the oil pump pickup screen with solvent and blow dry with compressed air, checking the oil pump pickup for cracking, clogging, or other damage, as well as checking the Oil Pan for cracks and distortion or damage to the sealing surface, renewing components as necessary. If removed, install the baffle plate to the Oil Pan and tighten the bolts to the specified torque, then install the oil pump pickup if it was removed. Apply a 4 mm wide bead of Loctite Blue Maxx or equivalent sealant to the Oil Pan mating surface, and place the Oil Pan onto the cylinder block, installing the retaining bolts and tightening them to the specified torque, following the correct tightening order for the respective models. Remove all traces of the sealant squeezed out on the flywheel side of the Oil Pan, and for 2.0 litre models, install the lower Oil Pan to the upper Oil Pan using the same procedure. Install the air conditioning compressor bracket and the compressor, then refill the engine using the specified grade and quantity of engine oil, waiting at least 30 minutes to allow the sealant to cure before filling the Oil Pan with engine oil. Finally, start the engine and ensure that the oil pressure warning lamp extinguishes after a short period, checking for oil leaks and rectifying as necessary.

Related Mitsubishi Lancer Parts
 Mitsubishi Lancer Engine Cover
 Mitsubishi Lancer Timing Belt
 Mitsubishi Lancer Crankshaft Pulley
 Mitsubishi Lancer Cylinder Head Gasket
 Mitsubishi Lancer Engine Oil Cooler
 Mitsubishi Lancer Exhaust Valve
 Mitsubishi Lancer Oil Filler Cap
 Mitsubishi Lancer Oil Pump
 Mitsubishi Lancer Piston Ring Set
 Mitsubishi Lancer Rod Bearing
 Mitsubishi Lancer Variable Timing Solenoid
 Mitsubishi Lancer Variable Timing Sprocket
Browse by Year
2017 2016 2015 2014 2013 2012 2011 2010 2009 2008 2007 2006 2005 2004 2003 2002