×
- Hello
- Login or Register
- Quick Links
- Live Chat
- Track Order
- Parts Availability
- RMA
- Help Center
- Contact Us
- Shop for
- Mitsubishi Parts
My Garage
My Account
Cart
Genuine Mitsubishi Lancer Radiator
Cooling Radiator- Select Vehicle by Model
- Select Vehicle by VIN
Select Vehicle by Model
orMake
Model
Year
Select Vehicle by VIN
For the most accurate results, select vehicle by your VIN (Vehicle Identification Number).
5 Radiators found


Mitsubishi Lancer Radiator Part Number: MZ690911
$68.89 MSRP: $136.68You Save: $67.79 (50%)Ships in 1-2 Business Days
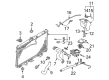
Mitsubishi Lancer Radiator Part Number: MR464612
$580.74 MSRP: $820.25You Save: $239.51 (30%)Ships in 1-2 Business Days
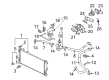
Mitsubishi Lancer Radiator Part Number: MZ691046
$146.37 MSRP: $199.00You Save: $52.63 (27%)Ships in 1-2 Business Days
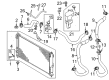
Mitsubishi Lancer Radiator Part Number: MZ690913
$173.43 MSRP: $235.00You Save: $61.57 (27%)Ships in 1-2 Business Days
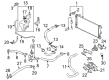
Mitsubishi Lancer Radiator Assembly Part Number: MZ690912
$196.57 MSRP: $266.35You Save: $69.78 (27%)Ships in 1-2 Business Days
Mitsubishi Lancer Radiator
Mitsubishi Lancer Radiator cools down the engine by transferring heat from the circulating coolant to the flow of air from the front grille. The Radiator is a type of heat exchanger comprising a core of narrow tubes connected by thin metal fins which create a large surface area to promote a rapid transfer of heat from the fluid as air flows through it. An upper or side inlet tank allows hot coolant to flow into the tubes, while the fins conduct the heat captured into the surrounding air. Mechanically and through convection, the lower or opposite outlet tank returns cooled liquid to the engine so temperature is kept within limits. Positioned at the front of the body of the Lancer, it utilizes airflow produced during driving conditions to increase efficiency without any moving components. Mitsubishi Radiator units use aluminum cores along with plastic or aluminum tanks since aluminum is great for quickly passing heat. There are also copper and brass variants known for conductivity. The effectiveness of the device essentially depends on how quickly the fins can soak up the heat from the tubes and pass it to the air that flows past. In fact, stronger airflow helps this heat transfer and prevents overheating under different conditions. The pressurized design leads to leaks being a common failure. Small pinholes may be repairable with brazing, soldering, or welding. However, severe damage generally warrants a full Radiator replacement to ensure reliable cooling. This assembly is extremely durable and is component of all Mitsubishi cooling systems fitted into a Lancer. Thus, it ensures that the Mitsubishi powerplant in every Lancer runs cool.
OEM Radiator can boast superior quality and long-term durability. Each part meets strict factory specs and passes careful checks in production. So you'll get Radiator with long-lasting strength and an exact fit. If you need OEM Mitsubishi Lancer Radiator, the online store is the ideal place. The store carry a wide range of genuine Mitsubishi Lancer parts at the highly competitive prices. You'll enjoy a simple and no-hassle shopping experience. You'll get unbeatable prices and fast delivery service. You'll get the manufacturer's warranty and a straightforward return policy. Shop with confidence and keep your car in top condition.
Mitsubishi Lancer Radiator Parts Questions & Experts Answers
- Q: How to remove and reinstall a radiator on Mitsubishi Lancer?A:Begin by disconnecting the negative battery terminal before draining the cooling system and removing radiator. Disconnect the wiring connectors from the cooling fan and, if fitted, the air conditioning condenser fan. For automatic transaxle models, disconnect the oil cooler hoses from the lower radiator tank hoses. Seal the hoses and all oil cooler fittings to prevent fluid loss and dirt entry. Remove the upper and lower hoses from the radiator as well as the overflow hose from the radiator filler neck. Take away the bolts that hold the radiator mounting brackets to radiator support panel in place. Then, withdraw the brackets. Ensure that you carefully remove the radiator and cooling fan assembly from the engine bay while being careful not to damage the core of the radiator. If necessary, detach the mounting rubbers from the pegs on the lower radiator tank and remove the bolts securing the fan(s) to clear the radiator. When the radiator is out of the car for an extended period, immerse it in coolant or keep it full. This will prevent internal deposits from drying out and blocking the tubes, which would otherwise cause overheating when it is reinstalled. To flush and clean the radiator, once removed, install the radiator cap securely and turn it upside down. Place a hose in the radiator outlet fitting, seal with cloth, reverse flush until the outflow is clean and clear. If there is too much back pressure or too little flow, it may mean that core tubes are well blocked and a radiator specialist is required to repair it. Flushing direction reversal may be required several times to dislodge all deposits, thereafter, it is recommended to apply water or compressed air to the radiator core from the rear to the front opening until post flushing dirt disappears. Here a reasonable distance must be maintained to avoid damage. To install, reverse the removal procedure, making sure that if the fan(s) were removed, they are installed tightly with the retaining bolts. Ensure the mounting rubbers are in position and condition, change if they are not Install the radiator carefully, ensuring that the lower mounting rubbers on the lower mounting apertures are fully inserted and installing the mounting brackets and tightening them to the specified torque. For automatic transaxle models, the hoses of the oil cooler are connected to the lower tank of the radiator, followed by the upper and lower hoses of the radiator. The overflow hose is also added. Reattach the electrical connections of the cooling fan and the AC condenser fan, if any. The cooling system should be refilled and, for automatic transaxle models, inspect the transaxle fluid level and top up if necessary. Finally, you should run the engine and check the cooling system for leaks at normal operating temperature. Also verify correct operation of the cooling fan. Carry out repairs as needed. It can be advisable removing the radiator and taking it to a specialist as it may require the use of tools not on site.

Related Mitsubishi Lancer Parts
 Mitsubishi Lancer Coolant Reservoir
 Mitsubishi Lancer Radiator Cap
 Mitsubishi Lancer Radiator Hose
 Mitsubishi Lancer Water Pump
 Mitsubishi Lancer Coolant Reservoir Cap
 Mitsubishi Lancer Cooling Fan Module
 Mitsubishi Lancer Cooling Hose
 Mitsubishi Lancer Engine Cooling Fan
 Mitsubishi Lancer Fan Blade
 Mitsubishi Lancer Fan Shroud
 Mitsubishi Lancer Thermostat Housing
 Mitsubishi Lancer Water Pump Pulley