×
- Hello
- Login or Register
- Quick Links
- Live Chat
- Track Order
- Parts Availability
- RMA
- Help Center
- Contact Us
- Shop for
- Mitsubishi Parts
My Garage
My Account
Cart
Genuine Mitsubishi Montero Piston Ring Set
Piston Ring- Select Vehicle by Model
- Select Vehicle by VIN
Select Vehicle by Model
orMake
Model
Year
Select Vehicle by VIN
For the most accurate results, select vehicle by your VIN (Vehicle Identification Number).
2 Piston Ring Sets found

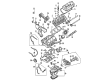
Mitsubishi Montero Piston Ring Set Part Number: MD329755
$240.09 MSRP: $339.12You Save: $99.03 (30%)Ships in 1-2 Business Days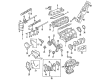
Mitsubishi Montero Piston Rings Part Number: MN183867
$78.80 MSRP: $109.45You Save: $30.65 (28%)Ships in 1-2 Business Days
Mitsubishi Montero Piston Ring Set
OEM Piston Ring Set can boast superior quality and long-term durability. Each part meets strict factory specs and passes careful checks in production. So you'll get Piston Ring Set with long-lasting strength and an exact fit. If you need OEM Mitsubishi Montero Piston Ring Set, the online store is the ideal place. The store carry a wide range of genuine Mitsubishi Montero parts at the highly competitive prices. You'll enjoy a simple and no-hassle shopping experience. You'll get unbeatable prices and fast delivery service. You'll get the manufacturer's warranty and a straightforward return policy. Shop with confidence and keep your car in top condition.
Mitsubishi Montero Piston Ring Set Parts Questions & Experts Answers
- Q: How should the end gaps of a Piston Ring Set be checked and corrected before installation on Mitsubishi Montero?A:It must be assumed the piston ring side clearance has been checked OK before checking the ring end gaps on the new piston rings fitted. Before performing the end gap measurement and engine assembly, lay out all piston/connecting rod assemblies and new rings sets in a way that they will match with the same piston and cylinder. Place the top ring into the first cylinder, square it with the cylinder walls and push it in with the top of the piston. Position the ring near the bottom of the cylinder, at the lower limit of ring travel. To ascertain the end gap, a set of feeler gauges is to be slipped between the ring ends until the one with the same width as the gap is found, which should slide between the ring ends wit minor drag. If the gap is reduced too much, it should be opened out so that the ring ends do not touch each other when the engine is in operation. The end gap can be increased by carefully filing the ring ends down from the outside in. Unless the excess end gap is greater than 0.040-inch, it does not matter, so double-check that you're using the right rings. Repeat for each ring in the first cylinder and in remaining cylinders by keeping rings, pistons and cylinders matched. After the ring end gaps have been verified and adjusted, the next step is to install the rings on the pistons, like that on the oil control ring made up of three parts. Either a spacer or particularly an expander must be slip in the groove. Aluminum foil is added for the hydrodynamic oil supply. The anti-rotation tang must insert in the drilled hole of the ring groove. The lower side-railer must be installed by hand without a piston ring installation tool. This also applies to the rubber so-called oil dam rings. With the rubber rings, the spacer must slip onto the foil. Insert one end of the side rail into the groove and push it into place with a finger, then similarly install the upper side rail. Once the three oil ring parts are installed, check that both side rails can easily rotate in the groove. After that, install the middle ring. Ensure that the stamped mark is facing upward, toward the top of the piston. Use a piston ring installation tool to slip the ring into the middle groove. Take care not to expand it more than necessary. Lastly, install the top ring in similar fashion in the same rotational position, marking the up position, and repeat for the 3 other pistons and rings.
Related Mitsubishi Montero Parts
 Mitsubishi Montero Timing Belt
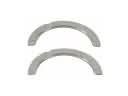 Mitsubishi Montero Crankshaft Thrust Washer
 Mitsubishi Montero Exhaust Valve
 Mitsubishi Montero Harmonic Balancer
 Mitsubishi Montero Intake Valve
 Mitsubishi Montero Oil Pump
 Mitsubishi Montero Timing Cover
 Mitsubishi Montero Valve Cover
 Mitsubishi Montero Valve Cover Gasket
 Mitsubishi Montero Valve Lifter
 Mitsubishi Montero Valve Spring Retainer
 Mitsubishi Montero Valve Stem Oil Seal