×
- Hello
- Login or Register
- Quick Links
- Live Chat
- Track Order
- Parts Availability
- RMA
- Help Center
- Contact Us
- Shop for
- Mitsubishi Parts
My Garage
My Account
Cart
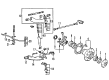
Genuine Mitsubishi Montero Shock Absorber
Suspension Shock Absorber- Select Vehicle by Model
- Select Vehicle by VIN
Select Vehicle by Model
orMake
Model
Year
Select Vehicle by VIN
For the most accurate results, select vehicle by your VIN (Vehicle Identification Number).
7 Shock Absorbers found


Mitsubishi Montero Shock Absorber Part Number: 4162A023
$125.20 MSRP: $169.65You Save: $44.45 (27%)Ships in 1-2 Business Days

Mitsubishi Montero Shock Absorber Part Number: 4062A003
$152.36 MSRP: $206.45You Save: $54.09 (27%)Ships in 1-2 Business Days
Mitsubishi Montero Shock Absorber, Passenger Side Part Number: MR353808
$75.13 MSRP: $104.36You Save: $29.23 (29%)Ships in 1-2 Business DaysMitsubishi Montero Shock Absorber, Driver Side Part Number: MR353807
$75.13 MSRP: $104.36You Save: $29.23 (29%)Ships in 1-2 Business DaysMitsubishi Montero Shock Absorber Part Number: MR267960
$79.01 MSRP: $109.73You Save: $30.72 (28%)Ships in 1-2 Business Days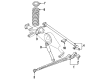
Mitsubishi Montero Shock Absorber Part Number: MR353811
$103.64 MSRP: $143.96You Save: $40.32 (29%)Ships in 1-2 Business DaysMitsubishi Montero Shock Absorber Part Number: MB663364
$105.25 MSRP: $146.18You Save: $40.93 (28%)Ships in 1-2 Business Days
Mitsubishi Montero Shock Absorber
OEM Shock Absorber can boast superior quality and long-term durability. Each part meets strict factory specs and passes careful checks in production. So you'll get Shock Absorber with long-lasting strength and an exact fit. If you need OEM Mitsubishi Montero Shock Absorber, the online store is the ideal place. The store carry a wide range of genuine Mitsubishi Montero parts at the highly competitive prices. You'll enjoy a simple and no-hassle shopping experience. You'll get unbeatable prices and fast delivery service. You'll get the manufacturer's warranty and a straightforward return policy. Shop with confidence and keep your car in top condition.
Mitsubishi Montero Shock Absorber Parts Questions & Experts Answers
- Q: Should both rear shock absorbers be replaced at the same time when one is defective on Mitsubishi Montero?A:It is recommended to change out both shocks on the rear of the vehicle if the shock absorber is to be replaced with a new one. To start, follow the jacking and towing procedures to raise and support se rear of the vehicle. Employ a jack to elevate the differential until the tires are off the ground. Place jackstands beneath the axle housing. Do not attempt the shock absorber removal with the vehicle raised and the axle unsupported, caution. The next step is to unscrew and remove the lower shock absorber mounting nut to detach one side at the spring seat and then unscrew and remove the upper mounting nut at the frame to pull out the shock absorber. In case of having remote controlled variable shock absorbers (if any), actuator assembly must be removed before taking out the shock absorber. Your full-text must consist of about 125 words. To install the shocks, reverse the order of removal. Ensure that the vehicle is free standing on the ground before tightening the mounting nuts. Finally, bounce the back of the vehicle a couple of times to settle the bushings before tightening the nuts properly.
- Q: How to remove and install shock absorbers on Mitsubishi Montero?A:Jack up the front of the vehicle and place it securely on jackstands, then remove the front wheels. Next, take off the nuts holding the shock absorber to the upper mount, using locking pliers on the flats at the top of the shock rod to prevent it from turning. If the vehicle has remote-controlled variable shock absorbers, loosen the two bolts securing the actuator assembly to the shock absorber stud end, then remove the upper shock absorber hold-down nut and actuator mounting bracket, followed by the lower shock absorber hold-down nut and actuator washer assembly with the stud pin, taking care not to bend the stud pin. After that, remove the upper washer and rubber cushion from the shock absorber shaft. For 2WD models, remove the two bolts securing the shock absorber to the lower arm from below, lower the shock absorber through the lower arm, and take it out of the vehicle. For 4WD models, remove the two shock absorber-to-lower Control Arm bolts from the upper surface of the arm, fully compress the shock absorber, and lift it up and over the arm to remove it. Finally, installation follows the reverse order of removal, ensuring that the washers and bushings are assembled correctly and that all bolts and nuts are tightened securely.
Related Mitsubishi Montero Parts
 Mitsubishi Montero Axle Support Bushings
 Mitsubishi Montero Coil Spring Insulator
 Mitsubishi Montero Control Arm
 Mitsubishi Montero Control Arm Nut
 Mitsubishi Montero Differential Mount
 Mitsubishi Montero Radius Arm
 Mitsubishi Montero Sway Bar Bracket
 Mitsubishi Montero Sway Bar Link
 Mitsubishi Montero Track Bar
 Mitsubishi Montero Trailing Arm
 Mitsubishi Montero Trailing Arm Bushing
 Mitsubishi Montero Wheel Hub