×
- Hello
- Login or Register
- Quick Links
- Live Chat
- Track Order
- Parts Availability
- RMA
- Help Center
- Contact Us
- Shop for
- Mitsubishi Parts
My Garage
My Account
Cart
Genuine Mitsubishi Montero Control Arm
Suspension Arm- Select Vehicle by Model
- Select Vehicle by VIN
Select Vehicle by Model
orMake
Model
Year
Select Vehicle by VIN
For the most accurate results, select vehicle by your VIN (Vehicle Identification Number).
7 Control Arms found


Mitsubishi Montero Lower Control Arm, Driver Side Part Number: MR496795
$243.88 MSRP: $344.47You Save: $100.59 (30%)Ships in 1-2 Business Days
Mitsubishi Montero Upper Control Arm, Driver Side Part Number: 4010A139
$272.18 MSRP: $384.43You Save: $112.25 (30%)Ships in 1-2 Business DaysMitsubishi Montero Lower Control Arm, Passenger Side Part Number: MR496796
$299.28 MSRP: $422.72You Save: $123.44 (30%)Ships in 1-2 Business DaysMitsubishi Montero Upper Control Arm, Passenger Side Part Number: 4010A140
$329.35 MSRP: $465.19You Save: $135.84 (30%)Ships in 1-2 Business Days
Mitsubishi Montero Upper Control Arm, Passenger Side Part Number: MR296094
$161.33 MSRP: $218.60You Save: $57.27 (27%)Ships in 1-2 Business DaysMitsubishi Montero Upper Control Arm, Driver Side Part Number: MR296093
$161.33 MSRP: $218.60You Save: $57.27 (27%)Ships in 1-2 Business Days
Mitsubishi Montero Lower Control Arm, Passenger Side Part Number: MN161354
$288.32 MSRP: $407.23You Save: $118.91 (30%)Ships in 1-2 Business Days
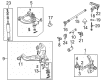
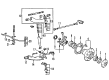
Mitsubishi Montero Control Arm
OEM Control Arm can boast superior quality and long-term durability. Each part meets strict factory specs and passes careful checks in production. So you'll get Control Arm with long-lasting strength and an exact fit. If you need OEM Mitsubishi Montero Control Arm, the online store is the ideal place. The store carry a wide range of genuine Mitsubishi Montero parts at the highly competitive prices. You'll enjoy a simple and no-hassle shopping experience. You'll get unbeatable prices and fast delivery service. You'll get the manufacturer's warranty and a straightforward return policy. Shop with confidence and keep your car in top condition.
Mitsubishi Montero Control Arm Parts Questions & Experts Answers
- Q: How to properly remove and replace the front lower Control Arm on 2WD and 4WD on Mitsubishi Montero?A:Loosen the wheel lug nuts, raise the front of the vehicle, and support it securely on jackstands before removing the wheel. For 2WD models, remove the spring and steering knuckle, then take off the pivot shaft nuts and pull the shaft out or drive it out with a hammer and drift punch to detach the lower arm. In 4WD models, remove the Torsion Bar and unbolt the lower balljoint from the control arm, then take off the lower arm pivot nuts and shafts to lower the arm from the vehicle. Inspect the lower arm bushings for deterioration, cracking, and other damage; if replacement is needed, take the lower arm to an automotive machine shop for bushing replacement. For 2WD models, slip the pivot shaft into the cross member and through the control arm and bushing from the rear, using a soft-face hammer to tap it into place, then install the lock washers and nuts at the rear and the washer and nut at the front of the pivot shaft. Position the arm at normal ride height with a jack and tighten the nuts to the specified torque. For 4WD models, connect the balljoint to the lower arm and install the bolts and nuts, then position the arm at normal ride height and tighten the pivot shaft nuts to torque before installing the torsion bar. Finally, install the wheel and lug nuts, lower the vehicle, and tighten the lug nuts to the specified torque, then drive the vehicle to an alignment shop for a front end alignment check and adjustment if necessary.
Related Mitsubishi Montero Parts
 Mitsubishi Montero Axle Support Bushings
 Mitsubishi Montero Ball Joint
 Mitsubishi Montero Coil Spring Insulator
 Mitsubishi Montero Control Arm Bushing
 Mitsubishi Montero Shock Absorber
 Mitsubishi Montero Steering Knuckle
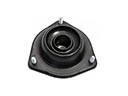 Mitsubishi Montero Strut Mounts
 Mitsubishi Montero Sway Bar Link
 Mitsubishi Montero Sway Bar Link Bushing
 Mitsubishi Montero Torsion Bar
 Mitsubishi Montero Wheel Hub
 Mitsubishi Montero Wheel Seal
Browse by Year
2006
2005
2004
2003
2002
2001
2000
1999
1998
1997
1996
1995
1994
1993
1992