×
- Hello
- Login or Register
- Quick Links
- Live Chat
- Track Order
- Parts Availability
- RMA
- Help Center
- Contact Us
- Shop for
- Mitsubishi Parts
My Garage
My Account
Cart
Genuine Mitsubishi Crankshaft
Crank Shaft- Select Vehicle by Model
- Select Vehicle by VIN
Select Vehicle by Model
orMake
Model
Year
Select Vehicle by VIN
For the most accurate results, select vehicle by your VIN (Vehicle Identification Number).
14 Crankshafts found

Mitsubishi Crankshaft Part Number: 12200W000P
$583.18 MSRP: $823.70You Save: $240.52 (30%)Ships in 1-2 Business Days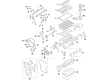
Mitsubishi Crankshaft Part Number: MD346024
$777.27 MSRP: $1013.39You Save: $236.12 (24%)Ships in 1-2 Business Days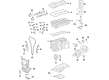
Mitsubishi Crankshaft Part Number: 1100A350
$933.29 MSRP: $1216.80You Save: $283.51 (24%)Ships in 1-2 Business Days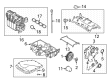
Mitsubishi Crankshaft Part Number: MQ718259
$962.63 MSRP: $1255.06You Save: $292.43 (24%)Ships in 1-2 Business DaysProduct Specifications- Other Name: Crankshaft Assembly
Mitsubishi Crankshaft Part Number: 1100A139
$1027.98 MSRP: $1340.26You Save: $312.28 (24%)Ships in 1-2 Business Days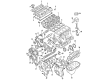
Mitsubishi Crankshaft Part Number: 1100A190
$1098.10 MSRP: $1431.68You Save: $333.58 (24%)Ships in 1-2 Business Days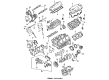
Mitsubishi Crankshaft Part Number: MD144525
$1098.59 MSRP: $1432.32You Save: $333.73 (24%)Ships in 1-2 Business Days
Mitsubishi Crankshaft Part Number: 1100A231
$1123.04 MSRP: $1464.20You Save: $341.16 (24%)Ships in 1-2 Business Days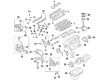
Mitsubishi Crankshaft Part Number: MD357543
$1133.14 MSRP: $1477.37You Save: $344.23 (24%)Ships in 1-2 Business Days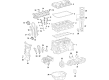
Mitsubishi Crankshaft Part Number: 1100A233
$1145.51 MSRP: $1493.49You Save: $347.98 (24%)Ships in 1-2 Business Days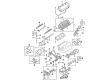
Mitsubishi Crankshaft Part Number: MD377545
$1156.74 MSRP: $1508.14You Save: $351.40 (24%)Ships in 1-2 Business Days
Mitsubishi Crankshaft Part Number: MD318150
$1232.99 MSRP: $1607.56You Save: $374.57 (24%)Ships in 1-2 Business Days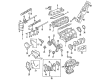
Mitsubishi Crankshaft Part Number: MN158813
$1314.83 MSRP: $1591.80You Save: $276.97 (18%)Ships in 1-2 Business Days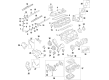
Mitsubishi Crankshaft Part Number: 1100A252
$1376.00 MSRP: $1665.86You Save: $289.86 (18%)Ships in 1-2 Business Days
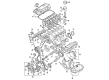
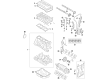
Mitsubishi Crankshaft
The Crankshaft converts the straight power pulses of combustion into steady spin to keep the drive train in motion. Because of this, every Mitsubishi model gets dependable rhythm and quick response. Through the wider family, Mitsubishi focuses on practical innovation that suits daily drivers. Fuel-saving MIVEC engines are blended with available plug-in hybrid systems that stretch range while Super All Wheel Control steadies the car on gravel or wet pavement. Blending a relaxing atmosphere with connectivity, comfortable cabins gain cruise control and smartphone link to minimize stress during the drive. Ongoing experiments with fuel cells and smart safety sensors show how Mitsubishi continues to innovate without complicating use. This measured approach creates vehicles that are easy to live with yet ready for adventure, generating confidence in the mechanical components hidden under the skin. One of the chiefly important components of the engine is the Crankshaft. It is located deep inside the engine block and accepts the up and down motion of the piston and converts it into rotational energy. This rotational energy turns the auxiliary belts, which ultimately drive the transmission and then the wheels. The forged steel versions offer enhanced strength for handling high-output setups, and the cast iron units are capable of handling moderate loads and provide lasting reliability. Both the forged and cast iron versions are provided with clean pressurized oil. The oil also creates a protective film on every journal. Regularly changing the oil will help the Crankshaft avoid scoring or vibration to last the life of the vehicle and maintain engine balance. Mitsubishi is known for a strong mechanical design philosophy.
Pick genuine OEM Crankshaft if you want superb performance and durability that lasts. Mitsubishi builds that using high-grade materials and official factory techniques to meet very strict standards. This means you get parts you can actually trust for your daily drive. Finding the right parts is simple in the massive stock of genuine inventory. You can stop guessing if a part will fit or hold up. You will love the low prices, dependable service and the real manufacturer's warranty on Mitsubishi Crankshaft. Order today and the store will ship your brand-new items to your door as fast as possible.
Mitsubishi Crankshaft Parts Questions & Experts Answers
- Q: How can the crankshaft be removed and installed in an engine on Mitsubishi Galant?A:The crankshaft can be removed only after the engine is taken out of the vehicle. This is possible only when the flywheel, crankshaft pulley, timing belt, oil pan, oil pump body, oil filter and piston/connecting rod assemblies are removed. Prior to removal, measure the crankshaft endplay with a dial gauge against the crankshaft. Position the crankshaft rearward and zero the indicator. Then position the crankshaft forward and check the reading. It should typically be about 0.003 to 0.010 inch (0.076 to 0.254 mm). If a dial indicator is not available, clearance can be checked using feeler gauges. Gradually loosen the main bearing cap assembly bolts, gently tap the assembly with a soft-face hammer and lift it off. It is preferable to enlist the help of an assistant to lift the crankshaft. Before installation, make sure the engine block and crankshaft are clean and checked. Turn the block upside down, remove the main bearing cap assembly, and clean the bearing surfaces. Place the set of upper bearing inserts into the main bearing housing(journal) ensuring the oil holes are aligned. The set of lower inserts is placed in the main bearing cap assembly. The crankshaft needs to be cleaned after checking the oil holes for dirt. Position the crankshaft and check the main bearing oil clearance using Plastigage without disturbing it during assembly. Once the bolts have been tightened, take off the cap assembly and measure the Plastigage width against the scale. If clearances are not good, check for cleanliness and consider different inserts if necessary. Remove any Plastigage from the surfaces of the journal and insert. Apply a thin film of grease or engine assembly lube to the bearing surfaces. Then reinstall the crankshaft. Make sure that the main bearing assembly is correctly orientated, install it and tighten. Examine the crankshaft endplay again and rotate the crankshaft to check for binding, ensuring it rotates smoothly. Last step, replace the rear main oil seal.
- Q: How to properly prepare a crankshaft for reassembly on Mitsubishi Montero?A:Ensure all burrs have been removed from the oil holes of the crankshaft with the help of a stone, file or scraper. The oil holes must also be chamfered. A sharp edge may damage the new bearings after the crankshaft is rebuilt. If possible, use compressed air to dry out the crankshaft after cleaning with solvent. Examine the main and connecting rod bearing journals for abnormal wear, scoring, pits, and cracks. Rub a penny across each of the journals a few times, copper must rub off and embed itself into the crankshaft. If it does so, then the journals must be reground. Examine the crankshaft for cracks, breaks, or other damage. A process called magnafluxing is useful for indicating hidden damage, and this is handled by an automotive machine shop. Measure the diameters at several points using a micrometer to detect taper and out-of-round conditions. Measurement should be taken at both ends of the journal just in front of the crank throws. Take the crankshaft to an automotive machine shop for re-grinding if the journals are damaged, tapered, out-of-round, or worn beyond specified limits; if the crank is reconditioned, it should use the correct size bearing inserts. Examine the oil seal journals at both ends of the crankshaft for wear and damage. If they have grooves or nicks, new seals will leak when assembled. Occasionally an automotive machine shop may repair the journal with a thin sleeve. If not, a new/different crankshaft should be installed. Examine the main and rod bearing inserts finally.
Related Mitsubishi Parts
 Mitsubishi Oil Filter
 Mitsubishi Timing Belt
 Mitsubishi Valve Cover Gasket
 Mitsubishi Crankshaft Gear
 Mitsubishi Crankshaft Timing Gear
 Mitsubishi Engine Mount Torque Strut
 Mitsubishi Oil Filler Cap
 Mitsubishi Oil Pan Baffle
 Mitsubishi Rod Bearing
 Mitsubishi Timing Belt Idler Pulley
 Mitsubishi Timing Chain Tensioner
 Mitsubishi Transmission Drain Plug
Browse by Model
3000GT Crankshaft Diamante Crankshaft Eclipse Crankshaft Eclipse Cross Crankshaft Endeavor Crankshaft Expo Crankshaft Expo LRV Crankshaft Galant Crankshaft Lancer Crankshaft Mighty Max Crankshaft Montero Crankshaft Montero Sport Crankshaft Outlander Crankshaft Outlander PHEV Crankshaft Outlander Sport Crankshaft Sigma Crankshaft