×
- Hello
- Login or Register
- Quick Links
- Live Chat
- Track Order
- Parts Availability
- RMA
- Help Center
- Contact Us
- Shop for
- Mitsubishi Parts
My Garage
My Account
Cart
Genuine Mitsubishi Galant Timing Belt
Engine Timing Belt- Select Vehicle by Model
- Select Vehicle by VIN
Select Vehicle by Model
orMake
Model
Year
Select Vehicle by VIN
For the most accurate results, select vehicle by your VIN (Vehicle Identification Number).
11 Timing Belts found


Mitsubishi Galant Timing Belt Part Number: MD336149
$52.76 MSRP: $73.28You Save: $20.52 (28%)Ships in 1-2 Business Days
Mitsubishi Galant Timing Belt Part Number: MR994968
$68.92 MSRP: $95.72You Save: $26.80 (28%)Ships in 1-2 Business Days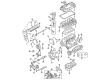
Mitsubishi Galant Timing Belt Part Number: 1145A045
$71.68 MSRP: $99.55You Save: $27.87 (28%)Ships in 1-2 Business Days
Mitsubishi Galant Timing Belt Part Number: MD182294
$88.00 MSRP: $122.22You Save: $34.22 (28%)Ships in 1-2 Business Days
Mitsubishi Galant Timing Belt Part Number: MD307487
$88.44 MSRP: $122.84You Save: $34.40 (28%)Ships in 1-2 Business Days
Mitsubishi Galant Belt Part Number: 1145A046
$72.10 MSRP: $100.13You Save: $28.03 (28%)Ships in 1-2 Business Days
Mitsubishi Galant Timing Belt Part Number: MD326059
$128.67 MSRP: $174.35You Save: $45.68 (27%)Ships in 1-2 Business Days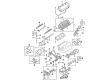
Mitsubishi Galant Timing Belt Part Number: 1145A043
$131.40 MSRP: $178.06You Save: $46.66 (27%)Ships in 1-2 Business Days
Mitsubishi Galant Timing Belt Part Number: MR984778
$43.52 MSRP: $57.11You Save: $13.59 (24%)Ships in 1-2 Business Days
Mitsubishi Galant Timing Belt Part Number: MD111427
$114.55 MSRP: $159.09You Save: $44.54 (28%)Ships in 1-2 Business Days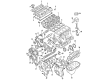
Mitsubishi Galant Timing Belt Part Number: MD331076
$123.71 MSRP: $167.63You Save: $43.92 (27%)Ships in 1-2 Business Days
Mitsubishi Galant Timing Belt
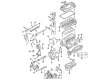
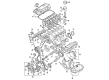
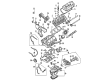
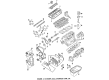
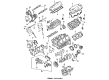
Mitsubishi Galant Timing Belt is a toothed drive belt that connects the crankshaft and camshaft to ensure the precise timing of valve operation with piston travel. This configuration allows the Mitsubishi Galant engine to inhale and ignite at the right times, which ensures smooth power delivery while also preventing contact between the piston and open valves inside the internal components. The Mitsubishi powerplant of Galant is brought consistently into time by a dedicated tensioner that applies constant pressure and idler pulleys that guide the loop. If the belt stretches, loses teeth, becomes cracked, oil-contaminated, or coolant-contaminated, timing can shift. This results in rough running or non-starting of the engine. A complete break will stop the vehicle immediately. A failure of this type can allow pistons to strike valves and cause a lot of damage because many Galant engines are interference designs. Not servicing the Timing Belt at the replacement interval shown in the owner's manual adds risk of inspection for fraying, exposed fibers, or missing teeth. In connection with the installation of a new Timing Belt, the automatic tensioner and idler pulleys should also generally be renewed, with the water pump, a component often driven by this Timing Belt, usually changing at the same time to avoid unnecessary labor. This arrangement for maintaining the Mitsubishi system keeps each power stroke correctly timed, never allowing a Galant journey to be interrupted by timing failure that could have been prevented.
OEM Timing Belt can boast superior quality and long-term durability. Each part meets strict factory specs and passes careful checks in production. So you'll get Timing Belt with long-lasting strength and an exact fit. If you need OEM Mitsubishi Galant Timing Belt, the online store is the ideal place. The store carry a wide range of genuine Mitsubishi Galant parts at the highly competitive prices. You'll enjoy a simple and no-hassle shopping experience. You'll get unbeatable prices and fast delivery service. You'll get the manufacturer's warranty and a straightforward return policy. Shop with confidence and keep your car in top condition.
Mitsubishi Galant Timing Belt Parts Questions & Experts Answers
- Q: What should be done if the timing belt fails while the engine is running on Mitsubishi Galant?A:If the timing belt fails while the engine is turning over, it is likely that the valves and possibly the pistons have been damaged. This can be verified by performing a compression or leak down check on all cylinders after installing a new timing belt, although this will probably be futile. The new belt and cylinder head will probably need to be removed. Bent valves can sometimes be confirmed by simply removing the valve cover and comparing the valve stem height. If one or more valves sit lower than the others, they are bent. The crankshaft must never be turned using the camshaft sprocket bolt or in a counterclockwise direction. Furthermore, after the timing belt has been removed, the crankshaft and camshaft (s) must not be turned to prevent the valves from striking the pistons. To tension the timing belt a special tool is required which is available from automotive specialty tool companies. Start with the number one piston at TDC, negative battery terminal disconnected, and accessory drivebelts off. Lift the car on jackstands and remove the inner fender splash shield if present, and loosen the large center bolt in the crankshaft damper pulley using a large screwdriver or bar to hold the pulley. A proper 3-jaw puller should be installed on the damper pulley from the crank shaft. One must use the proper insertso that the crank shaft threads are not damaged. Timing belts should be changed (2.4L DOHC) at the same time and be careful because it is a very complicated timing system and if there are mistakes, it could damage the engine significantly. Take out the air conditioning idler pulley assembly, use a floor jack to support the engine, and remove the Engine Mount and support bracket. After timing belt cover removal, rotate the crankshaft clockwise until the timing mark is aligned on the camshaft sprockets and verify the timing mark on the oil pump sprocket is aligned. Insert a screwdriver into the hole in the engine block 2-1/2 in will lock balance shaft in position. If you are reusing the timing belt, mark the direction of rotation. Now, loosen the tensioner pulley bolt to create slack and remove the timing belt. For the balance shaft belt, mark rotation direction if reusing. Before removing belt, check timing marks on crankshaft & balance shaft sprockets are aligned with each other. Check the timing belt for damage and wear, and the automatic tensioner for leaking and damage. Make sure that all timing marks are aligned during installation, the timing belt is installed in the correct sequence, and the tension is adjusted using a special tool while monitoring the plunger protrusion at the tensioner. Once you are satisfied that the marks are aligned and tension is correct, refit the timing covers, ensuring the bolts are put back into the correct holes, before completing the rest of the reassembly and starting the engine, and going on a road test. Refer to the removal and installation procedure for the 2.4L SOHC engine. The engine timing marks, as well as the condition of the various belts and tensioners, must always be checked.
- Q: What should be considered when replacing a timing belt to avoid engine damage on Mitsubishi Galant?A:In the event that the timing belt failed while the engine was running, it is likely the valves and possibly the pistons suffered damage, but this can be confirmed through a compression or leak-down check on all the cylinders after the new timing belt installation. Nonetheless, this is probably pointless since the belt and the cylinder heads would probably need to be removed again. The removal of the valve covers, camshaft, and Rocker Arms will give some indication of bent valves if the height of the valve stem is compared. The timing systems can be quite complicated and mistake here can cause serious engine damage so this procedure should only be attempted by an experienced person. Furthermore, always double-check your work before starting the engine. Never turn the Crankshaft or Camshafts again once the Timing Belt is removed, so as not to bend the Valves when the Pistons hit them. A special tool is necessary for timing belt tensioning. To start, set number one piston to TDC and remove negative battery cable. Place the vehicle securely on jackstands, remove the right front wheel and drivebelt splash shield and then remove the drivebelts. Loosen and take out the crankshaft pulley, reinstall the crankshaft bolt using a spacer and take out the alternator cover and timing belt cover. Remove the engine support bracket and Engine Mount with the engine supported. Ensure the crankshaft timing sprocket and the camshaft timing sprockets are properly aligned before timing belt removal and if reusing the belt mark the direction of rotation. Remove the tensioner by unscrewing the mounting bolts and by carefully slipping it off the sprockets. Examine the front crankshaft and camshaft seals; check the water pump, tensioner pulleys and timing belt for damage and replace as necessary. Rotate the crankshaft by hand before starting the engine to check for resistance to the downstroke. Check the timing marks on the camshaft sprockets; reposition as necessary. First, compress the piston on the timing belt tensioner and install the tensioner. Next, install the timing belt, which must be clamped during installation. Check timing marks after properly tensioning. Then, turn the crankshaft in a clockwise manner to check for resistance. If the timing marks do not line up, realign and reinstall the timing belt and tensioner. Finish off the installation by reversing the removal procedure and torque-ing on all components to spec.


Related Mitsubishi Galant Parts
 Mitsubishi Galant Oil Pan
 Mitsubishi Galant Cam Gear
 Mitsubishi Galant Crankshaft
 Mitsubishi Galant Crankshaft Gear
 Mitsubishi Galant Crankshaft Timing Gear
 Mitsubishi Galant Engine Mount Bracket
 Mitsubishi Galant Oil Drain Plug
 Mitsubishi Galant Oil Filler Cap
 Mitsubishi Galant Piston
 Mitsubishi Galant Rocker Arm
 Mitsubishi Galant Timing Cover
 Mitsubishi Galant Valve Stem Oil Seal