×
- Hello
- Login or Register
- Quick Links
- Live Chat
- Track Order
- Parts Availability
- RMA
- Help Center
- Contact Us
- Shop for
- Mitsubishi Parts
My Garage
My Account
Cart
Genuine Mitsubishi Lancer Exterior Door Handle
Outside Door Handle- Select Vehicle by Model
- Select Vehicle by VIN
Select Vehicle by Model
orMake
Model
Year
Select Vehicle by VIN
For the most accurate results, select vehicle by your VIN (Vehicle Identification Number).
48 Exterior Door Handles found

Mitsubishi Lancer Handle, Outside, Passenger Side Green Part Number: 5716A014HD
$51.64 MSRP: $71.72You Save: $20.08 (28%)Ships in 1-2 Business DaysMitsubishi Lancer Handle, Outside, Driver Side Green Part Number: 5716A013HD
$52.14 MSRP: $72.42You Save: $20.28 (28%)Ships in 1-2 Business DaysMitsubishi Lancer Handle, Outside, Passenger Side Gray Part Number: 5716A014HC
$56.32 MSRP: $78.22You Save: $21.90 (28%)Ships in 1-2 Business DaysMitsubishi Lancer Handle, Outside, Driver Side Orange Part Number: 5716A013YB
$56.32 MSRP: $78.22You Save: $21.90 (28%)Ships in 1-2 Business Days
Mitsubishi Lancer Handle, Outside, Driver Side Black Part Number: 5716A013HH
$56.32 MSRP: $78.22You Save: $21.90 (28%)Ships in 1-2 Business DaysMitsubishi Lancer Handle, Outside, Passenger Side White Part Number: 5716A014WA
$60.23 MSRP: $83.65You Save: $23.42 (28%)Ships in 1-2 Business DaysMitsubishi Lancer Handle, Outside, Passenger Side Silver Part Number: 5716A014HB
$62.09 MSRP: $86.24You Save: $24.15 (28%)Ships in 1-2 Business DaysMitsubishi Lancer Handle, Outside, Driver Side Blue Part Number: 5716A013BC
$62.09 MSRP: $86.24You Save: $24.15 (28%)Ships in 1-2 Business DaysMitsubishi Lancer Handle, Outside, Passenger Side Red Part Number: 5716A014RA
$62.47 MSRP: $86.77You Save: $24.30 (29%)Ships in 1-2 Business DaysMitsubishi Lancer Handle, Outside, Passenger Side Black Part Number: 5716A014XA
$62.88 MSRP: $87.33You Save: $24.45 (28%)Ships in 1-2 Business DaysMitsubishi Lancer Handle, Outside, Driver Side Black Part Number: 5716A013XA
$62.88 MSRP: $87.33You Save: $24.45 (28%)Ships in 1-2 Business DaysMitsubishi Lancer Handle, Outside, Driver Side White Part Number: 5716A013WA
$66.25 MSRP: $92.02You Save: $25.77 (28%)Ships in 1-2 Business DaysMitsubishi Lancer Handle, Outside, Driver Side Silver Part Number: 5716A013HB
$66.46 MSRP: $92.30You Save: $25.84 (28%)Ships in 1-2 Business DaysMitsubishi Lancer Handle, Outside, Passenger Side Blue Part Number: 5716A014BD
$68.98 MSRP: $95.80You Save: $26.82 (28%)Ships in 1-2 Business Days
Mitsubishi Lancer Handle, Outside, Driver Side Blue Part Number: MR647067
$85.98 MSRP: $119.42You Save: $33.44 (28%)Ships in 1-2 Business Days
Mitsubishi Lancer Handle, Outside, Passenger Side Black Part Number: MR970268
$89.84 MSRP: $124.78You Save: $34.94 (28%)Ships in 1-2 Business Days
Mitsubishi Lancer Handle, Outside, Driver Side Part Number: MR970229
$90.98 MSRP: $126.37You Save: $35.39 (29%)Ships in 1-2 Business DaysMitsubishi Lancer Handle, Outside, Driver Side Black Part Number: MR970267
$92.02 MSRP: $127.80You Save: $35.78 (28%)Ships in 1-2 Business DaysMitsubishi Lancer Handle, Outside, Passenger Side Silver Part Number: MR646803
$95.22 MSRP: $132.25You Save: $37.03 (28%)Ships in 1-2 Business DaysMitsubishi Lancer Handle, Outside, Passenger Side White Part Number: MR654032
$96.56 MSRP: $134.12You Save: $37.56 (28%)Ships in 1-2 Business Days
| Page 1 of 3 |Next >
1-20 of 48 Results
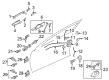
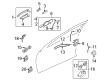
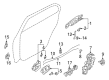
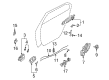
Mitsubishi Lancer Exterior Door Handle
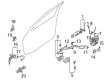
The Mitsubishi Lancer's Exterior Door Handle provides a convenient way for passengers to open the vehicle door via a pull action that disengages the latch internally with a metal rod connected to the door latch. Made of heavy plastic or metal, the handle is attached to this rod so that when the handle is pulled out, it pulls the rod which disengages the latch and allows the door to swing free. Some handles extend flush into the body and follow its curvature, while others project out from it. Both varieties function with a single outward pull that unlatches and opens the door. The handles can be ordered in a chrome or primed surface treatment, textured black, silver, or body color to match or contrast with surrounding panels. A genuine Mitsubishi Lancer Exterior Door Handle can be selected with a finish that suits your personal preference and blends with factory trim. Different variants may have different keyhole configurations which may include an actual hole in the door lock to use a visible key or it may be a clean face with no keyhole or groove. However, the underlying connection is always to the latch. When a latch becomes stiff due to dirt, the force required at the handle increases. If applied regularly, it can scratch, discolor, or break. Substituting a worn Mitsubishi Lancer Exterior Door Handle will allow for secure entry while maintaining good looks without disrupting the original door latch design. Each option of the Mitsubishi Lancer Exterior Door Handle, flush or projecting, is a direct-fit component that operates effortlessly and functions as intended on every door of the car to provide secure and easy access for daily driving.
OEM Exterior Door Handle can boast superior quality and long-term durability. Each part meets strict factory specs and passes careful checks in production. So you'll get Exterior Door Handle with long-lasting strength and an exact fit. If you need OEM Mitsubishi Lancer Exterior Door Handle, the online store is the ideal place. The store carry a wide range of genuine Mitsubishi Lancer parts at the highly competitive prices. You'll enjoy a simple and no-hassle shopping experience. You'll get unbeatable prices and fast delivery service. You'll get the manufacturer's warranty and a straightforward return policy. Shop with confidence and keep your car in top condition.
Mitsubishi Lancer Exterior Door Handle Parts Questions & Experts Answers
- Q: How to remove and install front Car Mirror, Door Lock, Door Lock Cylinder, Exterior Door Handle, Interior Door Handle and Window Regulator on Mitsubishi Lancer?A:To remove / install the interior handles, trim panel and sealing sheet on CE models, with the regulator handle engage the washer is pushed away. Then withdraw the handle retaining clip with a wire hook, and remove the handle and washer. For power windows, remove the retaining screw within the pull handle. Carefully prise the switch panel from the door trim using a cloth-covered screwdriver. Disconnect the wiring and withdraw the switch panel. On the passenger's side, it's not necessary to remove this. After that, take out the retaining screw in the pull handle cavity and pull out the pull handle, then take out the retaining screw from the inner handle trim and pull out the trim. With utmost care, remove the cover from the screw at the front of the door trim. Then undo the screw. Take note that for a sedan model, there's another screw at the back of the trim above the door lock. To remove the trim panel, grasp its lower outside edge and pull it away from the door to disengage the retaining clips. Next, lift the trim panel up and withdraw it. If working on the passenger's side of a model with power windows, disconnect power window switch wiring before removing trim panel. After removing the retaining screws, the pull handle bracket is withdrawn. After that, remove the retaining screws of the interior handle and carefully peel off the plastic sheet from the door by cutting the sealant. If required, feed the wiring connector through and then remove the sealing sheet from the door. Store it flat and with the sealant-side facing up. If necessary, release the clips that hold the control rods to the interior handle. Remove the handle. The process of installation is just the reverse of that of removal and entails ensuring that the sealing sheet is correctly positioned, the sealant remains in operable condition, replacing any damaged trim panel retaining clips, and tightening all screws securely. The CG and CH models start the same way: the switch panel and pull handle are removed. Next, the interior handle trim and the trim panel are removed. If the model is equipped with power windows, the power window switch wiring must be disconnected. The window glass removal entails positioning of the glass to expose the retaining screws, temporally installing the window regulator handle or connecting of power window switch wiring so the glass can be moved as required, loosening of screws retaining the glass to the regulator slide, tilting the glass up and by maneuvering it through the door opening. To install the window, one must follow the steps in reverse to ensure it is seated properly and operates properly before putting the sealing sheet and trim panel back on. To service each window regulator, remove the trim panel, sealing sheet, window glass, if applicable disconnect the wiring of power window motor, if applicable remove the retaining bolts and move out the regulator assembly from the door and lubricate the sliding surfaces before refitting. Removing the exterior handle and lock cylinder requires that the window (which we can assume is the window of a car) be raised. Subsequently, the trim panel must first be removed, control rods disconnected, and the handle and lock cylinder removed. With everything on the right place, the exterior handle and lock cylinder will operate properly. The door lock removal consists of disconnecting control rods and wiring;after removing retaining screws grease sliding parts before reinstalling. Mark the position of the lock striker, remove retaining screw, and reinstall an aligned position. To renew mirror glass, adjust mirror and disengage spring or clips if necessary, next remove mirror cover and the surrounding panel if applicable, disconnect power mirror wiring, remove retaining screws or nuts, finally reinstall and test mirror operation.
- Q: How to remove and install the rear Door Lock, Exterior Door Handle, Interior Door Handle and Window Regulator on Mitsubishi Lancer?A:To remove and install the interior handles, trim panel and sealing sheet, the retaining screw in the pull handle cavity must first be removed and the pull handle withdrawn from the door (some models cover the screw with a cover which can be removed with a small flat-bladed screwdriver). After that, take out the retaining screw from the interior handle trim, and withdraw the trim. For models where there are windows, push the washer away from the regulator handle andwith a suitable wire hook withdraw the handle retaining clip and remove the handle and washer. In the CG and CH models, unscrew the screws by removing the covers (located) at the top corners of the door trim. Use a firm grip on the lower outer edge of the trim panel. Pull that trim panel outward to effectively disengage the retaining clips. Lift the trim panel upward to remove it from the door. In case of the power window switch wiring, disconnect them to complete the process. Remove the retaining screws and take out the pull handle bracket, then remove the interior handle bracket retaining screws and careful peel the plastic sheet away from the door, cutting the sealant if necessary. If necessary, disconnect the clips securing the control rods to the interior handle and take off the handle. To install the sealing sheet, place it on the door panel after checking that the sealing agent is ready for use, and apply a thin bead of sealant. Install the pull handle bracket and tighten the retaining screws securely. Then, install the control rods to the interior handle and secure with retaining screws. Before installing the trim panel, check the retaining clips for damage, replacing any that are damaged. If fitted with power windows, check the power window switch wiring is connected. If you have manual windows, then you need to fit the washer and clip to the regulator handle. Now press the handle onto the regulator shaft. Then fit the pull handle to the door, making sure to tighten the retaining screw securely. According to CH and CH Models, install screws to the top corners of the door trim, and place covers over the screws. The trim panel and sealing sheet must first be removed to lower the quarter window and while it is fully lowered, the sealing rubber must be eased from the top of the door frame so that the run channel retaining screw can be shown. Remove this screw. After that, remove the bolts holding the run channel to the door, detach the seal from the run channel, and pull the run channel from the door. After that, maneuver the quarter window and door seal; separate it from the window glass if needed. Before installation of the quarter window without damaging the inner seal, install the window run channel and tighten the retaining screw and screws to specifications. Install the sealing sheet and trim the panel of the door. Remove the trim panel and sealing sheet followed by the quarter window and seal to remove the window glass. On CG and CH models, remove screw retaining weatherstrip to door frame, prise weatherstrip from outside of door and position glass to expose screws on regulator slide. In the case of manual windows, the regulator handle is temporarily installed to move the glass into the required position. For power windows, the power window switch wiring is temporarily connected to operate the window regulator motor. Retaining screws are then removed. Remove the window glass through the opening in the top of the door with care. For installation, insert the window glass from the outside into the door, place it in the front run channel, and install the window retaining screws tightly. The rear run channel must be installed at an angle to engage with the window glass. Tighten the retaining screw and bolts. Before installing the sealing sheet and trim panel, check if window is operating properly, then install. Remove and Install the Window Regulator. To remove the window regulator, remove the trim panel and sealing sheet, window glass, and disconnect the power window motor wiring for power window models. Detach the retaining bolts and extract the regulator assembly from the door. The electric motor can also be removed from the regulator assembly after dislodging the retaining screws. To begin with installation, apply lubricant to the sliding surfaces of the window regulator. Subsequently, position the regulator assembly as well as the retaining bolts and do not tighten. Next, similarly install the window glass. Adjust the window control several times to make sure the pane is revolving in proper orientation. In case the pane moves freely, make sure you tighten the regulator bolts for further assurance. Sealing sheet and trimming panel finally gets installed. To uninstall and install the outside handle, lift the window completely and then uninstall the trim panel and sealing sheet. To remove the external handle, for CE models, undo the retaining clip and disconnect the control rod from the exterior handle pivot shaft. Remove the rubber grommet from the rear access hole and then the bolts holding the exterior handle. It can then be manoeuvred from the door panel. For CG models and CH models, remove the retaining bolt from the exterior handle. Move the handle assembly towards the outside of the door. Lift the handle assembly to release the control rod from the lock assembly. Remove the handle assembly from the vehicle. When installing, tighten the retaining bolts firmly without application of thread locking compound or over-tightening which will break the handle as it is a plastic. Verify the condition of the control rod retaining clip and connected status, serviceable. In the case of CG and CH models, the control rod should engage the lock assembly ahead of the installation of the retaining bolt. The operation of the exterior handle and lock assembly should be checked before the sealing sheet and trim panel installation. To remove and install the door lock on a CE model car, raise the window all the way up. Remove the trim panel and sealing sheet. Remove the retaining clips and separate the control rods from the interior and exterior handles. For vehicles equipped with central locking, detach the wiring from the lock actuator, detach the retaining screws securing the door lock, and extract the lock assembly from the door, which may require using an impact driver to loosen the screws. When you install a lock, first smear multipurpose grease on all the sliding and rotating parts of the lock. Next, connect the control rods to the internal and external handles. Apply a thread locking compound to the threads of the door lock retaining screws. Finally, connect the wiring to the lock actuator. Lastly, check the operation of the door lock system before putting in the sealing sheet and trim panel. The lock striker can be renewed and adjusted in a manner similar to the striker on the front door.


Related Mitsubishi Lancer Parts
 Mitsubishi Lancer Window Regulator
 Mitsubishi Lancer Power Window Switch
 Mitsubishi Lancer Door Lock
 Mitsubishi Lancer Door Hinge
 Mitsubishi Lancer Door Lock Switch
 Mitsubishi Lancer Door Screws
 Mitsubishi Lancer Door Seal
 Mitsubishi Lancer Front Door Striker
 Mitsubishi Lancer Interior Door Handle
 Mitsubishi Lancer Rear Door Striker
 Mitsubishi Lancer Weather Strip
 Mitsubishi Lancer Window Run