×
- Hello
- Login or Register
- Quick Links
- Live Chat
- Track Order
- Parts Availability
- RMA
- Help Center
- Contact Us
- Shop for
- Mitsubishi Parts
My Garage
My Account
Cart
Genuine Mitsubishi Lancer Power Window Switch
Electric Window Switch- Select Vehicle by Model
- Select Vehicle by VIN
Select Vehicle by Model
orMake
Model
Year
Select Vehicle by VIN
For the most accurate results, select vehicle by your VIN (Vehicle Identification Number).
6 Power Window Switches found

Mitsubishi Lancer Window Switch, Driver Side Part Number: MR587943
$271.44 MSRP: $383.38You Save: $111.94 (30%)Ships in 1-2 Business Days
Mitsubishi Lancer Window Switch, Driver Side Part Number: 8608A068
$301.48 MSRP: $425.81You Save: $124.33 (30%)Ships in 1-2 Business Days
Mitsubishi Lancer Window Switch Part Number: MR194829
$59.27 MSRP: $82.32You Save: $23.05 (28%)Ships in 1-2 Business DaysMitsubishi Lancer Window Switch Part Number: MR587944
$79.18 MSRP: $109.97You Save: $30.79 (28%)Ships in 1-2 Business Days
Mitsubishi Lancer Window Switch, Passenger Side Part Number: MR587946
$82.18 MSRP: $114.13You Save: $31.95 (28%)Ships in 1-2 Business Days
Mitsubishi Lancer Window Switch, Driver Side Part Number: MR587942
$154.65 MSRP: $209.55You Save: $54.90 (27%)Ships in 1-2 Business Days
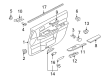
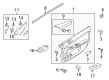
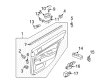
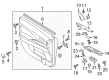
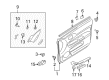
Mitsubishi Lancer Power Window Switch
The Mitsubishi Lancer Power Window Switch controls the electrical mechanism that moves the glass in the door panel up and down. A switch sends an electrical signal to the window motor when pressed to enable the occupant to raise the glass, which helps to keep the rain out or lower it for air without adding any effort. A typical Mitsubishi Lancer interior has a driver who uses a master assembly that may open or close all windows while the passengers use their door-mounted switches. Every Power Window Switch operates with a single press and release just like a light switch. This completes the circuit, turning on the motor, which pushes the window to the desired position. A normally working Power Window Switch is expected to respond favorably to touch with a consistent feel. When applied frequently, internal gears and contacts can become worn, which may slow the movement or require assistance for the pane to travel fully. Replacement units provided for the Mitsubishi Lancer are advertised as tough, wear-resistant, and capable of providing years of service without changing the vehicle's original electrical system. Choosing a correctly specified Power Window Switch will guarantee that electrical current makes it to the window motor without failure while driving. This allows for the convenient operation of the windows without exposing the elements inside the Mitsubishi Lancer.
OEM Power Window Switch can boast superior quality and long-term durability. Each part meets strict factory specs and passes careful checks in production. So you'll get Power Window Switch with long-lasting strength and an exact fit. If you need OEM Mitsubishi Lancer Power Window Switch, the online store is the ideal place. The store carry a wide range of genuine Mitsubishi Lancer parts at the highly competitive prices. You'll enjoy a simple and no-hassle shopping experience. You'll get unbeatable prices and fast delivery service. You'll get the manufacturer's warranty and a straightforward return policy. Shop with confidence and keep your car in top condition.
Mitsubishi Lancer Power Window Switch Parts Questions & Experts Answers
- Q: How does the power window switch operate to control the window's movement, and what steps should be taken to troubleshoot and remove the power window master switch on Mitsubishi Lancer?A:The power window switch, when moved down, activates the battery's electrical circuit and energizes the motor. This allows the window to wind down. At the same time, moving up reverses the polarity causing the window to wind up. The driver side window switch works differently; when pressed all of the way down, the window will go all of the way down without the driver having to hold the switch down. The switch automatically returns to rest when it detects an increased current draw due to the window being at the bottom. The power window motors can either be tested by trying to operate the window or by checking for power on the yellow wire with the ignition switch on after removing the master switch assembly. Test for continuity to earth at the master switch black wire if at least one window works and check that each motor is powered and earthed. If no power and earth are present with the switch assembly, change it. If there is power and earth. Remove the door trim panel of the faulty window. Unplug the motor wiring. Connect a test lamp. Press the switch and check for illumination. To perform the test, make sure the wiring of the driver's door motor is connected, and if you are using an LED test lamp, check that it illuminates in both positions of the switch. If the light doesn't shine, check the wire for an open circuit. When the lamp illuminates, use an ohmmeter to check the continuity across motor wiring connector terminals. If the circuit is open, the motor is suspect. To remove the power window master switch, the retaining screw must be removed. Then the switch panel is pried from the door trim with a plastic wedge. Disconnect the wiring, and separate all components. The procedure for the rear power window switches is to remove the door trim panel, unscrew the switch and withdraw it. The same goes for the front passenger switch. The installation is the reverse of removal. Ensure the wiring is secure. The body section describes a procedure to remove the power window regulator motors.

Related Mitsubishi Lancer Parts
 Mitsubishi Lancer Speedometer
 Mitsubishi Lancer Door Lock
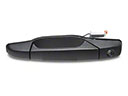 Mitsubishi Lancer Exterior Door Handle
 Mitsubishi Lancer Door Check
 Mitsubishi Lancer Door Latch Cable
 Mitsubishi Lancer Door Lock Switch
 Mitsubishi Lancer Door Screws
 Mitsubishi Lancer Door Seal
 Mitsubishi Lancer Rear Door Striker
 Mitsubishi Lancer Rear Passenger Door Handle Latch
 Mitsubishi Lancer Window Motor
 Mitsubishi Lancer Window Run