×
- Hello
- Login or Register
- Quick Links
- Live Chat
- Track Order
- Parts Availability
- RMA
- Help Center
- Contact Us
- Shop for
- Mitsubishi Parts
My Garage
My Account
Cart
Genuine Mitsubishi Montero Brake Pads
Disc Brake Pad Set- Select Vehicle by Model
- Select Vehicle by VIN
Select Vehicle by Model
orMake
Model
Year
Select Vehicle by VIN
For the most accurate results, select vehicle by your VIN (Vehicle Identification Number).
3 Brake Pads found

Mitsubishi Montero Front Pads Part Number: MZ690562
$52.86 MSRP: $73.42You Save: $20.56 (28%)Ships in 1-2 Business Days
Mitsubishi Montero Brake Pads Part Number: MZ690574
$54.12 MSRP: $75.17You Save: $21.05 (28%)Ships in 1-2 Business Days
Mitsubishi Montero Front Pads Part Number: MZ690557
$54.12 MSRP: $75.17You Save: $21.05 (28%)Ships in 1-2 Business Days
Mitsubishi Montero Brake Pads
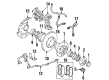
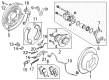
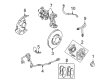
The Mitsubishi Montero Brake Pads transform the kinetic energy gained by the moving vehicle into heat through the friction of the Brake Pads with the wheel so that the wheels slow or stop when the driver applies the brake pedal. The friction lining of each pad and its metal backing plate provide the consistent surface needed to brake. As the lining experiences regular usage, banks of manufacturers determine a minimal thickness and pad replacement ensues when that threshold is crossed. Numerous Montero models come equipped with electronic or mechanical wear sensors that trigger an alert in the driver's cab when the lining reaches the service point. Some pads even feature a built-in indicator that squeals against the rotor. Brake Pads built for a Mitsubishi Montero are designed to the specifications of an average driver for use in everyday driving, shopping trips, and mild highway cruising. In more severe situations, such as traveling at high speeds on twisty roads, towing, hauling, or traveling downhill for a long time, this Mitsubishi produces extra heat that can cause these pads to overheat and fade. Stopping takes longer now. Because the function of the pad and rotor is very much linked, many owners opt for a brake disc and pad kit which combines new rotors with a fresh set of Brake Pads. This is because matching the components together and installing them all at the same time restores that component of the brake system to full performance in one service. By frequently checking the thickness of the pads and replacing worn linings with new Mitsubishi Montero Brake Pads, reliable stopping power can be sustained and the rotors will be protected.
OEM Brake Pads can boast superior quality and long-term durability. Each part meets strict factory specs and passes careful checks in production. So you'll get Brake Pads with long-lasting strength and an exact fit. If you need OEM Mitsubishi Montero Brake Pads, the online store is the ideal place. The store carry a wide range of genuine Mitsubishi Montero parts at the highly competitive prices. You'll enjoy a simple and no-hassle shopping experience. You'll get unbeatable prices and fast delivery service. You'll get the manufacturer's warranty and a straightforward return policy. Shop with confidence and keep your car in top condition.
Mitsubishi Montero Brake Pads Parts Questions & Experts Answers
- Q: How to service disc Brake Pads on Mitsubishi Montero?A:While servicing disc brakes, you must use good quality name brand pads of national repute. To determine the type, inspect the caliper with the wheel removed. It can either have sliding type caliper or floating type caliper. To reduce the risk of spilling on painted surfaces, remove the cap to the master cylinder reservoir in the sliding calipers and siphon out approximately half the fluid. Loosen the lug nuts on the front wheel, securely raise the vehicle on jackstands, then remove the wheels, working on one brake assembly at a time. In the case of sliding calipers, the two spigot pins should be removed from the stopper plugs and these should be pulled out along with the stopper plugs and pad support plates. If necessary, remove the top bolt to hang the caliper out of the way. Remove the pads from the caliper bracket. Separate the outer pad from the shim and remove the pad clips. Assemble new pads with the shim on the outer pad, insert piston with wood dowel or hammer handle and lubricate contact with multi-purpose grease. Place the caliper assembly over the new pads and refit the pad support plates, stopper plugs and spigot pin. For floating calipers, first, use a large C-clamp to push back the piston. Next, remove the lower mount bolt and rotate the caliper to get to the pads. Detach any anti-rattle springs, remove the brake pads and shims from the bracket, and clean the surfaces. To install the pads and shims, install the new retaining clips and coat the shims with disc brake grease. As the caliper is installed, lower the vehicle, Press the pedal for the pads to touch the disc, and check the fluid level in the master cylinder. Make sure to perform a careful road test before normal use.

Related Mitsubishi Montero Parts
 Mitsubishi Montero ABS Control Module
 Mitsubishi Montero ABS Pump And Motor Assembly
 Mitsubishi Montero ABS Sensor
 Mitsubishi Montero Axle Bearing Lock Rings
 Mitsubishi Montero Brake Caliper
 Mitsubishi Montero Brake Caliper Piston
 Mitsubishi Montero Brake Line
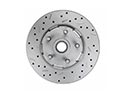 Mitsubishi Montero Brake Rotor
 Mitsubishi Montero Hydraulic Hose
 Mitsubishi Montero Wheel Bearing
 Mitsubishi Montero Wheel Cylinder
 Mitsubishi Montero Wheel Cylinder Repair Kit