×
- Hello
- Login or Register
- Quick Links
- Live Chat
- Track Order
- Parts Availability
- RMA
- Help Center
- Contact Us
- Shop for
- Mitsubishi Parts
My Garage
My Account
Cart
Genuine Mitsubishi Montero Ball Joint
Control Arm Joint- Select Vehicle by Model
- Select Vehicle by VIN
Select Vehicle by Model
orMake
Model
Year
Select Vehicle by VIN
For the most accurate results, select vehicle by your VIN (Vehicle Identification Number).
7 Ball Joints found

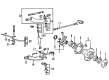
Mitsubishi Montero Lower Ball Joint Part Number: MB176308
$61.25 MSRP: $85.07You Save: $23.82 (28%)Ships in 1-2 Business Days
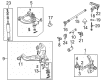
Mitsubishi Montero Upper Ball Joint, Passenger Side Part Number: MB860830
$61.75 MSRP: $85.77You Save: $24.02 (29%)Ships in 1-2 Business DaysMitsubishi Montero Upper Ball Joint, Driver Side Part Number: MB860829
$61.75 MSRP: $85.77You Save: $24.02 (29%)Ships in 1-2 Business DaysMitsubishi Montero Upper Ball Joints Part Number: MB176309
$86.98 MSRP: $120.80You Save: $33.82 (28%)Ships in 1-2 Business Days
Mitsubishi Montero Lower Ball Joint, Driver Side Part Number: MR296269
$58.06 MSRP: $80.63You Save: $22.57 (28%)Ships in 1-2 Business DaysMitsubishi Montero Lower Ball Joint, Passenger Side Part Number: MR296270
$61.09 MSRP: $84.84You Save: $23.75 (28%)Ships in 1-2 Business Days

Mitsubishi Montero Lower Ball Joint Part Number: MR496799
$66.16 MSRP: $91.88You Save: $25.72 (28%)Ships in 1-2 Business Days
Mitsubishi Montero Ball Joint
OEM Ball Joint can boast superior quality and long-term durability. Each part meets strict factory specs and passes careful checks in production. So you'll get Ball Joint with long-lasting strength and an exact fit. If you need OEM Mitsubishi Montero Ball Joint, the online store is the ideal place. The store carry a wide range of genuine Mitsubishi Montero parts at the highly competitive prices. You'll enjoy a simple and no-hassle shopping experience. You'll get unbeatable prices and fast delivery service. You'll get the manufacturer's warranty and a straightforward return policy. Shop with confidence and keep your car in top condition.
Mitsubishi Montero Ball Joint Parts Questions & Experts Answers
- Q: How to check and replace a Ball Joint on Mitsubishi Montero?A:To inspect the balljoint, lift the vehicle and securely support it on jackstands. Evaluate the condition of the rubber seal. If you see any cuts, tears, or leaking grease, the balljoint should be replaced. Use a large prybar under the balljoint to push it up and put it between the steering knuckle and the arm to apply downforce. Any movement during these checks indicates a failing ball joint. Get an assistant to shake the wheel in and out. Meanwhile, you touch the castellated nut on the balljoint stud. If you feel looseness in that area, suspect a worn balljoint stud or a loose fit in the hole in the steering knuckle boss. If so, you should replace the steering knuckle and the balljoint. To replace the upper Control Arm balljoint, the upper arm must be removed and taken to a dealer or an appropriately equipped shop to have the old balljoint pressed out and a new one installed. To replace the lower control arm balljoint on 2WD models, the front spring and steering knuckle have to be removed followed by detaching of the balljoint from the control arm to install a new balljoint followed by reassembling. If the vehicle is a 4WD model, support the lower arm with a floor jack. Remove the wheel, then loosen the castellated nut (you don't need to take it off yet). Use a balljoint separating tool to release the balljoint from the steering knuckle. Take off the castellated nut, unclip the balljoint from the arm, and make sure the new balljoint is the same way as the old one. The new balljoint must be installed and the nut or bolts tightened. The balljoint stud must then be inserted into the boss of the steering knuckle. Finally, tighten the castellated nut and install a new cotter pin. Once you install the wheel and lug nuts, lower your vehicle and tighten the nuts to the specified torque.

Related Mitsubishi Montero Parts
 Mitsubishi Montero Axle Support Bushings
 Mitsubishi Montero Control Arm
 Mitsubishi Montero Control Arm Bushing
 Mitsubishi Montero Shock Absorber
 Mitsubishi Montero Steering Knuckle
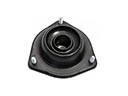 Mitsubishi Montero Strut Mounts
 Mitsubishi Montero Sway Bar Link
 Mitsubishi Montero Sway Bar Link Bushing
 Mitsubishi Montero Torsion Bar
 Mitsubishi Montero Wheel Bearing Dust Cap
 Mitsubishi Montero Wheel Hub
 Mitsubishi Montero Wheel Seal