×
- Hello
- Login or Register
- Quick Links
- Live Chat
- Track Order
- Parts Availability
- RMA
- Help Center
- Contact Us
- Shop for
- Mitsubishi Parts
My Garage
My Account
Cart
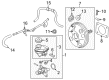
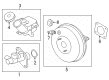
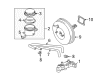
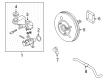
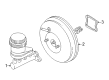
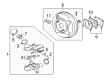
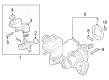
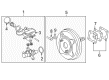
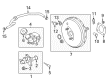
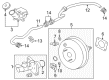
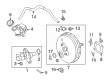
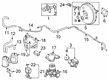
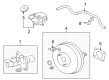
Genuine Mitsubishi Brake Booster
Brake Power Booster- Select Vehicle by Model
- Select Vehicle by VIN
Select Vehicle by Model
orMake
Model
Year
Select Vehicle by VIN
For the most accurate results, select vehicle by your VIN (Vehicle Identification Number).
18 Brake Boosters found

Mitsubishi Brake Booster Part Number: 4630A403
$394.17 MSRP: $556.73You Save: $162.56 (30%)Ships in 1-2 Business DaysProduct Specifications- Other Name: Booster Assembly, Brake; Booster
- Replaced by: 47210W210P

Mitsubishi Brake Booster Part Number: 4630A245
$421.37 MSRP: $595.15You Save: $173.78 (30%)Ships in 1-2 Business DaysProduct Specifications- Other Name: Booster Assembly, Brake; Power Booster

Mitsubishi Brake Booster Part Number: MR569690
$157.60 MSRP: $213.55You Save: $55.95 (27%)Ships in 1-2 Business DaysProduct Specifications- Other Name: Booster Assembly, Brake; Booster Assembly

Mitsubishi Brake Booster Part Number: 4630A531
$605.84 MSRP: $789.88You Save: $184.04 (24%)Ships in 1-2 Business DaysProduct Specifications- Other Name: Booster Assembly, Brake; Power Booster

Mitsubishi Power Booster Part Number: MR527618
$628.44 MSRP: $819.35You Save: $190.91 (24%)Ships in 1-2 Business DaysProduct Specifications- Other Name: Booster Assembly, Brake; Brake Booster

Mitsubishi Power Booster Part Number: 4630A140
$688.85 MSRP: $898.11You Save: $209.26 (24%)Ships in 1-2 Business DaysProduct Specifications- Other Name: Booster Assembly, Brake; Brake Booster
Mitsubishi Brake Booster Part Number: 4630A299
$761.47 MSRP: $992.79You Save: $231.32 (24%)Ships in 1-2 Business DaysProduct Specifications- Other Name: Booster Assembly, Brake; Power Booster
Mitsubishi Power Booster Part Number: 4630A247
$658.05 MSRP: $851.50You Save: $193.45 (23%)Ships in 1-2 Business DaysProduct Specifications- Other Name: Booster Assembly, Brake; Brake Booster

Mitsubishi Power Booster Part Number: 4630A547
$1221.62 MSRP: $1529.44You Save: $307.82 (21%)Ships in 1-2 Business DaysProduct Specifications- Other Name: Booster, Brake Electric; Brake Booster

Mitsubishi Power Booster Part Number: 4630A195
$735.12 MSRP: $910.97You Save: $175.85 (20%)Ships in 1-2 Business DaysProduct Specifications- Other Name: Booster Assembly, Brake; Brake Booster

Mitsubishi Brake Booster Part Number: 4630A191
$783.78 MSRP: $968.85You Save: $185.07 (20%)Ships in 1-2 Business DaysProduct Specifications- Other Name: Booster Assembly, Brake; Power Booster

Mitsubishi Power Booster Part Number: 4630A353
$892.17 MSRP: $1111.17You Save: $219.00 (20%)Ships in 1-2 Business DaysProduct Specifications- Other Name: Booster Assembly, Brake; Brake Booster
Mitsubishi Brake Booster Part Number: 4630A355
$936.78 MSRP: $1166.73You Save: $229.95 (20%)Ships in 1-2 Business DaysProduct Specifications- Other Name: Booster Assembly, Brake; Power Booster

Mitsubishi Brake Booster Part Number: 4630A225
$754.39 MSRP: $929.46You Save: $175.07 (19%)Ships in 1-2 Business DaysProduct Specifications- Other Name: Booster Assembly, Brake; Power Booster

Mitsubishi Power Booster Part Number: 4630A253
$757.81 MSRP: $931.75You Save: $173.94 (19%)Ships in 1-2 Business DaysProduct Specifications- Other Name: Booster Assembly, Brake; Brake Booster

Mitsubishi Brake Booster Part Number: 4630A238
$758.53 MSRP: $921.96You Save: $163.43 (18%)Ships in 1-2 Business DaysProduct Specifications- Other Name: Booster Assembly, Brake; Power Booster

Mitsubishi Power Booster Part Number: 46007W067P
$1072.15 MSRP: $1397.85You Save: $325.70 (24%)Ships in 1-2 Business DaysProduct Specifications- Other Name: Booster Assembly, Brake Electrical; Brake Booster
- Replaces: 46007W046P
Mitsubishi Power Booster Part Number: 46007W046P
$1072.15 MSRP: $1397.85You Save: $325.70 (24%)Ships in 1-2 Business DaysProduct Specifications- Other Name: Booster Assembly, Brake Electrical; Brake Booster
Mitsubishi Brake Booster
Mitsubishi Brake Booster provides fast, low effort braking by amplifying the force you exert on the brake pedal. This gives you more assurance in heavy traffic. Mitsubishi has established its brand based upon powertrain reliability, intelligent safety features, and technology such as MIVEC engines and Super All Wheel Control that balance power with economy. Features such as cruise and smartphone connectivity make any journey comfortable and easy to handle. The Mitsubishi originated with ships, designed the first series production motor car in Japan in 1917, and has persisted in experimenting with hybrids, fuel cells, and advanced driver support such that every new car feels modern but easy to drive. Designed to fit this broad range, the Brake Booster is mounted between the pedal and the master cylinder where it utilizes either engine vacuum or hydraulic pressure to increase hydraulic force and reduce stopping distance. Within a closed casing, a diaphragm or piston is immediately actuated by the driver when the driver presses the pedal. Atmospheric or fluid pressure acting upon the internal components propels them forward, and the master cylinder is pushed with a powerful but constant force that pushes brake fluid into the wheels. The release of the pedal causes equal pressure to be restored to both chambers, which re-energizes the Brake Booster for the next stop and ensures smooth braking over a number of miles.
Pick genuine OEM Brake Booster if you want superb performance and durability that lasts. Mitsubishi builds that using high-grade materials and official factory techniques to meet very strict standards. This means you get parts you can actually trust for your daily drive. Finding the right parts is simple in the massive stock of genuine inventory. You can stop guessing if a part will fit or hold up. You will love the low prices, dependable service and the real manufacturer's warranty on Mitsubishi Brake Booster. Order today and the store will ship your brand-new items to your door as fast as possible.
Mitsubishi Brake Booster Parts Questions & Experts Answers
- Q: How to check the operation and adjust the brake booster and check valve on Mitsubishi Lancer?A:In order to test the operation, with the engine stopped, depress the brake pedal several times in order to use up all the vacuum from the booster and the vacuum reservoir. Press the brake pedal down firmly and start the car engine. A distinct downward movement of the brake pedal indicates that the brake booster is functioning properly. If not, the vacuum system is inoperative. If the vehicle's clutch pedal continues to fall away, the hydraulic system may be faulty. Ensure the brake pedal is fully released, start the engine and run it at medium speed, then stop the engine. Allow the car to sit for 1-2 minutes, and press the brake pedal two or three times. If no vacuum assistance is felt, there is a leak in the vacuum system or defective check valve. To check the brake booster, first remove the hose and check valve and start the engine. The booster should have vacuum at it and in the check valve. When the engine is not running, press down on the footbrake several times until all vacuum is expelled. Release the clamp over the hose and detach the vacuum hose from the inlet manifold. To make sure air is not blowing through the hose, you would blow into it. Next suck on the vacuum hose to ensure air is flowing through. If either test indicates a fault, renew the check valve. To renew the check valve, depress the brake pedal several times to deplete all vacuum, then release clamps, and disconnect the hose from the inlet manifold and brake booster, noting the installed direction of vacuum hose. As an assembly which must be renewed is the vacuum hose check valve. The reversibility of removal allows installation (ensuring the vacuum hose is installed in the direction noted and hose clamps secure). In order to remove and fit the booster, the lower dash panel beneath the steering column must first be removed. To do this, remove the retaining clip and withdraw the clevis pin from the brake pedal. Note the washer's installed position. When the clevis is installed, mark its position, loosen the locknut and remove the clevis by turning it anticlockwise. Take off the brake booster retaining nuts and on the manual transaxle CE models, remove the clutch master cylinder. Remove the clips that secure the vacuum hose and detach the hose from the inlet manifold and brake booster fittings. Detach the brake master cylinder from the car, moving the brake pipes to one side, and maneuvering the brake booster from the engine compartment without damaging the pipes. Take out the gasket on the brake booster firewall if damaged. Installation reverses the removal, being sure the vacuum hose is not leaking or collapsed, and all connections are secure. If it's removed, the brake booster must have a new gasket fitted. Reinstall the clevis pin, washer, and retaining clip as shown in the illustration. If a new booster is installed, the pushrod setting should be factory set; otherwise, it should be checked. The brake master cylinder is installed, and the brakes bled. For CE manual transaxle models, the clutch master cyl is installed and bled. To check and reset the pushrod setting, remove the brake master cylinder and for CE models measure the distance from the mounting flange to the end of the master cylinder and record this as dimension B. With the vernier gauge, measure the distance from the end of the master cylinder to the bottom of the hole in the piston. This is dimension C. Record the pushrod extension from the surface of the master cylinder mounting on the front of the brake booster as dimension A (CE models only: measure and check dimensions against CG and CH specifications). For CE models, use the dimensions in the equation: Pushrod clearance = (C - B) - A, and check the dimensions with specifications. If necessary, with pliers, hold the knurled portion of the pushrod and adjust the pushrod length until dimension A when plugged into the formula gives the specified clearance.

Related Mitsubishi Parts
 Mitsubishi Brake Pads
 Mitsubishi Brake Caliper
 Mitsubishi Brake Master Cylinder
 Mitsubishi ABS Control Module
 Mitsubishi ABS Pump And Motor Assembly
 Mitsubishi Brake Drum
 Mitsubishi Brake Line
 Mitsubishi Brake Master Cylinder Reservoir
 Mitsubishi Hydraulic Hose
 Mitsubishi Wheel Cylinder
 Mitsubishi Wheel Cylinder Repair Kit
 Mitsubishi Wheel Stud