×
- Hello
- Login or Register
- Quick Links
- Live Chat
- Track Order
- Parts Availability
- RMA
- Help Center
- Contact Us
- Shop for
- Mitsubishi Parts
My Garage
My Account
Cart
Genuine Mitsubishi Lancer Parking Brake Shoes
Emergency Parking Brake Shoe- Select Vehicle by Model
- Select Vehicle by VIN
Select Vehicle by Model
orMake
Model
Year
Select Vehicle by VIN
For the most accurate results, select vehicle by your VIN (Vehicle Identification Number).
6 Parking Brake Shoes found

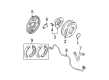
Mitsubishi Lancer Brake Shoes Part Number: 4800A089
$46.63 MSRP: $64.77You Save: $18.14 (29%)Ships in 1-2 Business Days
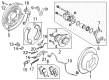
Mitsubishi Lancer Brake Shoes Part Number: MN161157
$48.96 MSRP: $68.01You Save: $19.05 (29%)Ships in 1-2 Business Days
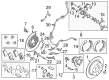
Mitsubishi Lancer Parking Brake Shoes Part Number: 4800A022
$48.96 MSRP: $68.01You Save: $19.05 (29%)Ships in 1-2 Business Days

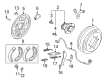
Mitsubishi Lancer Brake Shoes Part Number: MB950212
$52.15 MSRP: $72.43You Save: $20.28 (28%)Ships in 1-2 Business Days
Mitsubishi Lancer Brake Shoes Part Number: 4600A028
$43.30 MSRP: $59.99You Save: $16.69 (28%)Ships in 1-2 Business Days
Mitsubishi Lancer Parking Brake Shoes Cup Part Number: MB857302
$2.37 MSRP: $3.08You Save: $0.71 (24%)Ships in 1-2 Business Days
Mitsubishi Lancer Parking Brake Shoes
OEM Parking Brake Shoes can boast superior quality and long-term durability. Each part meets strict factory specs and passes careful checks in production. So you'll get Parking Brake Shoes with long-lasting strength and an exact fit. If you need OEM Mitsubishi Lancer Parking Brake Shoes, the online store is the ideal place. The store carry a wide range of genuine Mitsubishi Lancer parts at the highly competitive prices. You'll enjoy a simple and no-hassle shopping experience. You'll get unbeatable prices and fast delivery service. You'll get the manufacturer's warranty and a straightforward return policy. Shop with confidence and keep your car in top condition.
Mitsubishi Lancer Parking Brake Shoes Parts Questions & Experts Answers
- Q: How to check and install Parking Brake Shoes on Mitsubishi Lancer?A:First, remove the brake disc and then check if the thickness of the lining is according to standards. Have a close examination of the brake disc inner lining running face for cracks or scoring. If they are found, this may be an indication of a hanging or binding handbrake in need of adjustment. To remove and install, start with a brake disc removal. Next, pull off the upper return springs, and detach the plate from the upper anchor point using pliers or side cutters. Finally, pull off the lower return spring. Open the shoe bottom to remove the adjuster and do the same at the top to remove the strut and strut spring. Try to pin to hold it in place with a finger while the spring retainer and spring is removed from the front shoe. Then remove the front shoe. Using long-nosed pliers, hold the rear pin. Remove the rear spring retainer and spring. Next, partially remove the rear shoe. Finally, disconnect the Parking Brake Cable from the lever. If required, remove the lever from the rear shoe by spreading the horse-shoe shaped clip with a flat-bladed screwdriver, then take off the washer and the lever. To install the lever, first, clean all the parts using some brake cleaner. Next, attach the lever to the new brake shoe with the pin and shoe properly aligned. Finally bolt it in place. Use grease with a high melting point on the pin where it contacts the lever and washer. Attach the lever and washer to the pin before securing them in place with a clip. Make sure that the lever turns freely on the pin then connect the parking brake cable to the lever. Affix the back shoe to the backing plate. Secure it in position using the pin, spring and retainer. Once this is complete, install the front shoe, spring and retainer. Put the strut and strut spring to the top of the shoes, turn the adjuster to ensure that it turns freely, and adjust accordingly. Lastly, adjuster will fit between the bottom of the shoes. Lower return spring, the plate and both upper return springs will be installed and parking brake shoes adjusted.

Related Mitsubishi Lancer Parts
 Mitsubishi Lancer Brake Pads
 Mitsubishi Lancer ABS Control Module
 Mitsubishi Lancer Brake Caliper Bolt
 Mitsubishi Lancer Brake Caliper Bracket
 Mitsubishi Lancer Brake Drum
 Mitsubishi Lancer Brake Line
 Mitsubishi Lancer Brake Rotor
 Mitsubishi Lancer Hydraulic Hose
 Mitsubishi Lancer Parking Brake Cable
 Mitsubishi Lancer Wheel Bearing
 Mitsubishi Lancer Wheel Cylinder
 Mitsubishi Lancer Wheel Cylinder Repair Kit