×
- Hello
- Login or Register
- Quick Links
- Live Chat
- Track Order
- Parts Availability
- RMA
- Help Center
- Contact Us
- Shop for
- Mitsubishi Parts
My Garage
My Account
Cart
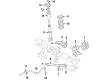
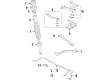
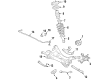
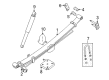
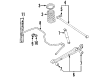
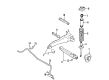
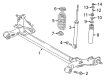
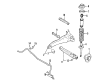
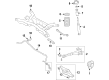
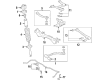
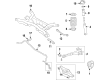
Genuine Mitsubishi Shock Absorber
Suspension Shock Absorber- Select Vehicle by Model
- Select Vehicle by VIN
Select Vehicle by Model
orMake
Model
Year
Select Vehicle by VIN
For the most accurate results, select vehicle by your VIN (Vehicle Identification Number).
52 Shock Absorbers found

Mitsubishi Shock Absorber Part Number: 05175436AG
$333.75 MSRP: $471.40You Save: $137.65 (30%)Ships in 1-2 Business DaysProduct Specifications- Other Name: Shock Absorber, Front Suspension

Mitsubishi Shock Absorber Part Number: 4162A170
$482.43 MSRP: $681.40You Save: $198.97 (30%)Ships in 1-2 Business DaysProduct Specifications- Other Name: Shock Absorber, Rear Suspension; Strut Housing; Strut

Mitsubishi Shock Absorber Part Number: MR589411
$55.24 MSRP: $76.72You Save: $21.48 (28%)Ships in 1-2 Business DaysProduct Specifications- Other Name: Shock Absorber, Rear Suspension; Strut Housing; Strut

Mitsubishi Shock Absorber, Passenger Side Part Number: MR353149
$55.56 MSRP: $77.17You Save: $21.61 (28%)Ships in 1-2 Business DaysProduct Specifications- Other Name: Shock Absorber, Rear Suspension; Shock
- Position: Passenger Side

Mitsubishi Shock Absorber Part Number: MR374117
$66.10 MSRP: $91.80You Save: $25.70 (28%)Ships in 1-2 Business DaysProduct Specifications- Other Name: Shock Absorber, Rear Suspension; Shock

Mitsubishi Shock Absorber Part Number: 4162A015
$124.70 MSRP: $168.97You Save: $44.27 (27%)Ships in 1-2 Business DaysProduct Specifications- Other Name: Rear Suspension Shock Absorber, Complete Strut Assembly Kit, Strut Housing; Strut


Mitsubishi Shock Absorber Part Number: 4162A023
$125.20 MSRP: $169.65You Save: $44.45 (27%)Ships in 1-2 Business DaysProduct Specifications- Other Name: Shock Absorber, Rear Suspension; Shock

Mitsubishi Shock Absorber Part Number: 4162A219
$125.58 MSRP: $170.17You Save: $44.59 (27%)Ships in 1-2 Business DaysProduct Specifications- Other Name: Shock Absorber, Rear Suspension; Shock


Mitsubishi Shock Absorber Part Number: 4162A192
$127.91 MSRP: $173.33You Save: $45.42 (27%)Ships in 1-2 Business DaysProduct Specifications- Other Name: Shock Absorber, Rear Suspension; Strut Housing; Strut

Mitsubishi Shock Absorber Part Number: 4162A014
$130.06 MSRP: $176.23You Save: $46.17 (27%)Ships in 1-2 Business DaysProduct Specifications- Other Name: Shock Absorber, Rear Suspension; Strut Housing; Strut


Mitsubishi Shock Absorber Part Number: 4162A415
$135.19 MSRP: $183.18You Save: $47.99 (27%)Ships in 1-2 Business DaysProduct Specifications- Other Name: Shock Absorber, Rear Suspension; Shock

Mitsubishi Shock Absorber Part Number: 4162A175
$146.62 MSRP: $198.66You Save: $52.04 (27%)Ships in 1-2 Business DaysProduct Specifications- Other Name: Rear Suspension Shock Absorber Kit: Includes Strut Assembly, Complete Strut Set, And Strut Housing.; Strut


Mitsubishi Shock Absorber Part Number: 4162A396
$147.74 MSRP: $200.18You Save: $52.44 (27%)Ships in 1-2 Business DaysProduct Specifications- Other Name: Shock Absorber, Rear Suspension; Shock
Mitsubishi Shock Absorber Part Number: 4162A036
$152.15 MSRP: $206.16You Save: $54.01 (27%)Ships in 1-2 Business DaysProduct Specifications- Other Name: Rear Suspension Shock Absorber And Strut Assembly Kit; Complete Strut And Housing; Strut


Mitsubishi Shock Absorber Part Number: 4062A003
$152.36 MSRP: $206.45You Save: $54.09 (27%)Ships in 1-2 Business DaysProduct Specifications- Other Name: Shock Absorber, Front Suspension; Shock

Mitsubishi Shock Absorber Part Number: 4162A304
$153.44 MSRP: $207.92You Save: $54.48 (27%)Ships in 1-2 Business DaysProduct Specifications- Other Name: Shock Absorber, Rear Suspension; Shock

Mitsubishi Shock Absorber Part Number: MN100475
$153.86 MSRP: $208.48You Save: $54.62 (27%)Ships in 1-2 Business DaysProduct Specifications- Other Name: Shock Absorber, Rear Suspension; Strut Housing; Strut
Mitsubishi Shock Absorber Part Number: 4162A397
$153.93 MSRP: $208.58You Save: $54.65 (27%)Ships in 1-2 Business DaysProduct Specifications- Other Name: Shock Absorber, Rear Suspension; Shock
Mitsubishi Shock Absorber Part Number: 4162A459
$155.29 MSRP: $210.42You Save: $55.13 (27%)Ships in 1-2 Business DaysProduct Specifications- Other Name: Shock Absorber, Rear Suspension

Mitsubishi Shock Absorber Part Number: 4162A034
$159.89 MSRP: $216.65You Save: $56.76 (27%)Ships in 1-2 Business DaysProduct Specifications- Other Name: Rear Suspension Shock Absorber And Strut Assembly Kit; Complete Strut And Shock Kit
| Page 1 of 3 |Next >
1-20 of 52 Results
Mitsubishi Shock Absorber
Mitsubishi Shock Absorber converts jarring motion of uneven roads into controlled stability that inspires confidence. No matter how cracked or bumpy the asphalt gets, drivers are left in a calm cabin. Mitsubishi has a rich history of innovation in its diverse lineup. Selected vehicles are available with MIVEC gasoline engines and advanced features such as Super All Wheel Control that helps keep traction on gravel and snow. Also offering smart cruise functions and smartphone connectivity, Mitsubishi is a company that helps simplify life. More than a century ago, the brand began with ocean transport and subsequently tested plug-in hybrids, city EV trials, and even fuel cell research. At all times aiming to combine economy, reliability, and user-friendliness, the technology that families, commuters, and adventurers can trust a single badge for many needs. The same dedication to equal performance emerges in each Shock Absorber that features an exact piston that moves through hydraulic fluid and metering valves that flex thousands of times every mile. Moreover, heat safely dissipates, allowing springs to settle quickly after every bump. Enhancing steering and safety system performance by maintaining consistent tire ground contact, the Shock Absorber serves to minimize nose diving when braking, reduce body roll while cornering, and prevent suspension bottoming from potholes. The boots protect the shaft from dirt. In addition, rubber bumpers damp the bumping from extreme travel. Thus, this compact piece works silently for many miles. Above all, it assists in preserving Mitsubishi's predictable handling signature.
Pick genuine OEM Shock Absorber if you want superb performance and durability that lasts. Mitsubishi builds that using high-grade materials and official factory techniques to meet very strict standards. This means you get parts you can actually trust for your daily drive. Finding the right parts is simple in the massive stock of genuine inventory. You can stop guessing if a part will fit or hold up. You will love the low prices, dependable service and the real manufacturer's warranty on Mitsubishi Shock Absorber. Order today and the store will ship your brand-new items to your door as fast as possible.
Mitsubishi Shock Absorber Parts Questions & Experts Answers
- Q: How to dismantle and assemble a Shock Absorber spring compressor on Mitsubishi Lancer?A:To accomplish this task, start by raising the front of the car and putting it on jack stands, then taking off the front wheel. If it is required to dismantle the suspension unit in the engine compartment, remove the dust cap and loosen the piston rod nut, without removing it, to avoid injury. Remove the spring clip which retains the brake hose and separate the brake hose from the bracket and on ABS models remove the bolt which retains the sensor to the steering knuckle and any bolts which secure the wiring to suspension and position the ABS sensor out of the way. Detach the bolts and nuts securing the suspension unit to the steering knuckle to free the knuckle from the suspension unit. Note the location of the outer suspension unit upper mounting in relation to the inner mudguard panel and remove the retaining nuts. Carefully lift the suspension unit from the vehicle to avoid damaging the drive shaft boot. Clamp the bottom-side of the suspension unit assembly in a vice. Install a spring compressor and compress the spring coil. Remove the piston rod nut and discard. Make a mark on the coil spring position concerning the upper spring seat, lower spring seat and insulator. Now, detach the upper mounting, washer, upper spring seat, insulator, spring, dust cover and lower insulator from the suspension unit. Test the shock absorber by moving the piston rod up and down. It should give firm pressure and no slack spots. Check for the presence of any fluid leaks. If there is excessive leakage or no pressure, the shock needs renewal. Also, always renew a pair. Scrutinize the top mounting assembly for any damage and fatigue; check on the bearing for wear and tear; check all rubber components for grade and renew any worn or damaged parts. Examine the coil spring for fatigue by comparing it with that of the same model new car. Check the coil springs for cracks and damage, if defective, it is advisable to renew the springs on both sides. For the assembly and installation, follow the reverse order of the disassembly and removal; ensure that the insulator is properly located onto the lower spring seat, install the dust cover and compress the coil spring. Ensure that the markings made during disassembly are in alignment. Finally, install the upper insulator, spring seat, washer and mounting, ensuring proper alignment. Attach a new piston rod nut to the suspension unit and tighten it while holding the upper mounting to prevent it from turning. A coil spring compressor enables slow release. As it's released, check that the end of the top coil sits against the end of the upper spring seat and that the end of the lower coil seats against the end of the lower spring seat. Finally tighten the piston rod nut to the correct torque. In case the suspension unit cannot be held, fit it to the vehicle first before torqueing the piston rod nut to specs. Using multi-purpose grease, pack the recess at the top of the upper mounting bearing and fit the dust cap, ensuring no grease gets on the rubber. Attach the suspension unit to the upper mounting by installing it loosely with the retaining nuts. Connect the suspension unit to the steering knuckle and tighten the retaining nuts (bolts) to the required torque. Lastly, fit the front wheel, lower the vehicle to the ground, and tighten the upper mounting retaining nuts to specifications, ensuring that the piston rod nut is tightened to specifications and the dust cap is fitted if it has not been done, followed by checking and if necessary adjusting the front wheel alignment.
- Q: How to remove and install shock absorbers on Mitsubishi Montero?A:Jack up the front of the vehicle and place it securely on jackstands, then remove the front wheels. Next, take off the nuts holding the shock absorber to the upper mount, using locking pliers on the flats at the top of the shock rod to prevent it from turning. If the vehicle has remote-controlled variable shock absorbers, loosen the two bolts securing the actuator assembly to the shock absorber stud end, then remove the upper shock absorber hold-down nut and actuator mounting bracket, followed by the lower shock absorber hold-down nut and actuator washer assembly with the stud pin, taking care not to bend the stud pin. After that, remove the upper washer and rubber cushion from the shock absorber shaft. For 2WD models, remove the two bolts securing the shock absorber to the lower arm from below, lower the shock absorber through the lower arm, and take it out of the vehicle. For 4WD models, remove the two shock absorber-to-lower control arm bolts from the upper surface of the arm, fully compress the shock absorber, and lift it up and over the arm to remove it. Finally, installation follows the reverse order of removal, ensuring that the washers and bushings are assembled correctly and that all bolts and nuts are tightened securely.


Related Mitsubishi Parts
 Mitsubishi Ball Joint
 Mitsubishi Crossmember Bushing
 Mitsubishi Differential Mount
 Mitsubishi Radius Arm
 Mitsubishi Shock and Strut Boot
 Mitsubishi Spindle Nut
 Mitsubishi Steering Knuckle
 Mitsubishi Strut Housing
 Mitsubishi Sway Bar Link Bushing
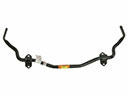 Mitsubishi Sway Bars
 Mitsubishi Wheel Bearing Dust Cap
 Mitsubishi Wheel Seal
Browse by Model
Eclipse Cross Shock Absorber Eclipse Shock Absorber Galant Shock Absorber Lancer Shock Absorber Mirage G4 Shock Absorber Mirage Shock Absorber Montero Shock Absorber Montero Sport Shock Absorber Outlander PHEV Shock Absorber Outlander Shock Absorber Outlander Sport Shock Absorber Raider Shock Absorber