×
- Hello
- Login or Register
- Quick Links
- Live Chat
- Track Order
- Parts Availability
- RMA
- Help Center
- Contact Us
- Shop for
- Mitsubishi Parts
My Garage
My Account
Cart
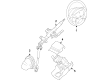
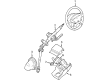
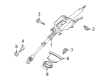
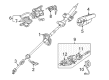
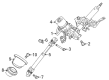
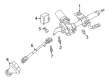
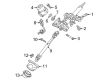
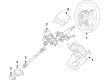
Genuine Mitsubishi Steering Column
Steering Column Tilt- Select Vehicle by Model
- Select Vehicle by VIN
Select Vehicle by Model
orMake
Model
Year
Select Vehicle by VIN
For the most accurate results, select vehicle by your VIN (Vehicle Identification Number).
13 Steering Columns found

Mitsubishi Steering Column Part Number: MN101516
$337.83 MSRP: $477.17You Save: $139.34 (30%)Ships in 1-2 Business DaysProduct Specifications- Other Name: Column Assembly, Steering

Mitsubishi Steering Column Part Number: MN101704
$342.38 MSRP: $483.58You Save: $141.20 (30%)Ships in 1-2 Business DaysProduct Specifications- Other Name: Column Assembly, Steering; Column Assembly

Mitsubishi Column Assembly Part Number: 4401A087
$352.24 MSRP: $497.52You Save: $145.28 (30%)Ships in 1-2 Business DaysProduct Specifications- Other Name: Column Assembly, Steering; Steering Column

Mitsubishi Steering Column Part Number: MR493261
$362.09 MSRP: $511.43You Save: $149.34 (30%)Ships in 1-2 Business DaysProduct Specifications- Other Name: Column Assembly, Steering

Mitsubishi Steering Column Part Number: 4401A474
$718.45 MSRP: $936.71You Save: $218.26 (24%)Ships in 1-2 Business DaysProduct Specifications- Other Name: Column Assembly, Steering

Mitsubishi Steering Column Part Number: 48805W590P
$816.90 MSRP: $1065.06You Save: $248.16 (24%)Ships in 1-2 Business DaysProduct Specifications- Other Name: Column, Steering

Mitsubishi Steering Column Part Number: 4401A195
$1163.80 MSRP: $1517.34You Save: $353.54 (24%)Ships in 1-2 Business DaysProduct Specifications- Other Name: Column Assembly, Steering

Mitsubishi Steering Column Part Number: 4405A226
$1680.07 MSRP: $2033.99You Save: $353.92 (18%)Ships in 1-2 Business DaysProduct Specifications- Other Name: Column Assembly, Steering

Mitsubishi Steering Column Part Number: 4405A211
$1828.55 MSRP: $2213.74You Save: $385.19 (18%)Ships in 1-2 Business DaysProduct Specifications- Other Name: Column Assembly, Steering
Mitsubishi Steering Column Part Number: 4401A313
$2135.45 MSRP: $2585.29You Save: $449.84 (18%)Ships in 1-2 Business DaysProduct Specifications- Other Name: Column Assembly, Steering

Mitsubishi Steering Column Part Number: 4405A233
$2215.98 MSRP: $2682.78You Save: $466.80 (18%)Ships in 1-2 Business DaysProduct Specifications- Other Name: Column Assembly, Steering

Mitsubishi Steering Column Part Number: 4405A229
$2494.98 MSRP: $3020.56You Save: $525.58 (18%)Ships in 1-2 Business DaysProduct Specifications- Other Name: Column Assembly, Steering
Mitsubishi Steering Column Part Number: 4405A178
Product Specifications- Other Name: Column Assembly, Steering
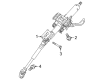
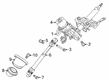
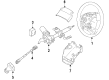
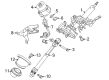
Mitsubishi Steering Column
The Mitsubishi Steering Column provides the driver with a direct connection between the hands and the front wheels, making every rotation of the steering wheel accurate movement on the road. Behind the steering wheel, the Steering Column directs the torque and angles variations in a smooth manner such that the vehicle responds immediately to each command. The Steering Column is also properly maintained and it facilitates the wheel lock and easy self centering to make the driver comfortable at all speeds. Should grinding sounds or stiffness of movement occur, immediate action maintains guidance straight and prevents additional stress on related components. The component plays a central role in ride comfort and general control as it determines the accuracy of the car response. Mitsubishi constructs cars based on equal power, easy functionality as well as reliable technology. MIVEC engines are valve timing adjusters in real time, which provide a lively response and assist in fuel economy. Super All Wheel Control is an addition that provides grip on wet roads or on gravel roads and lets the driver remain calm when the weather becomes rough. These mechanical capabilities are combined with user friendly conveniences like cruise control and a simple smart phone connection to make the daily commute comfortable to the company. Its plug in hybrid Outlander PHEV indicates that the brand is making efforts to travel clean, and current research on fuel cell drive suggests even higher efficiency ambitions. Mitsubishi maintains every vehicle in a state of readiness to the real world by incorporating intelligent features with robust engineering.
Pick genuine OEM Steering Column if you want superb performance and durability that lasts. Mitsubishi builds that using high-grade materials and official factory techniques to meet very strict standards. This means you get parts you can actually trust for your daily drive. Finding the right parts is simple in the massive stock of genuine inventory. You can stop guessing if a part will fit or hold up. You will love the low prices, dependable service and the real manufacturer's warranty on Mitsubishi Steering Column. Order today and the store will ship your brand-new items to your door as fast as possible.
Mitsubishi Steering Column Parts Questions & Experts Answers
- Q: How to remove and install the steering column on Mitsubishi Lancer?A:Removal and installation To remove, position the front wheels in the straight ahead position first and then remove the ignition key followed by the disconnection of the negative battery terminal. When using models that have an airbag, allow at least 1 minute to turn off airbag system before proceeding. The next step is to take off the steering wheel and, inevitably, the clock spring. To fit the assembly into the steering column, remove the screws that hold the combination switch base plate in place, disconnect the wiring of the combination switches and withdraw the assembly. Unscrew the bottom dash panel below the steering column, unscrew the wiring of the ignition switch and the key reader, and unscrew the wiring of the steering column clip. Use quick drying paint to trace the correlation between the intermediate shaft and the steering gear by rotating the steering shaft so that it can be used during installation. Take off the pinch bolt and washer holding the intermediate shaft to the steering gear and then take off the steering column holding bolts and dismount the steering column to the steering gear, positioning the column out of the vehicle. When fitting, follow the removal procedure in reverse, making sure the marks left in the course of removing are all facing upwards at the time the steering column is pressed into place. Connect the pinch bolt and steering column retaining bolts to their required torque, firmly attaching the ignition switch and key reader wiring, the lower dash panel with its retaining screws firmly fastened and the rheostat wiring connected, then the clock spring (where applicable) then the steering wheel.

Related Mitsubishi Parts
 Mitsubishi Steering Wheel
 Mitsubishi Ignition Switch
 Mitsubishi Steering Angle Sensor
 Mitsubishi Tie Rod
 Mitsubishi Camber and Alignment Kit
 Mitsubishi Idler Arm
 Mitsubishi Ignition Lock Cylinder
 Mitsubishi Power Steering Assist Motor
 Mitsubishi Rack & Pinion Bushing
 Mitsubishi Rack and Pinion Boot
 Mitsubishi Steering Shaft
 Mitsubishi Tie Rod End