×
- Hello
- Login or Register
- Quick Links
- Live Chat
- Track Order
- Parts Availability
- RMA
- Help Center
- Contact Us
- Shop for
- Mitsubishi Parts
My Garage
My Account
Cart
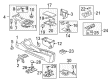
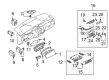
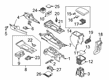
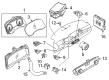
Genuine Mitsubishi Neutral Safety Switch
Transmission Range Sensor- Select Vehicle by Model
- Select Vehicle by VIN
Select Vehicle by Model
orMake
Model
Year
Select Vehicle by VIN
For the most accurate results, select vehicle by your VIN (Vehicle Identification Number).
14 Neutral Safety Switchs found


Mitsubishi Shift Paddle Part Number: 2401A004
$241.16 MSRP: $323.98You Save: $82.82 (26%)Ships in 1-2 Business DaysProduct Specifications- Other Name: Switch Assembly, Automatic Transmission Shift R; Neutral Safety Switch; Range Sensor

Mitsubishi Neutral Safety Switch Part Number: MR983147
$86.57 MSRP: $120.23You Save: $33.66 (28%)Ships in 1-2 Business DaysProduct Specifications- Other Name: Switch, Automatic Transmission Case Inhibit
Mitsubishi Neutral Safety Switch Part Number: 8604A011
$90.59 MSRP: $125.82You Save: $35.23 (28%)Ships in 1-2 Business DaysProduct Specifications- Other Name: Switch, Automatic Transmission Case Inhibit
Mitsubishi Range Sensor Part Number: 8617A002
$92.46 MSRP: $128.42You Save: $35.96 (28%)Ships in 1-2 Business DaysProduct Specifications- Other Name: Switch, Automatic Transmission Case Inhibit; Neutral Safety Switch
Mitsubishi Neutral Safety Switch Part Number: 8604A009
$94.76 MSRP: $131.62You Save: $36.86 (28%)Ships in 1-2 Business DaysProduct Specifications- Other Name: Switch, Automatic Transmission Case Inhibit
Mitsubishi Range Sensor Part Number: 2702A043
$94.85 MSRP: $131.73You Save: $36.88 (28%)Ships in 1-2 Business DaysProduct Specifications- Other Name: Switch, Automatic Transmission Case Inhibit; Neutral Safety Switch
- Replaces: 2702A083

Mitsubishi Neutral Safety Switch Part Number: MD753631
$102.26 MSRP: $142.03You Save: $39.77 (28%)Ships in 1-2 Business DaysProduct Specifications- Other Name: Switch, Automatic Transmission Case Inhibit
Mitsubishi Range Sensor Part Number: 8617B127
$137.18 MSRP: $185.88You Save: $48.70 (27%)Ships in 1-2 Business DaysProduct Specifications- Other Name: Switch, Automatic Transmission Case Inhibit; Neutral Safety Switch
Mitsubishi Neutral Safety Switch Part Number: MD722712
$148.81 MSRP: $201.63You Save: $52.82 (27%)Ships in 1-2 Business DaysProduct Specifications- Other Name: Switch, Automatic Transmission Case Inhibit
Mitsubishi Neutral Safety Switch Part Number: 31918W010P
$158.88 MSRP: $215.28You Save: $56.40 (27%)Ships in 1-2 Business DaysProduct Specifications- Other Name: Switch, Automatic Transmission Case Inhibit
- Replaces: 8604A053
Mitsubishi Neutral Safety Switch Part Number: MB811106
$200.12 MSRP: $271.17You Save: $71.05 (27%)Ships in 1-2 Business DaysProduct Specifications- Other Name: Switch, Automatic Transmission Case Inhibit
Mitsubishi Range Sensor Part Number: 8617A636
$69.35 MSRP: $92.87You Save: $23.52 (26%)Ships in 1-2 Business DaysProduct Specifications- Other Name: Switch, Automatic Transmission Case Inhibit; Neutral Safety Switch
Mitsubishi Clutch Switch Part Number: MR329955
$17.16 MSRP: $22.35You Save: $5.19 (24%)Ships in 1-2 Business DaysProduct Specifications- Other Name: Switch, Clutch; Neutral Safety Switch
Mitsubishi Back-Up Switch Part Number: MD730979
$28.10 MSRP: $36.58You Save: $8.48 (24%)Ships in 1-2 Business DaysProduct Specifications- Other Name: Switch, Gearshift Backup; Neutral Safety Switch; Back Up Light Switch
Mitsubishi Neutral Safety Switch
The functionality of the Mitsubishi Neutral Safety Switch ensures that the starter remains inoperative unless the transmission lever is positioned in Park or Neutral. This provides drivers with the assurance that upon turning the key, the vehicle will not surge or lurch forward unexpectedly. Since the early Model A, Mitsubishi has dedicated its energy to designing vehicles that combine smart engineering with everyday practicality. Mitsubishi can be traced back to 1870. Today's cars are fitted with dynamic MIVEC engines that put out great power for little fuel, the Super All Wheel Control that keeps you steady on rain or gravel, as well as convenient cruise control and smartphone tech to make every trip easy and connected. The brand also uses plug-in hybrids as well as fuel cell ideas to stay one step ahead of changing energy needs, which shows Mitsubishi keeps on looking ahead while maintaining simple, reliable running around the world for families. Simultaneously, the Neutral Safety Switch is a silent guardian inside every automatic transmission model. The Neutral Safety Switch serves as a gatekeeper or an actuating switch at the starter circuit that detects the position of the gears and then sends that data to the Vehicle Control Module. Only after that will the switch allow the engine to crank. The accurate connections also signal to the electronic systems of the selected range and facilitate smooth engagement of the hydraulics and exact timing of shifts. No additional adjustment or maintenance is required. This switch is designed as a robust one-piece unit, creating universal value throughout the lineup by reinforcing safety each time the driver turns on the car.
Pick genuine OEM Neutral Safety Switch if you want superb performance and durability that lasts. Mitsubishi builds that using high-grade materials and official factory techniques to meet very strict standards. This means you get parts you can actually trust for your daily drive. Finding the right parts is simple in the massive stock of genuine inventory. You can stop guessing if a part will fit or hold up. You will love the low prices, dependable service and the real manufacturer's warranty on Mitsubishi Neutral Safety Switch. Order today and the store will ship your brand-new items to your door as fast as possible.
Mitsubishi Neutral Safety Switch Parts Questions & Experts Answers
- Q: How to check and adjust the Neutral Safety Switch on Mitsubishi Lancer?A:Before balancing the inhibitor switch, make sure that the selector cable is properly adjusted. In the engine compartment, remove the battery hold down clamp, and as a helper raises the battery a little with the terminals attached, take out the tray underneath the battery. Disconnect the wiring of the inhibitor switch, and, connecting an ohmmeter between the terminals 9 and 10 of the inhibitor switch, measure continuity, which at no point should occur except when the selector lever is in the Neutral or Park position. As required, use Neutral, loosen the retaining bolts and position the inhibitor switch until a 6 mm drill bit can be inserted on the inhibitor switch boss and into the hole in the lever of selection; should the adjustment fail to correct the fault, change the inhibitor switch. Moving the selector lever to Reverse, verify continuity between the inhibitor switch terminals 7 and 8, and when the inhibitor switch is not in Reverse, continuity is checked to ensure that there is none; in case of fault, replace the inhibitor switch. To take the inhibitor switch off, once more lift the battery hold down clamp and have an assistant slightly raise the battery then lift the tray. Pull the clip that holds the inner selector cable off the selector lever, and pull the inner cable off the pin. Take the nut and washer off the selector shaft and pull the selector lever out of the transaxle. Indicate the installed position of the inhibitor switch inside the assembly and take out the retaining bolts and pull out the inhibitor switch out of the transaxle. To install, simply reverse the removal process, making sure to keep the inhibitor switch in the identified position when tightening the retaining bolts to a certain torque. Install washer, nut and the selection lever, ensuring that the nut of the selection shaft is firmly fixed and ensures that there is no fault in the functioning of the inhibitor switch, and it may be necessary to adjust the lever.
- Q: What is the function and testing procedure for the neutral safety switch in a transmission on Mitsubishi Montero?A:The neutral safety switch is on the center pin of the 3 pin switch on the transmission side, which offers a ground to the starter solenoid in Park and Neutral position. A continuity test is performed by disconnection of the electrical connector and verifying that the switch and the transmission case remain continuous, with continuity only possible when the transmission is in Park or Neutral. If the switch does not pass the test, check the shift linkage adjustment. To replace it, disconnect the electrical connector, unscrew the switch off the transmission and be ready to have a little spillage of transmission fluid. Installation: MAKE sure that the shift lever fingers are aligned in the switch opening, then wrap the threads of the new switch with Teflon tape or cover them with ATV sealant, then carefully screw the new switch into the transmission case. Lastly, pour in the type of automatic transmission fluid recommended into the transmission to reach the desired level.
Related Mitsubishi Parts
 Mitsubishi Brake Light Switch
 Mitsubishi Instrument Cluster
 Mitsubishi Speed Sensor
 Mitsubishi Cruise Control Switch
 Mitsubishi Body Control Module
 Mitsubishi Door Jamb Switch
 Mitsubishi Hazard Warning Switch
 Mitsubishi Headlight Switch
 Mitsubishi Steering Column Cover
 Mitsubishi Temperature Sender
 Mitsubishi Vehicle Speed Sensor
 Mitsubishi Windshield Wiper Switch
Browse by Model
3000GT Neutral Safety Switch Diamante Neutral Safety Switch Eclipse Cross Neutral Safety Switch Eclipse Neutral Safety Switch Endeavor Neutral Safety Switch Expo LRV Neutral Safety Switch Expo Neutral Safety Switch Galant Neutral Safety Switch Lancer Neutral Safety Switch Mirage G4 Neutral Safety Switch Mirage Neutral Safety Switch Montero Neutral Safety Switch Montero Sport Neutral Safety Switch Outlander Neutral Safety Switch Outlander Sport Neutral Safety Switch Sigma Neutral Safety Switch Van Neutral Safety Switch